
——
#DonLucElectronics #DonLuc #Arduino #SD #RTC #EEPROM #DHT11 #ASM #Display #Elecrow #Project #Patreon #Electronics #Microcontrollers #IoT #Fritzing #Programming #Consultant
——
——
——
——
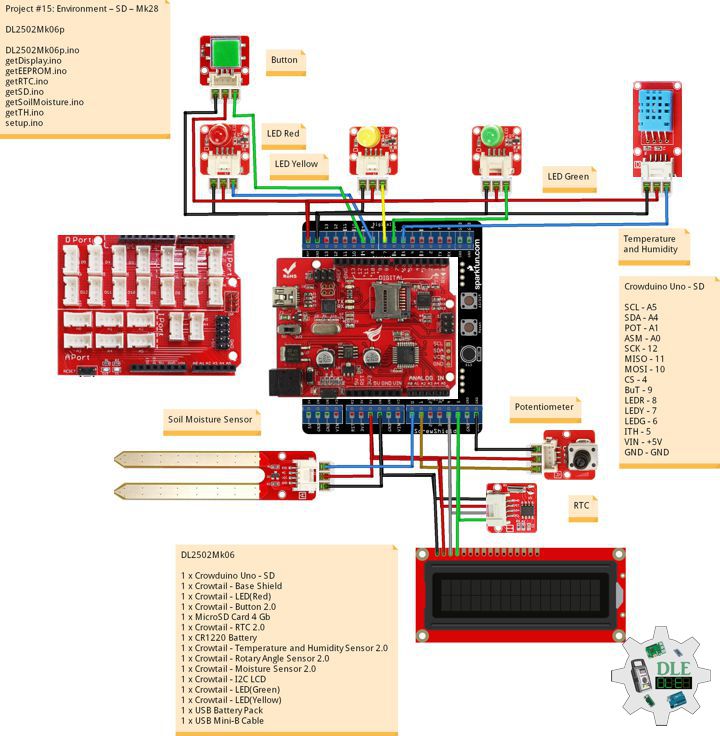
Crowduino Uno – SD – SD Cards
There is a SD card slot on the Crowduino Uno – SD – SD Card board, with which you can easily use SD Card to record and thus to read data on the SD Card. The SD Card uses the SPI interface (D10/D11/D12) plus a CS Pin (D3 or D4) to cominicate with the main microcontroller Atmega328. First, Select the CS Pin you want to use with jumper. To make your project more flexible, you can select either the D3 or D4 pin as your CS pin for SD card. The default is D4. If your D4 have been applied for other modules, you can select the D3, but notice to modify related files in your program, which we will discuss later.
DL2502Mk06
1 x Crowduino Uno – SD
1 x Crowtail – Base Shield
1 x Crowtail – LED(Red)
1 x Crowtail – Button 2.0
1 x MicroSD Card 4 Gb
1 x Crowtail – RTC 2.0
1 x CR1220 Battery
1 x Crowtail – Temperature and Humidity Sensor 2.0
1 x Crowtail – Rotary Angle Sensor 2.0
1 x Crowtail – Moisture Sensor 2.0
1 x Crowtail – I2C LCD
1 x Crowtail – LED(Green)
1 x Crowtail – LED(Yellow)
1 x USB Battery Pack
1 x USB Mini-B Cable
Crowduino Uno – SD
SCL – A5
SDA – A4
POT – A1
ASM – A0
SCK – 12
MISO – 11
MOSI – 10
CS – 4
BUT – 9
LEDR – 8
LEDY – 7
LEDG – 6
ITH – 5
VIN – +5V
GND – GND
DL2502Mk06p
DL2502Mk06p.ino
/****** Don Luc Electronics © ******
Software Version Information
Project #15: Environment – SD – Mk28
DL2502Mk06p.ino
DL2502Mk06
1 x Crowduino Uno - SD
1 x Crowtail - Base Shield
1 x Crowtail - LED(Red)
1 x Crowtail - Button 2.0
1 x MicroSD Card 4 Gb
1 x Crowtail - RTC 2.0
1 x CR1220 Battery
1 x Crowtail - Temperature and Humidity Sensor 2.0
1 x Crowtail - Rotary Angle Sensor 2.0
1 x Crowtail - Moisture Sensor 2.0
1 x Crowtail - I2C LCD
1 x Crowtail - LED(Green)
1 x Crowtail - LED(Yellow)
1 x USB Battery Pack
1 x USB Mini-B Cable
*/

// Include the Library Code
// EEPROM library to read and write EEPROM with unique ID for unit
#include <EEPROM.h>
// Wire
#include <Wire.h>
// Liquid Crystal
#include "LiquidCrystal.h"
// Temperature and Humidity Sensor
#include "DHT.h"
// RTC (Real-Time Clock)
#include "RTClib.h"
// Secure Digital (SD Card)
#include <SD.h>
#include <SPI.h>

// Secure Digital (SD Card)
const int chipSelect = 4;
String zzzzzz = "";

// Define LED Red
int iLED = 8;

// Button
int iButton = 9;
// Variable for reading the Button status
int iButtonState = 0;

// RTC (Real-Time Clock)
RTC_DS1307 RTC;
String dateRTC = "";
String timeRTC = "";

// Temperature and Humidity Sensor
#define DHTPIN 5
// DHT 11
#define DHTTYPE DHT11
DHT dht(DHTPIN, DHTTYPE);
// Temperature and Humidity Sensor
float h = 0;
float t = 0;

// Potentiometer
int iPotentiometer = A1;
// Change Your Threshold Here
int Threshold = 0;
int zz = 0;

// Liquid Crystal
// Connect via i2c
LiquidCrystal lcd(0);

// Crowtail Moisture Sensor
int iSoilMoisture = A0;
int iSoilMoistureVal = 0;

// LED Yellow
int iLEDYellow = 7;

// LED Green
int iLEDGreen = 6;

// EEPROM Unique ID Information
String uid = "";

// Software Version Information
String sver = "15-28";

void loop() {

  // Crowtail Moisture Sensor
  isSoilMoisture();

  // Temperature and Humidity Sensor
  isTH();

  // RTC (Real-Time Clock)
  isRTC();

  // Read the state of the Switch value
  iButtonState = digitalRead(iButton);

  // The Button is HIGH:
  if (iButtonState == HIGH) {

    // LED Red HIGH
    digitalWrite(iLED, HIGH);

    // MicroSD Card
    isSD();

  } else {

    // LED Red LOW
    digitalWrite(iLED, LOW);

  }

  // Delay 0.5 Second
  delay( 500 );

}
getDisplay.ino
// getDisplay
// Crowbits - OLED 128X64 UID
void isDisplayUID(){
// Set up the LCD's number of rows and columns:
lcd.begin(16, 2);
// Print a message to the LCD.
// Cursor
lcd.setCursor(0, 0);
lcd.print("Don Luc Electron");
// Cursor
lcd.setCursor(0, 1);
// Print a message to the LCD.
lcd.print( sver );
}
// isDisplay Green
void isDisplayG(){
// Print a message to the LCD
// Clear
lcd.clear();
// Cursor
lcd.setCursor(0, 0);
lcd.print("Humid Soil");
// Cursor
lcd.setCursor(0, 1);
// Print a message to the LCD
lcd.print( iSoilMoistureVal );
}
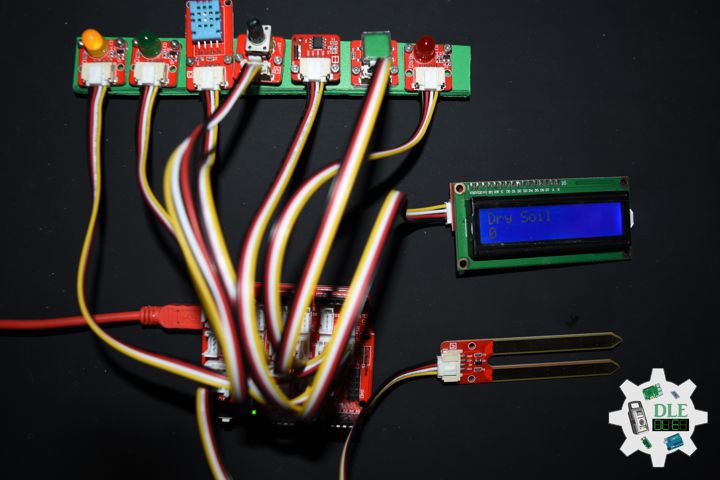
// isDisplay Yellow
void isDisplayY(){
// Print a message to the LCD
// Clear
lcd.clear();
// Cursor
lcd.setCursor(0, 0);
lcd.print("Dry Soil");
// Cursor
lcd.setCursor(0, 1);
// Print a message to the LCD
lcd.print( iSoilMoistureVal );
}
getEEPROM.ino
// EEPROM
// isUID EEPROM Unique ID
void isUID() {

  // Is Unit ID
  uid = "";
  for (int x = 0; x < 7; x++)
  {
    uid = uid + char(EEPROM.read(x));
  }

}
getRTC.ino
// RTC (Real-Time Clock)
// Setup RTC
void isSetupRTC(){

  // RTC (Real-Time Clock)
  RTC.begin();

  // RTC Running
  if (! RTC.isrunning()) {

    // following line sets the RTC to the date & time
    //this sketch was compiled
    RTC.adjust(DateTime(__DATE__, __TIME__));
    // This line sets the RTC with an explicit date & time, for example to set
    // January 21, 2014 at 3am you would call:
    // RTC.adjust(DateTime(2014, 1, 21, 3, 0, 0))

  }

}
// RTC (Real-Time Clock)
void isRTC(){

  // RTC (Real-Time Clock)
  DateTime now = RTC.now();

  // Date
  dateRTC = now.year(), DEC;
  dateRTC = dateRTC + "/";
  dateRTC = dateRTC + now.month(), DEC;
  dateRTC = dateRTC + "/";
  dateRTC = dateRTC + now.day(), DEC;

  // Time
  timeRTC = now.hour(), DEC;
  timeRTC = timeRTC + ":";
  timeRTC = timeRTC + now.minute(), DEC;
  timeRTC = timeRTC + ":";
  timeRTC = timeRTC + now.second(), DEC;

}
getSD.ino
// MicroSD Card
// MicroSD Setup
void isSetupSD() {

    // MicroSD Card
   // See if the card is present and can be initialized:
  if (!SD.begin(chipSelect)) {

    // Don't do anything more:
    while (1);

  }

}
// MicroSD Card
void isSD() {

  zzzzzz = "";

  //DLE|EEPROM Unique ID|Version|Date|Time|
  //Temperature|Humidity|Soil Moisture|
  zzzzzz = "DLE|" + uid + "|" + sver + "|" + String( dateRTC ) + "|"
  + String( timeRTC ) + "|" + String(t) + "|" + String(h) + "|"
  + String(iSoilMoistureVal) + "|";

  // Open the file. Note that only one file can be open at a time,
  // so you have to close this one before opening another.
  File dataFile = SD.open("dledata.txt", FILE_WRITE);

  // If the file is available, write to it:
  if (dataFile) {

    // Write
    dataFile.println( zzzzzz );
    dataFile.close();

  }

}
getSoilMoisture.ino
// Crowtail Moisture Sensor
// Soil Moisture
void isSoilMoisture(){

  // Connect Soil Moisture Sensor to Analog 0
  // iSoilMoistureVal => 0~700 Soil Moisture
  iSoilMoistureVal = analogRead( iSoilMoisture );

  // Threshold => 200~500
  zz = analogRead( iPotentiometer );
  Threshold = map( zz, 0, 1024, 200, 500);

  // Threshold
  if (iSoilMoistureVal > Threshold) {

    // 300~700 - Humid Soil
    // LED Yellow
    digitalWrite(iLEDYellow, LOW);
    // Display Green
    isDisplayG();
    // LED Green
    digitalWrite(iLEDGreen, HIGH);

  }
  else {

    // 0-300 Dry Soil
    // LED Green
    digitalWrite(iLEDGreen, LOW);
    // Display Yellow
    isDisplayY();
    digitalWrite(iLEDYellow, HIGH);

  }

}
getTH.ino
// Temperature and Humidity Sensor
void isTH(){

  // Temperature
  t = dht.readTemperature();
  // Humidity
  h = dht.readHumidity();

}
setup.ino
// Setup
void setup()
{

  // Delay
  delay(100);

  // isUID EEPROM Unique ID
  isUID();

  // Delay
  delay(100);

  // Initialize the LED iLED Yellow
  pinMode(iLEDYellow, OUTPUT);

  // Initialize the LED LED Green
  pinMode(iLEDGreen, OUTPUT);

  // Temperature and Humidity Sensor
  dht.begin();

  // Delay
  delay(100);

  // Setup RTC
  isSetupRTC();

  // Delay
  delay(100);

  // MicroSD Card
  isSetupSD();

  // Delay
  delay(100);

  // iLED Red
  pinMode(iLED, OUTPUT);

  // LED Red LOW
  digitalWrite(iLED, LOW);

  // Delay
  delay( 100 );

  // Button
  pinMode(iButton,INPUT);

  // Delay
  delay( 100 );

  // Display UID
  isDisplayUID();

  // Delay 5 Second
  delay( 5000 );

}
——
People can contact us: https://www.donluc.com/?page_id=1927
Electronics, IoT, Teacher, Instructor, R&D and Consulting
- Programming Language
- Single-Board Microcontrollers (PIC, Arduino, Raspberry Pi, Arm, Silicon Labs, Espressif, Etc…)
- IoT
- Wireless (Radio Frequency, Bluetooth, WiFi, Etc…)
- Robotics
- Automation
- Camera and Video Capture Receiver Stationary, Wheel/Tank and Underwater Vehicle
- Unmanned Vehicles Terrestrial and Marine
- Machine Learning
- Artificial Intelligence (AI)
- RTOS
- Sensors, eHealth Sensors, Biosensor, and Biometric
- Research & Development (R & D)
- Consulting
Follow Us
Luc Paquin – Curriculum Vitae – 2024
https://www.donluc.com/luc/
Web: https://www.donluc.com/
Facebook: https://www.facebook.com/neosteam.labs.9/
YouTube: https://www.youtube.com/@thesass2063
Twitter: https://twitter.com/labs_steam
Pinterest: https://www.pinterest.com/NeoSteamLabs/
Instagram: https://www.instagram.com/neosteamlabs/
Patreon: https://patreon.com/DonLucElectronics59
DFRobot: https://learn.dfrobot.com/user-10186.html
Hackster.io: https://www.hackster.io/neosteam-labs
Elecrow: https://www.elecrow.com/share/sharepj/center/no/760816d385ebb1edc0732fd873bfbf13
TikTok: https://www.tiktok.com/@luc.paquin8
Twitch: https://www.twitch.tv/lucpaquin
LinkedIn: https://www.linkedin.com/in/jlucpaquin/
Don Luc