Patreon: Beginner
——
#DonLucElectronics #DonLuc #Arduino #Project #Patreon #Electronics #Microcontrollers #IoT #Fritzing #Programming #Consultant
——
——
——
——
Patreon: Beginner
Beginner: These beginner-friendly microcontrollers is Arduino Uno are easy to use and program with just a computer or laptop, a USB cable, and some open-source software.
What is Arduino?
Arduino board designs use a variety of microprocessors and controllers. The boards are equipped with sets of digital and analog input/output (I/O) pins that may be interfaced to various expansion boards “Shields” or breadboards and other circuits. The boards feature serial communications interfaces, including Universal Serial Bus (USB) on some models, which are also used for loading programs. Arduino boards are able to read inputs, light on a sensor, a finger on a button, or a Twitter message, and turn it into an output, activating a motor, turning on an LED, publishing something online. You can tell your board what to do by sending a set of instructions to the microcontroller on the board. The microcontrollers can be programmed using the C and C++ programming languages, using a standard API which is also known as the Arduino Programming Language, and the Arduino Software (IDE).
Arduino Software (IDE)
A minimal Arduino C/C++ program consists of only two functions:
setup(): This function is called once when a sketch starts after power-up or reset. It is used to initialize variables, input and output pin modes, and other libraries needed in the sketch.
loop(): After setup() function exits, the loop() function is executed repeatedly in the main program. It controls the board until the board is powered off or is reset. It is analogous to the function while.
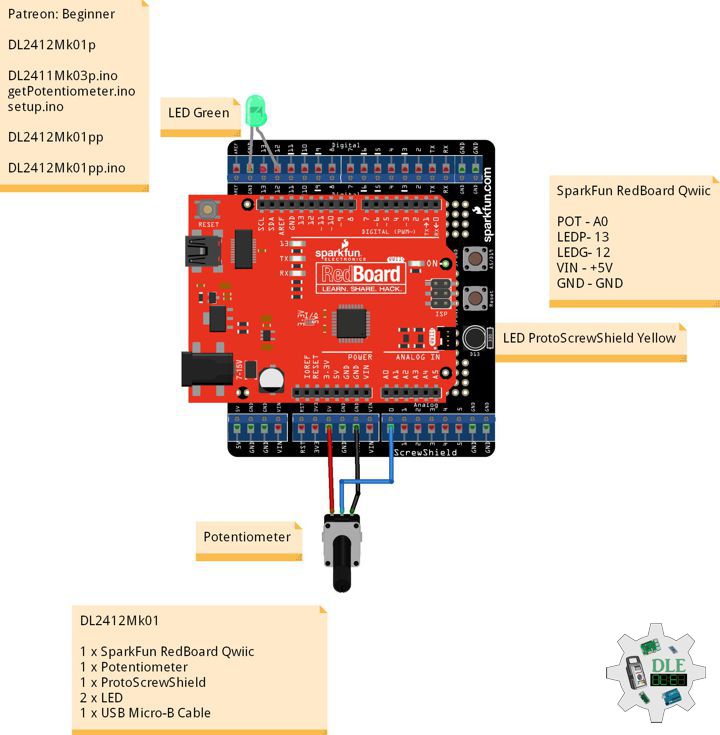
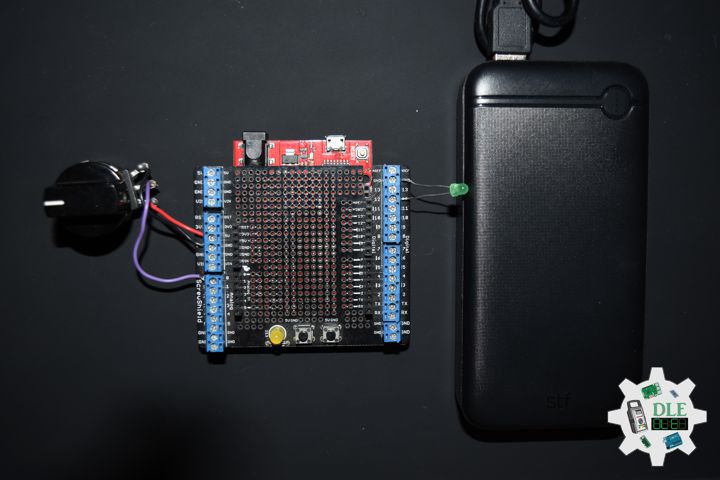
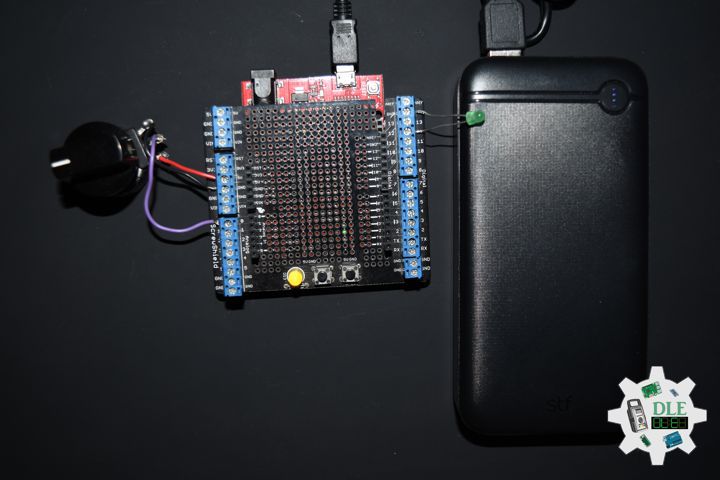
DL2412Mk01
1 x SparkFun RedBoard Qwiic
1 x Potentiometer 10K Ohm
1 x ProtoScrewShield
2 x LED
1 x USB Micro-B Cable
SparkFun RedBoard Qwiic
POT – A0
LEDP – 13
LEDG – 12
VIN – +5V
GND – GND
——
DL2412Mk01ppp
DL2412Mk01ppp.ino
/****** Don Luc Electronics © ******/

int iPot = A0;
int iPotVal = 0;
int Threshold = 500;
int iLEDProto = 13;
int iLEDGreen = 12;
String sver = "Beginner";

void setup()
{

  delay(100);

  Serial.begin(57600);
  pinMode(iLEDProto, OUTPUT);
  pinMode(iLEDGreen, OUTPUT);
  delay( 100 );

}

void loop() {

  iPotVal = analogRead( iPot );
  Serial.print("Potentiometer: ");
  if (iPotVal > Threshold) {

    digitalWrite(iLEDProto, LOW);
    Serial.print( "LED Green " );
    Serial.println( iPotVal );
    digitalWrite(iLEDGreen, HIGH);

  }
  else {

    digitalWrite(iLEDGreen, LOW);
    Serial.print( "LED Proto " );
    Serial.println( iPotVal );
    digitalWrite(iLEDProto, HIGH);

  }
  delay( 100 );

}
——
DL2412Mk01pp
DL2412Mk01pp.ino
/****** Don Luc Electronics © ******
Software Version Information
Patreon: Beginner
Beginner
DL2412Mk01pp.ino
DL2412Mk01
1 x SparkFun RedBoard Qwiic
1 x Potentiometer
1 x ProtoScrewShield
2 x LED
1 x USB Micro-B Cable
*/

// Include the Library Code

// Potentiometer
int iPot = A0;
int iPotVal = 0;
// Change Your Threshold Here
int Threshold = 500;

// LED ProtoScrewShield Yellow
int iLEDProto = 13;

// LED Green
int iLEDGreen = 12;

// Software Version Information
String sver = "Beginner";

// Setup
void setup()
{

  // Delay
  delay(100);

  // Serial
  Serial.begin(57600);

  // Initialize the LED iLEDProto
  pinMode(iLEDProto, OUTPUT);

  // Initialize the LED iLEDGreen
  pinMode(iLEDGreen, OUTPUT);

  // Delay 0.1 Second
  delay( 100 );

}
// Loop
void loop() {

  // Potentiometer
  // Connect Potentiometer to Analog 0
  iPotVal = analogRead( iPot );

  // Serial
  Serial.print("Potentiometer: ");

  // Threshold
  if (iPotVal > Threshold) {

    // LEDProto
    digitalWrite(iLEDProto, LOW);
    // Serial
    Serial.print( "LED Green " );
    Serial.println( iPotVal );
    // LEDGreen
    digitalWrite(iLEDGreen, HIGH);

  }
  else {

    // LEDGreen
    digitalWrite(iLEDGreen, LOW);
    // Serial
    Serial.print( "LED Proto " );
    Serial.println( iPotVal );
    // LEDProto
    digitalWrite(iLEDProto, HIGH);

  }

  // Delay 0.1 Second
  delay( 100 );

}
——
DL2412Mk01p
DL2412Mk01p.ino
loop()
getPotentiometer.ino
Attaining => get
Combining Form => is
setup.ino
setup()
DL2412Mk01p
DL2411Mk03p.ino
/****** Don Luc Electronics © ******
Software Version Information
Patreon: Beginner
Beginner
DL2412Mk01p.ino
DL2412Mk01
1 x SparkFun RedBoard Qwiic
1 x Potentiometer
1 x ProtoScrewShield
2 x LED
1 x USB Micro-B Cable
*/

// Include the Library Code

// Potentiometer
int iPot = A0;
int iPotVal = 0;
// Change Your Threshold Here
int Threshold = 500;

// LED ProtoScrewShield Yellow
int iLEDProto = 13;

// LED Green
int iLEDGreen = 12;

// Software Version Information
String sver = "Beginner";

void loop() {

  // Potentiometer
  isPotentiometer();

  // Delay 0.1 Second
  delay( 100 );

}
getPotentiometer.ino
// Potentiometer
// Potentiometer
void isPotentiometer(){

  // Connect Potentiometer to Analog 0
  iPotVal = analogRead( iPot );

  // Serial
  Serial.print("Potentiometer: ");

  // Threshold
  if (iPotVal > Threshold) {

    // LEDProto
    digitalWrite(iLEDProto, LOW);
    // Serial
    Serial.print( "LED Green " );
    Serial.println( iPotVal );
    // LEDGreen
    digitalWrite(iLEDGreen, HIGH);

  }
  else {

    // LEDGreen
    digitalWrite(iLEDGreen, LOW);
    // Serial
    Serial.print( "LED Proto " );
    Serial.println( iPotVal );
    // LEDProto
    digitalWrite(iLEDProto, HIGH);

  }

}
setup.ino
// Setup
void setup()
{

  // Delay
  delay(100);

  // Serial
  Serial.begin(57600);

  // Initialize the LED iLEDProto
  pinMode(iLEDProto, OUTPUT);

  // Initialize the LED iLEDGreen
  pinMode(iLEDGreen, OUTPUT);

  // Delay 0.1 Second
  delay( 100 );

}
——
People can contact us: https://www.donluc.com/?page_id=1927
Electronics, IoT, Teacher, Instructor, R&D and Consulting
- Programming Language
- Single-Board Microcontrollers (PIC, Arduino, Raspberry Pi, Arm, Silicon Labs, Espressif, Etc…)
- IoT
- Wireless (Radio Frequency, Bluetooth, WiFi, Etc…)
- Robotics
- Automation
- Camera and Video Capture Receiver Stationary, Wheel/Tank and Underwater Vehicle
- Unmanned Vehicles Terrestrial and Marine
- Machine Learning
- Artificial Intelligence (AI)
- RTOS
- Sensors, eHealth Sensors, Biosensor, and Biometric
- Research & Development (R & D)
- Consulting
Follow Us
Luc Paquin – Curriculum Vitae – 2024
https://www.donluc.com/luc/
Web: https://www.donluc.com/
Facebook: https://www.facebook.com/neosteam.labs.9/
YouTube: https://www.youtube.com/@thesass2063
Twitter: https://twitter.com/labs_steam
Pinterest: https://www.pinterest.com/NeoSteamLabs/
Instagram: https://www.instagram.com/neosteamlabs/
Patreon: https://patreon.com/DonLucElectronics59
DFRobot: https://learn.dfrobot.com/user-10186.html
Hackster.io: https://www.hackster.io/neosteam-labs
Elecrow: https://www.elecrow.com/share/sharepj/center/no/760816d385ebb1edc0732fd873bfbf13
TikTok: https://www.tiktok.com/@luc.paquin8
Twitch: https://www.twitch.tv/lucpaquin
LinkedIn: https://www.linkedin.com/in/jlucpaquin/
Don Luc


Leave a Reply