Rotary Switch – 10 Position
This is a single pole, 10 position rotary switch able to select up to 10 different states in a durable package. Unlike our other rotary switch, this model is much more robust and capable of handling larger currents and voltages.
With a max voltage rating of 125VAC at 0.3A and a dielectric strength of 250VAC for 1 minute this is a serious little rotary switch capable of working with some of your bigger projects. Though this switch requires you to use 11 pins and is not breadboard friendly we do offer a breakout board (found in the Recommended Products section below) to provide easier access to its capabilities.
1 x Rotary Switch – 10 Position
1 x Hex Nut
2 x Washer
Rating: 0.3A/125VAC
Contact Resistance: 50M Ohm max
Insulation Resistance: 100M Ohm @ 500VDC min
Dielectric Strength: 250VAC for 1 minute
Rotation torque: 1.0+0.5KG/cm
Shaft: 3/8″
Rotary Switch Breakout
This is the SparkFun Rotary Switch Breakout, a very simple board designed to easily provide you access to each pin on our 10-position rotary switches. This breakout allows you to easily add a rotary switch to your next project without having to worry about attaching its unique footprint to a custom board or solderless breadboard. All you need to do is solder the 10-position rotary switch into the breakout (using the silkscreen on the board as a guide) and each pin will become available for breadboard or hookup wire compatibility.
Each one of these boards breaks out the common ( C ), 1, 2, 3, 4, 5, 6, 7, 8, 9, and 10 positions on the board into 0.1″ spaced pins.
NeoPixel Stick – 8 x 5050 RGB LED
Make your own little LED strip arrangement with this stick of NeoPixel LEDs. We crammed 8 of the tiny 5050 (5mm x 5mm) smart RGB LEDs onto a PCB with mounting holes and a chainable design. Use only one microcontroller pin to control as many as you can chain together! Each LED is addressable as the driver chip is inside the LED. Each one has ~18mA constant current drive so the color will be very consistent even if the voltage varies, and no external choke resistors are required making the design slim. Power the whole thing with 5VDC (4-7V works) and you’re ready to rock.
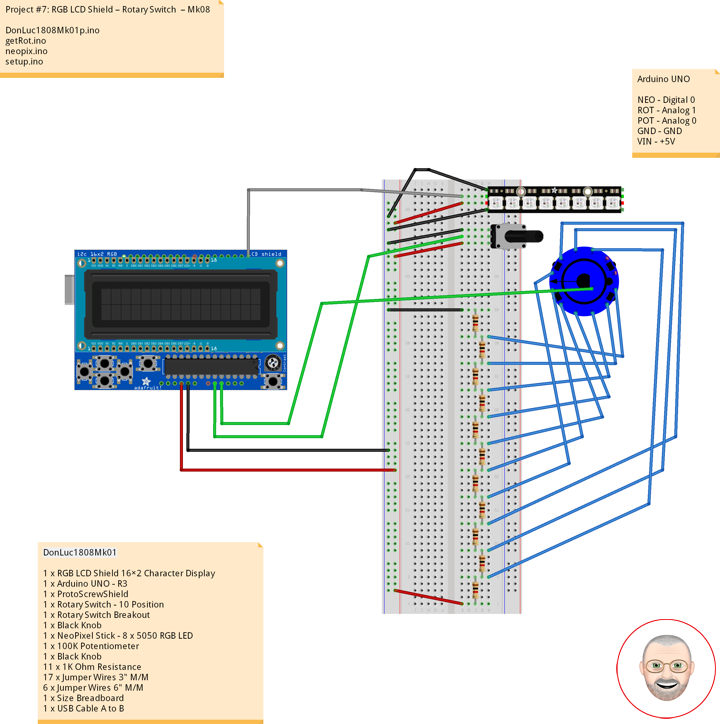
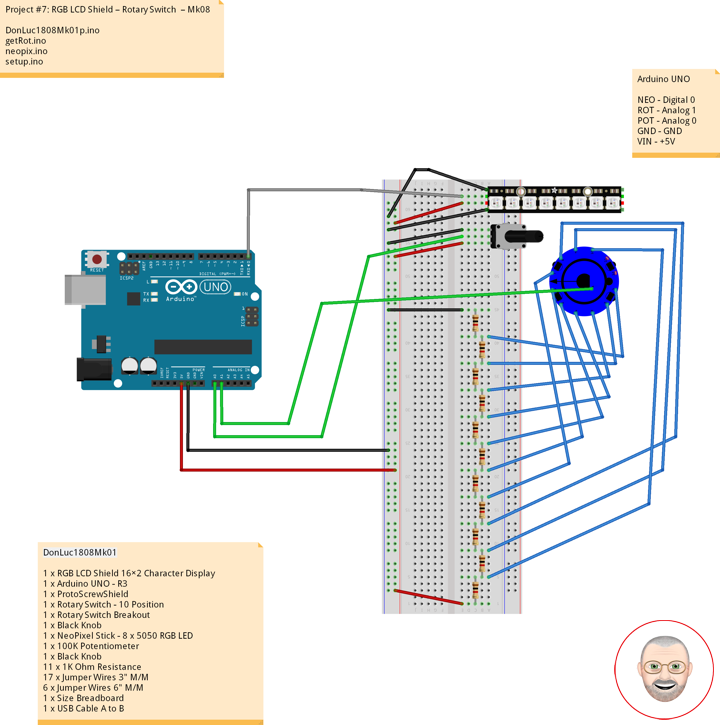
DonLuc1808Mk01
1 x RGB LCD Shield 16×2 Character Display
1 x Arduino UNO – R3
1 x ProtoScrewShield
1 x Rotary Switch – 10 Position
1 x Rotary Switch Breakout
1 x Black Knob
1 x NeoPixel Stick – 8 x 5050 RGB LED
1 x 100K Potentiometer
1 x Black Knob
11 x 1K Ohm Resistance
17 x Jumper Wires 3″ M/M
6 x Jumper Wires 6″ M/M
1 x Size Breadboard
1 x USB Cable A to B
Arduino UNO
NEO – Digital 0
ROT – Analog 1
POT – Analog 0
GND – GND
VIN – +5V
DonLuc1808Mk01p.ino
// ***** Don Luc *****
// Software Version Information
// Project #7: RGB LCD Shield – Rotary Switch – Mk08
// 8-01
// DonLuc1808Mk01p 8-01
// RGB LCD Shield
// Rotary Switch

// Include Library Code
#include <Adafruit_MCP23017.h>
#include <Adafruit_RGBLCDShield.h>
#include <Adafruit_NeoPixel.h>

// RGB LCD Shield
Adafruit_RGBLCDShield RGBLCDShield = Adafruit_RGBLCDShield();
#define GREEN 0x2

// NeoPixels
#define PIN 0                             // On digital pin 3
#define NUMPIXELS 8                       // NeoPixels NUMPIXELS = 8
Adafruit_NeoPixel pixels = Adafruit_NeoPixel(NUMPIXELS, PIN, NEO_GRB + NEO_KHZ800);
int red = 0;                              // Red
int green = 0;                            // Green
int blue = 0;                             // Blue
int iNeo = 0;                             // Neopix
const int iBriPin = A0;                   // Panel Mount 1K potentiometer Brightneed
int iBri = 0;                             // Neopix Brightness
int iBriMin = 1023;                       // Brightneed minimum sensor value
int iBriMax = 0;                          // Brightneed maximun sensor value

// Rotary Switch
// Rotary Switch - 10 Position
// Number = 1 => 10
int iRotNum = A1;                         // Rotary Switch
int iVal = 0;                             // iVal - Value
int z = 0;                                // Number

void loop()
{

  // Rotary Switch
  isRot();

  delay(1000);

  // Clear
  RGBLCDShield.clear();

}
getRot.ino
// Rotary Switch
void isRot()
{

  // NeoPixels
  for(int y=0; y < NUMPIXELS; y++)
  {
     // Black
     red = 0;                                 // Red
     green = 0;                               // Green
     blue = 0;                                // Blue
     iNeo = y;                                // Neopix
     neopix();
  }

  // Display
  // Set the cursor to column 0, line 0
  RGBLCDShield.setCursor(0,0);
  RGBLCDShield.print("Rotary Switch");        // Rotary Switch

  // Rotary Switch
  z = analogRead( iRotNum );                  // Rotary Switch
  iVal = ( z / 100 );                         // Rotary Value

  // Set the cursor to column 0, line 1
  RGBLCDShield.setCursor(0, 1);
  RGBLCDShield.print("iVal = ");              // Rotary Value
  RGBLCDShield.print( iVal + 1 );

  // Range Value
  switch ( iVal ) {
    case  0:
      // Red
      // NeoPixels
      for(int y=0; y<NUMPIXELS; y++){
         red = 255;                           // Red
         green = 0;                           // Green
         blue = 0;                            // Blue
         iNeo = y;                            // Neopix
         neopix();
      }
      break;
    case 1:
      // Green
      // NeoPixels
      for(int y=0; y<NUMPIXELS; y++){
         red = 0;                             // Red
         green = 255;                         // Green
         blue = 0;                            // Blue
         iNeo = y;                            // Neopix
         neopix();
      }
      break;
    case 2:
      // Blue
      // NeoPixels
      for(int y=0; y<NUMPIXELS; y++){
         red = 0;                             // Red
         green = 0;                           // Green
         blue = 255;                          // Blue
         iNeo = y;                            // Neopix
         neopix();
      }
      break;
    case 3:
      // White
      // NeoPixels
      for(int y=0; y<NUMPIXELS; y++){
         red = 255;                           // Red
         green = 255;                         // Green
         blue = 255;                          // Blue
         iNeo = y;                            // Neopix
         neopix();
      }
      break;
    case 4:
      // NeoPixels
      // Red
      for(int y=0; y<NUMPIXELS; y++){
         red = 255;                           // Red
         green = 0;                           // Green
         blue = 0;                            // Blue
         iNeo = y;                            // Neopix
         neopix();
      }
      delay( 2000 );
      // Green
      for(int y=0; y<NUMPIXELS; y++){
         red = 0;                             // Red
         green = 255;                         // Green
         blue = 0;                            // Blue
         iNeo = y;                            // Neopix
         neopix();
      }
      delay( 2000 );
      // Blue
      for(int y=0; y<NUMPIXELS; y++){
         red = 0;                             // Red
         green = 0;                           // Green
         blue = 255;                          // Blue
         iNeo = y;                            // Neopix
         neopix();
      }
      break;
    case 5:
      // NeoPixels
      // Yellow
      for(int y=0; y<NUMPIXELS; y++){
         red = 255;                           // Red
         green = 255;                         // Green
         blue = 0;                            // Blue
         iNeo = y;                            // Neopix
         neopix();
      }
      break;
    case 6:
      // NeoPixels
      // Orange
      for(int y=0; y<NUMPIXELS; y++){
         red = 255;                           // Red
         green = 102;                         // Green
         blue = 0;                            // Blue
         iNeo = y;                            // Neopix
         neopix();
      }
      break;
    case 7:
      // NeoPixels
      // Violet
      for(int y=0; y<NUMPIXELS; y++){
         red = 204;                           // Red
         green = 102;                         // Green
         blue = 204;                          // Blue
         iNeo = y;                            // Neopix
         neopix();
      }
      break;
    case 8:
      // NeoPixels
      // Red
      red = 255;                           // Red
      green = 0;                           // Green
      blue = 0;                            // Blue
      iNeo = 0;                            // Neopix
      neopix();
      delay( 1000 );
      // Green
      red = 0;                             // Red
      green = 255;                         // Green
      blue = 0;                            // Blue
      iNeo = 1;                            // Neopix
      neopix();
      delay( 1000 );
      // Blue
      red = 0;                             // Red
      green = 0;                           // Green
      blue = 255;                          // Blue
      iNeo = 2;                            // Neopix
      neopix();
      delay( 1000 );
      // White
      red = 255;                           // Red
      green = 255;                         // Green
      blue = 255;                          // Blue
      iNeo = 3;                            // Neopix
      neopix();
      delay( 1000 );
      // Pink
      red = 255;                           // Red
      green = 153;                         // Green
      blue = 203;                          // Blue
      iNeo = 4;                            // Neopix
      neopix();
      delay( 1000 );
      // Orange
      red = 255;                           // Red
      green = 102;                         // Green
      blue = 0;                            // Blue
      iNeo = 5;                            // Neopix
      neopix();
      delay( 1000 );
      // Violet
      red = 204;                           // Red
      green = 102;                         // Green
      blue = 204;                          // Blue
      iNeo = 6;                            // Neopix
      neopix();
      delay( 1000 );
      // Yellow
      red = 255;                           // Red
      green = 255;                         // Green
      blue = 0;                            // Blue
      iNeo = 7;                            // Neopix
      neopix();
      delay( 1000 );
      break;
    case 9:
      // NeoPixels
      // Red
      red = 255;                           // Red
      green = 0;                           // Green
      blue = 0;                            // Blue
      iNeo = 7;                            // Neopix
      neopix();
      delay( 1000 );
      // Green
      red = 0;                             // Red
      green = 255;                         // Green
      blue = 0;                            // Blue
      iNeo = 6;                            // Neopix
      neopix();
      delay( 1000 );
      // Blue
      red = 0;                             // Red
      green = 0;                           // Green
      blue = 255;                          // Blue
      iNeo = 5;                            // Neopix
      neopix();
      delay( 1000 );
      // White
      red = 255;                           // Red
      green = 255;                         // Green
      blue = 255;                          // Blue
      iNeo = 4;                            // Neopix
      neopix();
      delay( 1000 );
      // Pink
      red = 255;                           // Red
      green = 153;                         // Green
      blue = 203;                          // Blue
      iNeo = 3;                            // Neopix
      neopix();
      delay( 1000 );
      // Orange
      red = 255;                           // Red
      green = 102;                         // Green
      blue = 0;                            // Blue
      iNeo = 2;                            // Neopix
      neopix();
      delay( 1000 );
      // Violet
      red = 204;                           // Red
      green = 102;                         // Green
      blue = 204;                          // Blue
      iNeo = 1;                            // Neopix
      neopix();
      delay( 1000 );
      // Yellow
      red = 255;                           // Red
      green = 255;                         // Green
      blue = 0;                            // Blue
      iNeo = 0;                            // Neopix
      neopix();
      delay( 1000 );
      break;
  }

}
neopix.ino
// NeoPixels
void neopix() {

    // Brightness
    iBri = analogRead(iBriPin);

    // iBri apply the calibration to the sensor reading
    iBri = map(iBri, iBriMin, iBriMax, 0, 255);

    // iBri in case the sensor value is outside the range seen during calibration
    iBri = constrain(iBri, 0, 255);

    pixels.setBrightness( iBri );
    // Pixels.Color takes RGB values, from 0,0,0 up to 255,255,255
    pixels.setPixelColor( iNeo, pixels.Color(red,green,blue) );
    // This sends the updated pixel color to the hardware
    pixels.show();
    // Delay for a period of time (in milliseconds)
    delay(50);

}
setup.ino
// Setup
void setup()
{

  // set up the LCD's number of columns and rows:
  RGBLCDShield.begin(16, 2);
  RGBLCDShield.setBacklight(GREEN);

  // Display
  // Set the cursor to column 0, line 0
  RGBLCDShield.setCursor(0,0);
  RGBLCDShield.print("Don Luc");           // Don luc
  // Set the cursor to column 0, line 1
  RGBLCDShield.setCursor(0, 1);
  RGBLCDShield.print("Rotary Switch");     // Rotary Switch
  delay(5000);

  // Clear
  RGBLCDShield.clear();

  // NeoPixels
  pixels.begin();          // This initializes the NeoPixel library
  // NeoPixels

  for(int y=0; y < NUMPIXELS; y++)
  {
     // Black
     red = 0;                                 // Red
     green = 0;                               // Green
     blue = 0;                                // Blue
     iNeo = y;                                // Neopix
     neopix();
  }

}
Don Luc


