Sensors
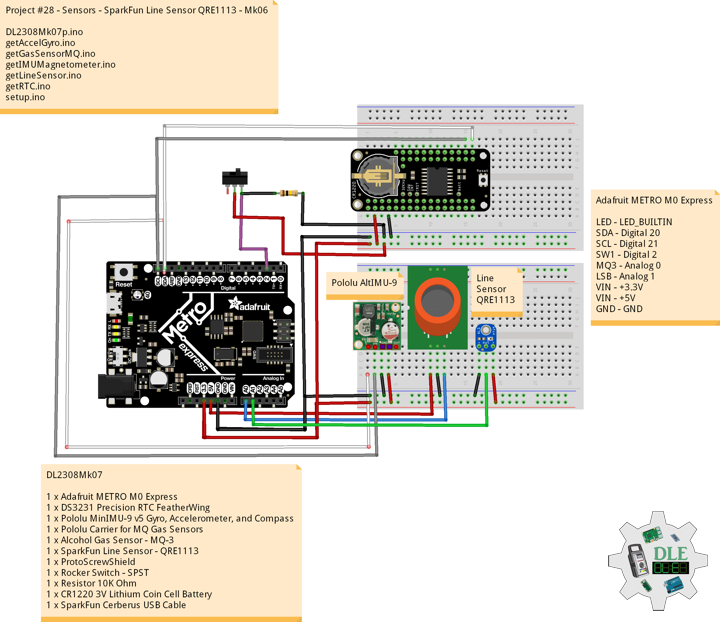
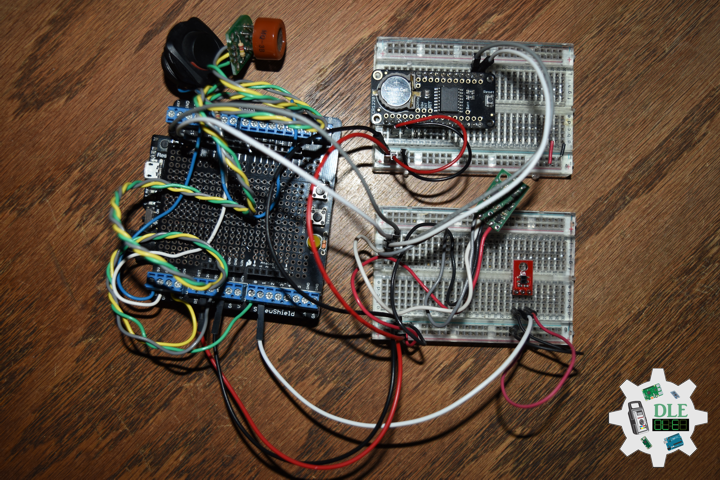
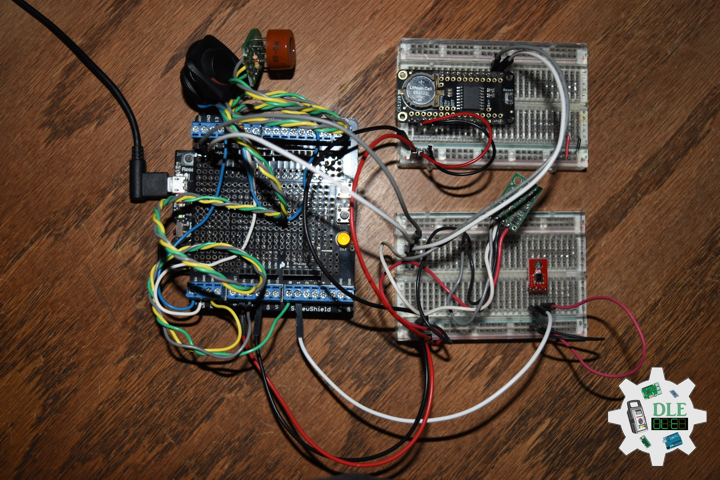
Project #28 – Sensors – SparkFun Line Sensor QRE1113 – Mk06
——
#DonLucElectronics #DonLuc #Sensors #LineSensor #AlcoholGasSensor #MinIMU9 #Pololu #Adafruit #SparkFun #Arduino #Project #Fritzing #Programming #Electronics #Microcontrollers #Consultant
——
——
——
——
SparkFun Line Sensor QRE1113 (Analog)
This version of the QRE1113 breakout board features an easy-to-use analog output, which will vary depending on the amount of IR light reflected back to the sensor. This tiny board is perfect for line sensing applications and can be used in both 3.3V and 5V systems.
The board’s QRE1113 IR reflectance sensor is comprised of two parts – an IR emitting LED and an IR sensitive phototransistor. When you apply power to the VCC and GND pins the IR LED inside the sensor will illuminate. A 100 Ohm resistor is on-board and placed in series with the LED to limit current. A 10k Ohm resistor pulls the output pin high, but when the light from the LED is reflected back onto the phototransistor the output will begin to go lower. The more IR light sensed by the phototransistor, the lower the output voltage of the breakout board.
These sensors are widely used in line following robots, white surfaces reflect much more light than black, so, when directed towards a white surface, the voltage output will be lower than that on a black surface.
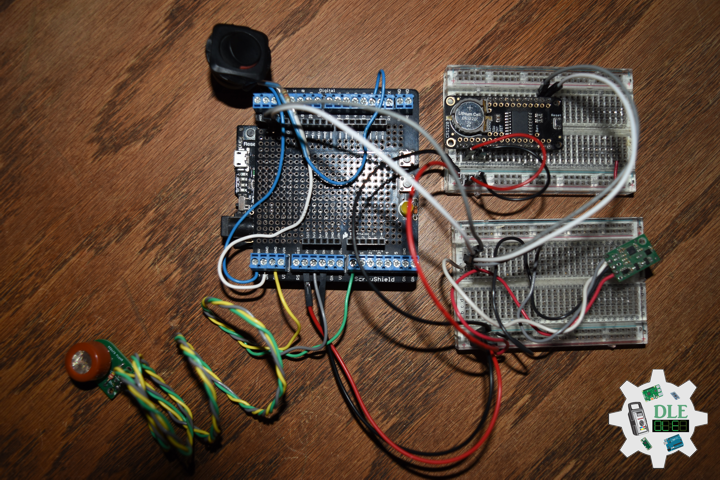
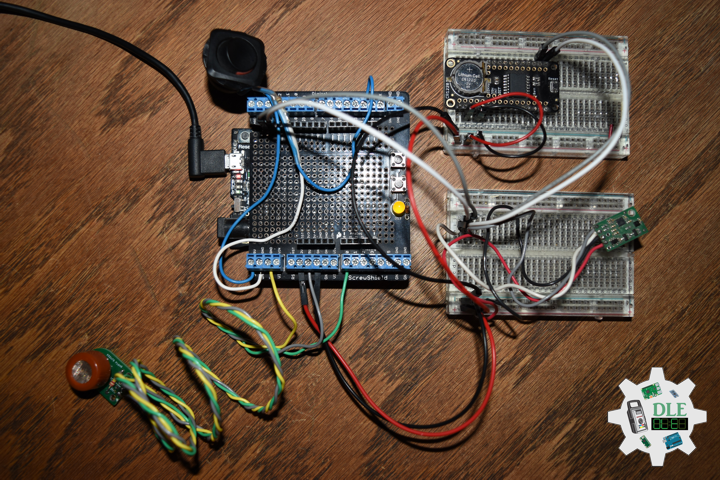
DL2308Mk07
1 x Adafruit METRO M0 Express
1 x DS3231 Precision RTC FeatherWing
1 x Pololu MinIMU-9 v5 Gyro, Accelerometer, and Compass
1 x Pololu Carrier for MQ Gas Sensors
1 x Alcohol Gas Sensor – MQ-3
1 x SparkFun Line Sensor – QRE1113
1 x ProtoScrewShield
1 x Rocker Switch – SPST
2 x Resistor 10K Ohm
1 x CR1220 3V Lithium Coin Cell Battery
1 x SparkFun Cerberus USB Cable
Adafruit METRO M0 Express
LED – LED_BUILTIN
SDA – Digital 20
SCL – Digital 21
SW1 – Digital 2
MQ3 – Analog 0
LSB – Analog 1
VIN – +3.3V
VIN – +5V
GND – GND
——
DL2308Mk07p.ino
/****** Don Luc Electronics © ******
Software Version Information
Project #28 - Sensors - SparkFun Line Sensor QRE1113 - Mk06
28-06
DL2308Mk07p.ino
1 x Adafruit METRO M0 Express
1 x DS3231 Precision RTC FeatherWing
1 x Pololu MinIMU-9 v5 Gyro, Accelerometer, and Compass
1 x Pololu Carrier for MQ Gas Sensors
1 x Alcohol Gas Sensor - MQ-3
1 x SparkFun Line Sensor - QRE1113
1 x ProtoScrewShield
1 x Rocker Switch - SPST
2 x Resistor 10K Ohm
1 x CR1220 3V Lithium Coin Cell Battery
1 x SparkFun Cerberus USB Cable
*/

// Include the Library Code
// DS3231 Precision RTC
#include <RTClib.h>
// Two Wire Interface (TWI/I2C)
#include <Wire.h>
// Keyboard
#include <Keyboard.h>
// Includes and variables for IMU integration
// STMicroelectronics LSM6DS33 Gyroscope and Accelerometer
#include <LSM6.h>
// STMicroelectronics LIS3MDL Magnetometer
#include <LIS3MDL.h>

// Keyboard
String sKeyboard = "";

// DS3231 Precision RTC
RTC_DS3231 rtc;
String dateRTC = "";
String timeRTC = "";

// Pololu 9DoF IMU
// STMicroelectronics LSM6DS33 Gyroscope and Accelerometer
LSM6 imu;
// Accelerometer and Gyroscopes
// Accelerometer
int imuAX;
int imuAY;
int imuAZ;
// Gyroscopes
int imuGX;
int imuGY;
int imuGZ;
// STMicroelectronics LIS3MDL Magnetometer
LIS3MDL mag;
// Magnetometer
int magX;
int magY;
int magZ;

// Gas Sensors MQ
// Alcohol Gas Sensor - MQ-3
int iMQ3 = A0;
int iMQ3Raw = 0;
int iMQ3ppm = 0;

// SparkFun Line Sensor - QRE1113 (Analog)
int iLine = A1;
int iLineSensor = 0;

// The number of the Rocker Switch pin
int iSwitch = 2;
// Variable for reading the button status
int SwitchState = 0;

// Software Version Information
String sver = "28-06";

void loop() {

  // Date and Time RTC
  isRTC ();

  // Pololu Accelerometer and Gyroscopes
  isIMU();

  // Pololu Magnetometer
  isMag();

  // Gas Sensors MQ
  isGasSensor();

  // SparkFun Line Sensor
  isLineSensor();

  // Read the state of the Switch value:
  SwitchState = digitalRead(iSwitch);

  // Check if the button is pressed. If it is, the SwitchState is HIGH:
  if (SwitchState == HIGH) {

     Keyboard.println(sKeyboard);

  }

  // Delay 1 Second
  delay(1000);

}
getAccelGyro.ino
// Accelerometer and Gyroscopes
// Setup IMU
void setupIMU() {

  // Setup IMU
  imu.init();
  // Default
  imu.enableDefault();

}
// Accelerometer and Gyroscopes
void isIMU() {

  // Accelerometer and Gyroscopes
  imu.read();
  // Accelerometer x, y, z
  imuAX = imu.a.x;
  imuAY = imu.a.y;
  imuAZ = imu.a.z;
  // Gyroscopes x, y, z
  imuGX = imu.g.x;
  imuGY = imu.g.y;
  imuGZ = imu.g.z;

  // Keyboard
  sKeyboard = sKeyboard + String(imuAX) + "|" + String(imuAY) + "|"
  + String(imuAZ) + "|";
  sKeyboard = sKeyboard + String(imuGX) + "|" + String(imuGY) + "|"
  + String(imuGZ) + "|";

}
getGasSensorMQ.ino
// Gas Sensors MQ
// Gas Sensor
void isGasSensor() {

  // Read in analog value from each gas sensors
  // Alcohol Gas Sensor - MQ-3
  iMQ3ppm = isMQ3( iMQ3Raw );

  // Keyboard
  sKeyboard = sKeyboard + String(iMQ3ppm) + "|";

}
// Alcohol Gas Sensor - MQ-3
int isMQ3(double rawValue) {

  double RvRo = rawValue;
  // % BAC = breath mg/L * 0.21
  double bac = RvRo * 0.21;
  return bac;

}
getIMUMagnetometer.ino
// IMU Magnetometer
// Setup Magnetometer
void setupMag() {

  // Setup Magnetometer
  mag.init();
  // Default
  mag.enableDefault();

}
// Magnetometer
void isMag() {

  // Magnetometer
  mag.read();
  // Magnetometer x, y, z
  magX = mag.m.x;
  magY = mag.m.y;
  magZ = mag.m.z;

  // Keyboard
  sKeyboard = sKeyboard + String(magX) + "|" + String(magY) + "|"
  + String(magZ) + "|";

}
getLineSensor.ino
// Line Sensor
// isLine Sensor
void isLineSensor(){

  // Line Sensor
  iLineSensor = analogRead(iLine);

  // Keyboard
  sKeyboard = sKeyboard + String(iLineSensor) + "|*";

}
getRTC.ino
// Date & Time
// DS3231 Precision RTC
void setupRTC() {

  // DS3231 Precision RTC
  if (! rtc.begin()) {
    //Serial.println("Couldn't find RTC");
    //Serial.flush();
    while (1) delay(10);
  }

  if (rtc.lostPower()) {
    //Serial.println("RTC lost power, let's set the time!");
    // When time needs to be set on a new device, or after a power loss, the
    // following line sets the RTC to the date & time this sketch was compiled
    rtc.adjust(DateTime(F(__DATE__), F(__TIME__)));
    // This line sets the RTC with an explicit date & time, for example to set
    // January 21, 2014 at 3am you would call:
    //rtc.adjust(DateTime(2023, 8, 10, 11, 0, 0));
  }

}
// Date and Time RTC
void isRTC () {

  // Date and Time
  dateRTC = "";
  timeRTC = "";
  DateTime now = rtc.now();

  // Date
  dateRTC = now.year(), DEC;
  dateRTC = dateRTC + "/";
  dateRTC = dateRTC + now.month(), DEC;
  dateRTC = dateRTC + "/";
  dateRTC = dateRTC + now.day(), DEC;

  // Time
  timeRTC = now.hour(), DEC;
  timeRTC = timeRTC + ":";
  timeRTC = timeRTC + now.minute(), DEC;
  timeRTC = timeRTC + ":";
  timeRTC = timeRTC + now.second(), DEC;

  // Keyboard
  sKeyboard = "SEN|" + sver + "|" + String(dateRTC) + "|" +
  String(timeRTC) + "|";

}
setup.ino
// Setup
void setup()
{

  // Give display time to power on
  delay(100);

  // Wire - Inialize I2C Hardware
  Wire.begin();

  // Give display time to power on
  delay(100);

  // Date & Time RTC
  // DS3231 Precision RTC
  setupRTC();

  // Initialize control over the keyboard:
  Keyboard.begin();

  // Pololu Setup IMU
  setupIMU();

  // Pololu Setup Magnetometer
  setupMag();

  // Initialize the Switch pin as an input
  pinMode(iSwitch, INPUT);

  // Initialize digital pin LED_BUILTIN as an output
  pinMode(LED_BUILTIN, OUTPUT);
  // Turn the LED on HIGH
  digitalWrite(LED_BUILTIN, HIGH);

  // Delay 5 Second
  delay( 5000 );

}
——
People can contact us: https://www.donluc.com/?page_id=1927
Technology Experience
- Programming Language
- Single-Board Microcontrollers (PIC, Arduino, Raspberry Pi,Espressif, etc…)
- IoT
- Wireless (Radio Frequency, Bluetooth, WiFi, Etc…)
- Robotics
- Camera and Video Capture Receiver Stationary, Wheel/Tank and Underwater Vehicle
- Unmanned Vehicles Terrestrial and Marine
- Machine Learning
- RTOS
- Research & Development (R & D)
Instructor, E-Mentor, STEAM, and Arts-Based Training
- Programming Language
- IoT
- PIC Microcontrollers
- Arduino
- Raspberry Pi
- Espressif
- Robotics
Follow Us
Luc Paquin – Curriculum Vitae – 2023
https://www.donluc.com/luc/
Web: https://www.donluc.com/
Facebook: https://www.facebook.com/neosteam.labs.9/
YouTube: https://www.youtube.com/@thesass2063
Twitter: https://twitter.com/labs_steam
Pinterest: https://www.pinterest.com/NeoSteamLabs/
Instagram: https://www.instagram.com/neosteamlabs/
Don Luc
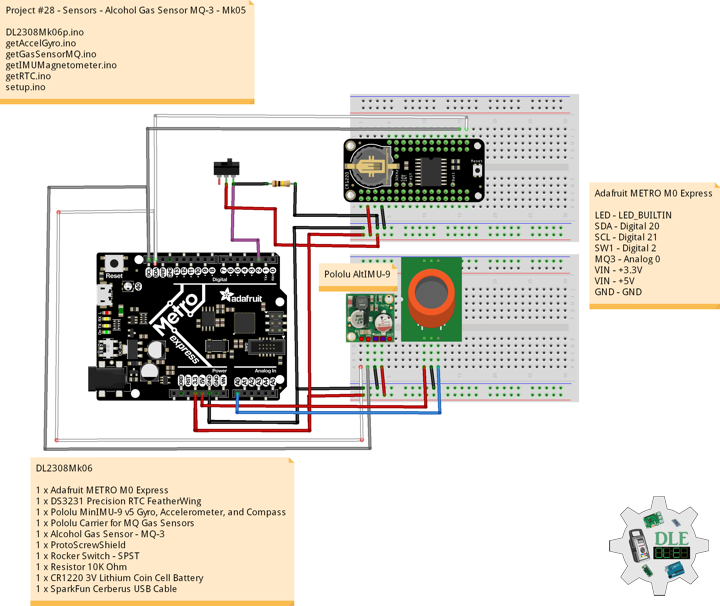
Project #28 – Sensors – Alcohol Gas Sensor MQ-3 – Mk05
——
#DonLucElectronics #DonLuc #Sensors #AlcoholGasSensor #MinIMU9 #Pololu #Adafruit #SparkFun #Arduino #Project #Fritzing #Programming #Electronics #Microcontrollers #Consultant
——
——
——
——
Pololu Carrier for MQ Gas Sensors
This carrier board is designed to work with any of the MQ-series gas sensors, simplifying the interface from 6 to 3 pins—ground, power and analog voltage output—that are broken out with a 0.1″ spacing, making the board compatible with 0.1″ headers and standard breadboards and perfboards. This board has two mounting holes and provides convenient pads for mounting the gas sensor’s required sensitivity-setting resistor.
Alcohol Gas Sensor – MQ-3
This alcohol sensor is suitable for detecting alcohol concentration on your breath, just like your common breathalyzer. It has a high sensitivity and fast response time. Sensor provides an analog resistive output based on alcohol concentration.
How does this relate to the breath? It turns out that there is a standard conversion from breath alcohol content to BAC that is employed by commercial breathalyzers. Our formula for calculating BAC from the alcohol measured in the breath is:
% BAC = Breath mg/L * 0.21
DL2308Mk06
1 x Adafruit METRO M0 Express
1 x DS3231 Precision RTC FeatherWing
1 x Pololu MinIMU-9 v5 Gyro, Accelerometer, and Compass
1 x Pololu Carrier for MQ Gas Sensors
1 x Alcohol Gas Sensor – MQ-3
1 x ProtoScrewShield
1 x Rocker Switch – SPST
2 x Resistor 10K Ohm
1 x CR1220 3V Lithium Coin Cell Battery
1 x SparkFun Cerberus USB Cable
Adafruit METRO M0 Express
LED – LED_BUILTIN
SDA – Digital 20
SCL – Digital 21
SW1 – Digital 2
MQ3 – Analog 0
VIN – +3.3V
VIN – +5V
GND – GND
——
DL2308Mk06p.ino
/****** Don Luc Electronics © ******
Software Version Information
Project #28 - Sensors - Alcohol Gas Sensor MQ-3 - Mk05
28-05
DL2308Mk06p.ino
1 x Adafruit METRO M0 Express
1 x DS3231 Precision RTC FeatherWing
1 x Pololu MinIMU-9 v5 Gyro, Accelerometer, and Compass
1 x Pololu Carrier for MQ Gas Sensors
1 x Alcohol Gas Sensor - MQ-3
1 x ProtoScrewShield
1 x Rocker Switch - SPST
2 x Resistor 10K Ohm
1 x CR1220 3V Lithium Coin Cell Battery
1 x SparkFun Cerberus USB Cable
*/

// Include the Library Code
// DS3231 Precision RTC
#include <RTClib.h>
// Two Wire Interface (TWI/I2C)
#include <Wire.h>
// Keyboard
#include <Keyboard.h>
// Includes and variables for IMU integration
// STMicroelectronics LSM6DS33 Gyroscope and Accelerometer
#include <LSM6.h>
// STMicroelectronics LIS3MDL Magnetometer
#include <LIS3MDL.h>

// Keyboard
String sKeyboard = "";

// DS3231 Precision RTC
RTC_DS3231 rtc;
String dateRTC = "";
String timeRTC = "";

// Pololu 9DoF IMU
// STMicroelectronics LSM6DS33 Gyroscope and Accelerometer
LSM6 imu;
// Accelerometer and Gyroscopes
// Accelerometer
int imuAX;
int imuAY;
int imuAZ;
// Gyroscopes
int imuGX;
int imuGY;
int imuGZ;
// STMicroelectronics LIS3MDL Magnetometer
LIS3MDL mag;
// Magnetometer
int magX;
int magY;
int magZ;

// Gas Sensors MQ
// Alcohol Gas Sensor - MQ-3
int iMQ3 = A0;
int iMQ3Raw = 0;
int iMQ3ppm = 0;

// The number of the button pin
int iButton = 2;
// Variable for reading the button status
int buttonState = 0;

// Software Version Information
String sver = "28-05";

void loop() {

  // Date and Time RTC
  isRTC ();

  // Pololu Accelerometer and Gyroscopes
  isIMU();

  // Pololu Magnetometer
  isMag();

  // Gas Sensors MQ
  isGasSensor();

  // Read the state of the button value:
  buttonState = digitalRead(iButton);

  // Check if the button is pressed. If it is, the buttonState is HIGH:
  if (buttonState == HIGH) {

     Keyboard.println(sKeyboard);

  }

  // Delay 1 Second
  delay(1000);

}
getAccelGyro.ino
// Accelerometer and Gyroscopes
// Setup IMU
void setupIMU() {

  // Setup IMU
  imu.init();
  // Default
  imu.enableDefault();

}
// Accelerometer and Gyroscopes
void isIMU() {

  // Accelerometer and Gyroscopes
  imu.read();
  // Accelerometer x, y, z
  imuAX = imu.a.x;
  imuAY = imu.a.y;
  imuAZ = imu.a.z;
  // Gyroscopes x, y, z
  imuGX = imu.g.x;
  imuGY = imu.g.y;
  imuGZ = imu.g.z;

  sKeyboard = sKeyboard + String(imuAX) + "|" + String(imuAY) + "|" + String(imuAZ) + "|";
  sKeyboard = sKeyboard + String(imuGX) + "|" + String(imuGY) + "|" + String(imuGZ) + "|";

}
getGasSensorMQ.ino
// Gas Sensors MQ
// Gas Sensor
void isGasSensor() {

  // Read in analog value from each gas sensors
  // Alcohol Gas Sensor - MQ-3
  iMQ3ppm = isMQ3( iMQ3Raw );

  sKeyboard = sKeyboard + String(iMQ3ppm) + "|*";

}
// Alcohol Gas Sensor - MQ-3
int isMQ3(double rawValue) {

  double RvRo = rawValue;
  // % BAC = breath mg/L * 0.21
  double bac = RvRo * 0.21;
  return bac;

}
getIMUMagnetometer.ino
// IMU Magnetometer
// Setup Magnetometer
void setupMag() {

  // Setup Magnetometer
  mag.init();
  // Default
  mag.enableDefault();

}
// Magnetometer
void isMag() {

  // Magnetometer
  mag.read();
  // Magnetometer x, y, z
  magX = mag.m.x;
  magY = mag.m.y;
  magZ = mag.m.z;

  sKeyboard = sKeyboard + String(magX) + "|" + String(magY) + "|"
  + String(magZ) + "|";

}
getRTC.ino
// Date & Time
// DS3231 Precision RTC
void setupRTC() {

  // DS3231 Precision RTC
  if (! rtc.begin()) {
    //Serial.println("Couldn't find RTC");
    //Serial.flush();
    while (1) delay(10);
  }

  if (rtc.lostPower()) {
    //Serial.println("RTC lost power, let's set the time!");
    // When time needs to be set on a new device, or after a power loss, the
    // following line sets the RTC to the date & time this sketch was compiled
    rtc.adjust(DateTime(F(__DATE__), F(__TIME__)));
    // This line sets the RTC with an explicit date & time, for example to set
    // January 21, 2014 at 3am you would call:
    //rtc.adjust(DateTime(2023, 8, 10, 11, 0, 0));
  }

}
// Date and Time RTC
void isRTC () {

  // Date and Time
  dateRTC = "";
  timeRTC = "";
  DateTime now = rtc.now();

  // Date
  dateRTC = now.year(), DEC;
  dateRTC = dateRTC + "/";
  dateRTC = dateRTC + now.month(), DEC;
  dateRTC = dateRTC + "/";
  dateRTC = dateRTC + now.day(), DEC;

  // Time
  timeRTC = now.hour(), DEC;
  timeRTC = timeRTC + ":";
  timeRTC = timeRTC + now.minute(), DEC;
  timeRTC = timeRTC + ":";
  timeRTC = timeRTC + now.second(), DEC;

  sKeyboard = "SEN|" + sver + "|" + String(dateRTC) + "|" +
  String(timeRTC) + "|";

}
setup.ino
// Setup
void setup()
{

  // Give display time to power on
  delay(100);

  // Wire - Inialize I2C Hardware
  Wire.begin();

  // Give display time to power on
  delay(100);

  // Date & Time RTC
  // DS3231 Precision RTC
  setupRTC();

  // Initialize control over the keyboard:
  Keyboard.begin();

  // Pololu Setup IMU
  setupIMU();

  // Pololu Setup Magnetometer
  setupMag();

  // Initialize the button pin as an input
  pinMode(iButton, INPUT);

  // Initialize digital pin LED_BUILTIN as an output
  pinMode(LED_BUILTIN, OUTPUT);
  // Turn the LED on HIGH
  digitalWrite(LED_BUILTIN, HIGH);

  // Delay 5 Second
  delay( 5000 );

}
——
People can contact us: https://www.donluc.com/?page_id=1927
Technology Experience
- Programming Language
- Single-Board Microcontrollers (PIC, Arduino, Raspberry Pi,Espressif, etc…)
- IoT
- Wireless (Radio Frequency, Bluetooth, WiFi, Etc…)
- Robotics
- Camera and Video Capture Receiver Stationary, Wheel/Tank and Underwater Vehicle
- Unmanned Vehicles Terrestrial and Marine
- Machine Learning
- RTOS
- Research & Development (R & D)
Instructor, E-Mentor, STEAM, and Arts-Based Training
- Programming Language
- IoT
- PIC Microcontrollers
- Arduino
- Raspberry Pi
- Espressif
- Robotics
Follow Us
Luc Paquin – Curriculum Vitae – 2023
https://www.donluc.com/luc/
Web: https://www.donluc.com/
Facebook: https://www.facebook.com/neosteam.labs.9/
YouTube: https://www.youtube.com/@thesass2063
Twitter: https://twitter.com/labs_steam
Pinterest: https://www.pinterest.com/NeoSteamLabs/
Instagram: https://www.instagram.com/neosteamlabs/
Don Luc
Project #28 – Sensors – Gyroscope L3G4200D – Mk03
——
#DonLucElectronics #DonLuc #Sensors #L3G4200D #HMC5883L #ADXL335 #Adafruit #SparkFun #Arduino #Project #Fritzing #Programming #Electronics #Microcontrollers #Consultant
——
——
——
——
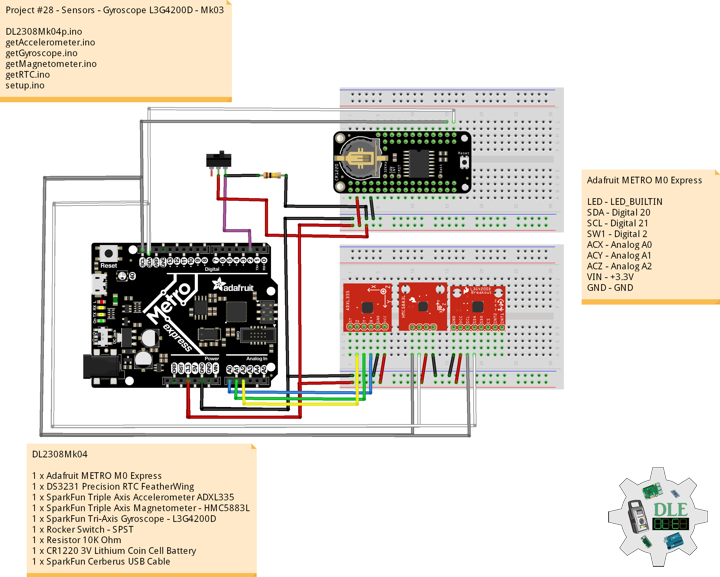
SparkFun Tri-Axis Gyroscope – L3G4200D
This is a breakout board for the L3G4200D low-power three-axis angular rate sensor. The L3G4200D is a MEMS motion sensor and has a full scale of dps and is capable of measuring rates with a user-selectable bandwidth. These work great in gaming and virtual reality input devices, motion control with MMI, GPS navigation systems, appliances and robotics. The L3G4200D is a low-power three-axis angular rate sensor able to provide unprecedented stablility of zero rate level and sensitivity over temperature and time. It includes a sensing element and an IC interface capable of providing the measured angular rate to the external world through a digital interface.
DL2308Mk04
1 x Adafruit METRO M0 Express
1 x DS3231 Precision RTC FeatherWing
1 x SparkFun Triple Axis Accelerometer ADXL335
1 x SparkFun Triple Axis Magnetometer – HMC5883L
1 x SparkFun Tri-Axis Gyroscope – L3G4200D
1 x Rocker Switch – SPST
1 x Resistor 10K Ohm
1 x CR1220 3V Lithium Coin Cell Battery
1 x SparkFun Cerberus USB Cable
Adafruit METRO M0 Express
LED – LED_BUILTIN
SDA – Digital 20
SCL – Digital 21
SW1 – Digital 2
ACX – Analog A0
ACY – Analog A1
ACZ – Analog A2
VIN – +3.3V
GND – GND
——
DL2308Mk04p.ino
/****** Don Luc Electronics © ******
Software Version Information
Project #28 - Sensors - Gyroscope L3G4200D - Mk03
28-03
DL2308Mk04p.ino
1 x Adafruit METRO M0 Express
1 x DS3231 Precision RTC FeatherWing
1 x SparkFun Triple Axis Accelerometer ADXL335
1 x SparkFun Tri-Axis Gyroscope - L3G4200D
1 x Rocker Switch - SPST
1 x Resistor 10K Ohm
1 x CR1220 3V Lithium Coin Cell Battery
1 x SparkFun Cerberus USB Cable
*/

// Include the Library Code
// DS3231 Precision RTC
#include <RTClib.h>
// Two Wire Interface (TWI/I2C)
#include <Wire.h>
// Keyboard
#include <Keyboard.h>
// Triple Axis Magnetometer
#include <HMC5883L.h>
// Gyroscope
#include <L3G4200D.h>

// Keyboard
String sKeyboard = "";

// DS3231 Precision RTC
RTC_DS3231 rtc;
String dateRTC = "";
String timeRTC = "";

// Accelerometer
int iX = A0;
int iY = A1;
int iZ = A2;
// Accelerometer
int X = 0;
int Y = 0;
int Z = 0;

// Triple Axis Magnetometer
HMC5883L compass;
// Triple Axis Magnetometer
int mX = 0;
int mY = 0;
int mZ = 0;

// Gyroscope
L3G4200D gyroscope;
// Timers
unsigned long timer = 0;
float timeStep = 0.01;
// Pitch, Roll and Yaw values
float pitch = 0;
float roll = 0;
float yaw = 0;

// The number of the pushbutton pin
int iButton = 2;
// Variable for reading the button status
int buttonState = 0;

// Software Version Information
String sver = "28-03";

void loop() {

  // Date and Time RTC
  isRTC ();

  // Accelerometer
  isAccelerometer();

  // Magnetometer
  isMagnetometer();

  // Gyroscope
  isGyroscope();

  // Read the state of the button value:
  buttonState = digitalRead(iButton);

  // Check if the button is pressed. If it is, the buttonState is HIGH:
  if (buttonState == HIGH) {

     Keyboard.println(sKeyboard);

  }

  // Delay 1 Second
  delay(1000);

}
getAccelerometer.ino
// Accelerometer
// Accelerometer
void isAccelerometer(){

  // Accelerometer X, Y, Z
  // X
  X = analogRead(iX);
  // Y
  Y = analogRead(iY);
  // Z
  Z = analogRead(iZ);

  sKeyboard = sKeyboard + String(X) + "|" + String(Y) + "|" + String(Z) + "|";

}
getGyroscope.ino
// L3G4200D Triple Axis Gyroscope
// Setup Gyroscope
void isSetupGyroscope() {

  // Setup Gyroscope
  // Set scale 2000 dps and 400HZ Output data rate (cut-off 50)
  while(!gyroscope.begin(L3G4200D_SCALE_2000DPS, L3G4200D_DATARATE_400HZ_50))
  {
    // Could not find a valid L3G4200D sensor, check wiring!
    delay(500);

  }

  // Calibrate gyroscope. The calibration must be at rest.
  // If you don't want calibrate, comment this line.
  gyroscope.calibrate(100);

}
// L3G4200D Gyroscope
void isGyroscope(){

  // Timer
  timer = millis();

  // Read normalized values
  Vector norm = gyroscope.readNormalize();

  // Calculate Pitch, Roll and Yaw
  pitch = pitch + norm.YAxis * timeStep;
  roll = roll + norm.XAxis * timeStep;
  yaw = yaw + norm.ZAxis * timeStep;

  sKeyboard = sKeyboard + String(pitch) + "|" + String(roll) + "|" + String(yaw) + "|*";

}
getMagnetometer.ino
// Magnetometer
// Setup Magnetometer
void isSetupMagnetometer(){

  // Magnetometer Serial
  // Initialize HMC5883L
  while (!compass.begin())
  {
    delay(500);
  }

  // Set measurement range
  // +/- 1.30 Ga: HMC5883L_RANGE_1_3GA (default)
  compass.setRange(HMC5883L_RANGE_1_3GA);

  // Set measurement mode
  // Continuous-Measurement: HMC5883L_CONTINOUS (default)
  compass.setMeasurementMode(HMC5883L_CONTINOUS);

  // Set data rate
  // 15.00Hz: HMC5883L_DATARATE_15HZ (default)
  compass.setDataRate(HMC5883L_DATARATE_15HZ);

  // Set number of samples averaged
  // 1 sample:  HMC5883L_SAMPLES_1 (default)
  compass.setSamples(HMC5883L_SAMPLES_1);

}
// Magnetometer
void isMagnetometer(){

  // Vector Norm
  Vector norm = compass.readNormalize();
  // Vector X, Y, Z
  // X Normalize
  mX = norm.XAxis;
  // Y Normalize
  mY = norm.YAxis;
  // Z Normalize
  mZ = norm.ZAxis;

  sKeyboard = sKeyboard + String(mX) + "|" + String(mY) + "|" + String(mZ) + "|";

}
getRTC.ino
// Date & Time
// DS3231 Precision RTC
void setupRTC() {

  // DS3231 Precision RTC
  if (! rtc.begin()) {
    //Serial.println("Couldn't find RTC");
    //Serial.flush();
    while (1) delay(10);
  }

  if (rtc.lostPower()) {
    //Serial.println("RTC lost power, let's set the time!");
    // When time needs to be set on a new device, or after a power loss, the
    // following line sets the RTC to the date & time this sketch was compiled
    rtc.adjust(DateTime(F(__DATE__), F(__TIME__)));
    // This line sets the RTC with an explicit date & time, for example to set
    // January 21, 2014 at 3am you would call:
    //rtc.adjust(DateTime(2023, 8, 10, 11, 0, 0));
  }

}
// Date and Time RTC
void isRTC () {

  // Date and Time
  dateRTC = "";
  timeRTC = "";
  DateTime now = rtc.now();

  // Date
  dateRTC = now.year(), DEC;
  dateRTC = dateRTC + "/";
  dateRTC = dateRTC + now.month(), DEC;
  dateRTC = dateRTC + "/";
  dateRTC = dateRTC + now.day(), DEC;

  // Time
  timeRTC = now.hour(), DEC;
  timeRTC = timeRTC + ":";
  timeRTC = timeRTC + now.minute(), DEC;
  timeRTC = timeRTC + ":";
  timeRTC = timeRTC + now.second(), DEC;

  sKeyboard = "SEN|" + sver + "|" + String(dateRTC) + "|" +
  String(timeRTC) + "|";

}
setup.ino
// Setup
void setup()
{

  // Give display time to power on
  delay(100);

  // Wire - Inialize I2C Hardware
  Wire.begin();

  // Give display time to power on
  delay(100);

  // Date & Time RTC
  // DS3231 Precision RTC
  setupRTC();

  // Initialize control over the keyboard:
  Keyboard.begin();

  // Setup Triple Axis Magnetometer
  isSetupMagnetometer();

  // L3G4200D Gyroscope
  isSetupGyroscope();

  // Initialize the button pin as an input
  pinMode(iButton, INPUT);

  // Initialize digital pin LED_BUILTIN as an output
  pinMode(LED_BUILTIN, OUTPUT);
  // Turn the LED on HIGH
  digitalWrite(LED_BUILTIN, HIGH);

  // Delay 5 Second
  delay( 5000 );

}
——
People can contact us: https://www.donluc.com/?page_id=1927
Technology Experience
- Programming Language
- Single-Board Microcontrollers (PIC, Arduino, Raspberry Pi,Espressif, etc…)
- IoT
- Wireless (Radio Frequency, Bluetooth, WiFi, Etc…)
- Robotics
- Camera and Video Capture Receiver Stationary, Wheel/Tank and Underwater Vehicle
- Unmanned Vehicles Terrestrial and Marine
- Machine Learning
- RTOS
- Research & Development (R & D)
Instructor, E-Mentor, STEAM, and Arts-Based Training
- Programming Language
- IoT
- PIC Microcontrollers
- Arduino
- Raspberry Pi
- Espressif
- Robotics
Follow Us
Luc Paquin – Curriculum Vitae – 2023
https://www.donluc.com/luc/
Web: https://www.donluc.com/
Facebook: https://www.facebook.com/neosteam.labs.9/
YouTube: https://www.youtube.com/@thesass2063
Twitter: https://twitter.com/labs_steam
Pinterest: https://www.pinterest.com/NeoSteamLabs/
Instagram: https://www.instagram.com/neosteamlabs/
Don Luc
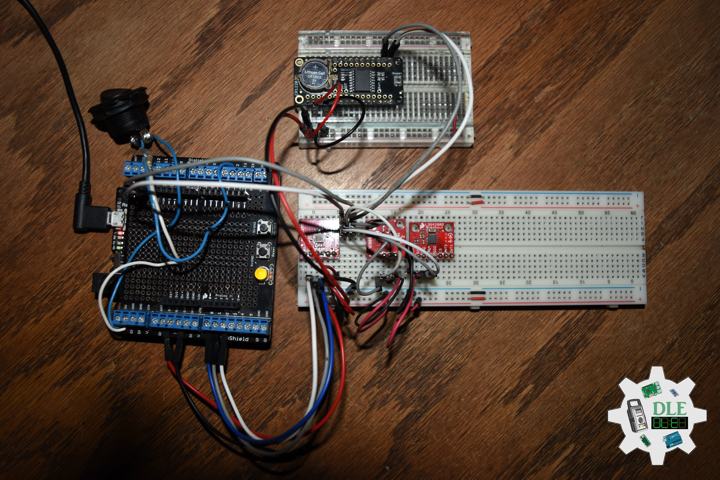
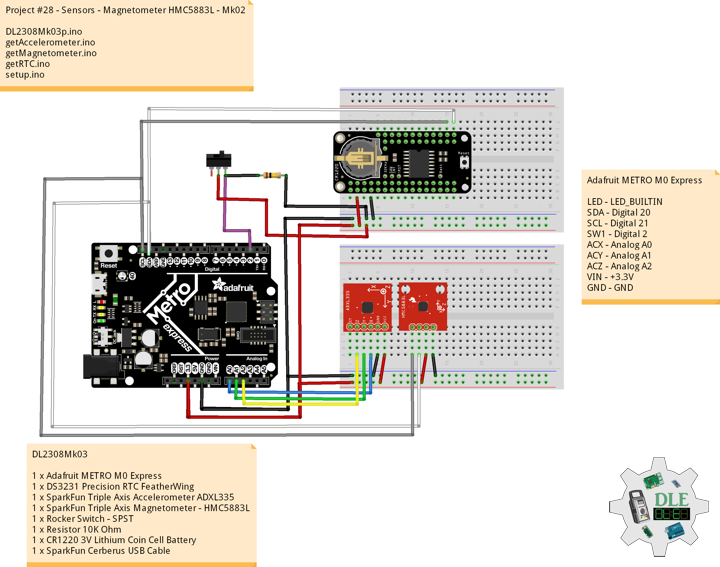
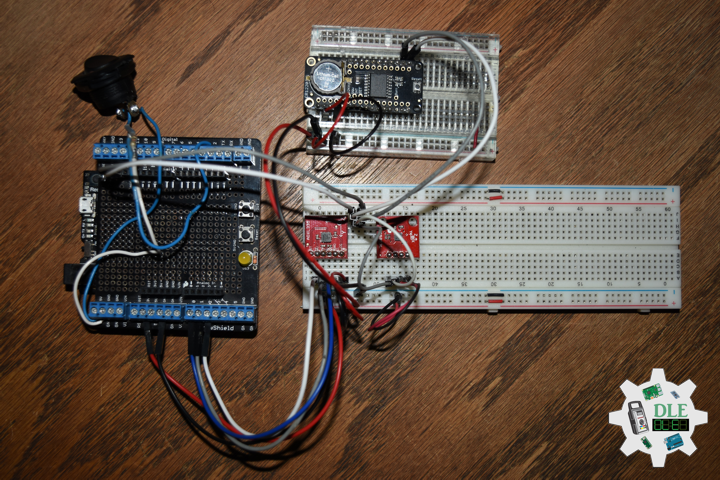
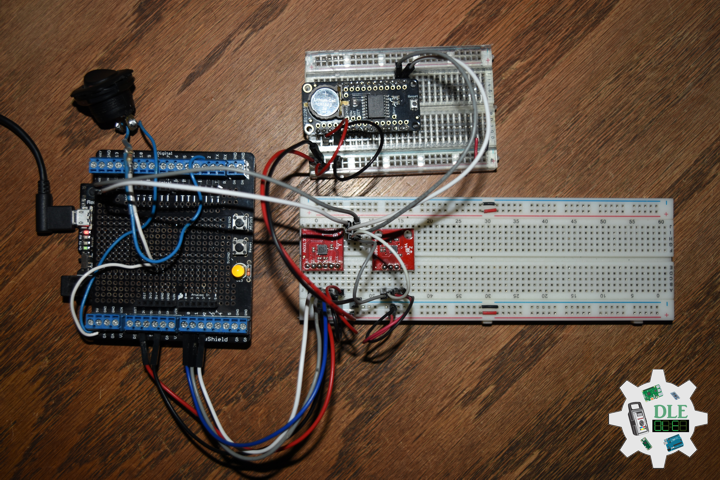
Project #28 – Sensors – Magnetometer HMC5883L – Mk02
——
#DonLucElectronics #DonLuc #Sensors #HMC5883L #ADXL335 #Adafruit #SparkFun #Arduino #Project #Fritzing #Programming #Electronics #Microcontrollers #Consultant
——
——
——
——
SparkFun Triple Axis Magnetometer – HMC5883L
This is a breakout board for Honeywell’s HMC5883L, a 3-axis digital compass. Communication with the HMC5883L is simple and all done through an I2C interface. There is no on-board regulator, so a regulated voltage of 2.16-3.6VDC should be supplied. The Honeywell HMC5883L is a surface-mount, multi-chip module designed for low-field magnetic sensing with a digital interface for applications such as low-cost compassing and magnetometry. Applications for the HMC5883L include Mobile Phones, Netbooks, Consumer Electronics, Auto Navigation Systems, and Personal Navigation Devices.
DL2308Mk03
1 x Adafruit METRO M0 Express
1 x DS3231 Precision RTC FeatherWing
1 x SparkFun Triple Axis Accelerometer ADXL335
1 x SparkFun Triple Axis Magnetometer – HMC5883L
1 x Rocker Switch – SPST
1 x Resistor 10K Ohm
1 x CR1220 3V Lithium Coin Cell Battery
1 x SparkFun Cerberus USB Cable
Adafruit METRO M0 Express
LED – LED_BUILTIN
SDA – Digital 20
SCL – Digital 21
SW1 – Digital 2
ACX – Analog A0
ACY – Analog A1
ACZ – Analog A2
VIN – +3.3V
GND – GND
——
DL2308Mk03p.ino
/****** Don Luc Electronics © ******
Software Version Information
Project #28 - Sensors - Magnetometer HMC5883L - Mk02
28-02
DL2308Mk03p.ino
1 x Adafruit METRO M0 Express
1 x DS3231 Precision RTC FeatherWing
1 x SparkFun Triple Axis Accelerometer ADXL335
1 x Rocker Switch - SPST
1 x Resistor 10K Ohm
1 x CR1220 3V Lithium Coin Cell Battery
1 x SparkFun Cerberus USB Cable
*/

// Include the Library Code
// DS3231 Precision RTC
#include <RTClib.h>
// Two Wire Interface (TWI/I2C)
#include <Wire.h>
// Keyboard
#include <Keyboard.h>
// Triple Axis Magnetometer
#include <HMC5883L.h>

// Keyboard
String sKeyboard = "";

// DS3231 Precision RTC
RTC_DS3231 rtc;
String dateRTC = "";
String timeRTC = "";

// Accelerometer
int iX = A0;
int iY = A1;
int iZ = A2;
// Accelerometer
int X = 0;
int Y = 0;
int Z = 0;

// Triple Axis Magnetometer
HMC5883L compass;
// Triple Axis Magnetometer
int mX = 0;
int mY = 0;
int mZ = 0;

// The number of the pushbutton pin
int iButton = 2;
// Variable for reading the pushbutton status
int buttonState = 0;

// Software Version Information
String sver = "28-02";

void loop() {

  // Date and Time RTC
  isRTC ();

  // Accelerometer
  isAccelerometer();

  // Magnetometer
  isMagnetometer();

  // Read the state of the button value:
  buttonState = digitalRead(iButton);

  // Check if the button is pressed. If it is, the buttonState is HIGH:
  if (buttonState == HIGH) {

     Keyboard.println(sKeyboard);

  }

  // Delay 1 sec
  delay(1000);

}
getAccelerometer.ino
// Accelerometer
// Accelerometer
void isAccelerometer(){

  // Accelerometer X, Y, Z
  // X
  X = analogRead(iX);
  // Y
  Y = analogRead(iY);
  // Z
  Z = analogRead(iZ);

  sKeyboard = sKeyboard + String(X) + "|" + String(Y) + "|" + String(Z) + "|";

}
getMagnetometer.ino
// Magnetometer
// Setup Magnetometer
void isSetupMagnetometer(){

  // Magnetometer Serial
  // Initialize HMC5883L
  while (!compass.begin())
  {
    delay(500);
  }

  // Set measurement range
  // +/- 1.30 Ga: HMC5883L_RANGE_1_3GA (default)
  compass.setRange(HMC5883L_RANGE_1_3GA);

  // Set measurement mode
  // Continuous-Measurement: HMC5883L_CONTINOUS (default)
  compass.setMeasurementMode(HMC5883L_CONTINOUS);

  // Set data rate
  // 15.00Hz: HMC5883L_DATARATE_15HZ (default)
  compass.setDataRate(HMC5883L_DATARATE_15HZ);

  // Set number of samples averaged
  // 1 sample:  HMC5883L_SAMPLES_1 (default)
  compass.setSamples(HMC5883L_SAMPLES_1);

}
// Magnetometer
void isMagnetometer(){

  // Vector Norm
  Vector norm = compass.readNormalize();
  // Vector X, Y, Z
  // X Normalize
  mX = norm.XAxis;
  // Y Normalize
  mY = norm.YAxis;
  // Z Normalize
  mZ = norm.ZAxis;

  sKeyboard = sKeyboard + String(mX) + "|" + String(mY) + "|" + String(mZ) + "|*";

}
getRTC.ino
// Date & Time
// DS3231 Precision RTC
void setupRTC() {

  // DS3231 Precision RTC
  if (! rtc.begin()) {
    //Serial.println("Couldn't find RTC");
    //Serial.flush();
    while (1) delay(10);
  }

  if (rtc.lostPower()) {
    //Serial.println("RTC lost power, let's set the time!");
    // When time needs to be set on a new device, or after a power loss, the
    // following line sets the RTC to the date & time this sketch was compiled
    rtc.adjust(DateTime(F(__DATE__), F(__TIME__)));
    // This line sets the RTC with an explicit date & time, for example to set
    // January 21, 2014 at 3am you would call:
    //rtc.adjust(DateTime(2023, 8, 10, 11, 0, 0));
  }

}
// Date and Time RTC
void isRTC () {

  // Date and Time
  dateRTC = "";
  timeRTC = "";
  DateTime now = rtc.now();

  // Date
  dateRTC = now.year(), DEC;
  dateRTC = dateRTC + "/";
  dateRTC = dateRTC + now.month(), DEC;
  dateRTC = dateRTC + "/";
  dateRTC = dateRTC + now.day(), DEC;

  Serial.print("Date: ");
  Serial.println(dateRTC);

  // Time
  timeRTC = now.hour(), DEC;
  timeRTC = timeRTC + ":";
  timeRTC = timeRTC + now.minute(), DEC;
  timeRTC = timeRTC + ":";
  timeRTC = timeRTC + now.second(), DEC;

  Serial.print("Time: ");
  Serial.println(timeRTC);

  sKeyboard = "SEN|" + sver + "|" + String(dateRTC) + "|" +
  String(timeRTC) + "|";

}
setup.ino
// Setup
void setup()
{

  // Give display time to power on
  delay(100);

  // Wire - Inialize I2C Hardware
  Wire.begin();

  // Give display time to power on
  delay(100);

  // Date & Time RTC
  // DS3231 Precision RTC
  setupRTC();

  // Initialize control over the keyboard:
  Keyboard.begin();

  // Setup Triple Axis Magnetometer
  isSetupMagnetometer();

  // Initialize the button pin as an input
  pinMode(iButton, INPUT);

  // Initialize digital pin LED_BUILTIN as an output
  pinMode(LED_BUILTIN, OUTPUT);
  // Turn the LED on HIGH
  digitalWrite(LED_BUILTIN, HIGH);

  delay( 5000 );

}
——
People can contact us: https://www.donluc.com/?page_id=1927
Technology Experience
- Programming Language
- Single-Board Microcontrollers (PIC, Arduino, Raspberry Pi,Espressif, etc…)
- IoT
- Wireless (Radio Frequency, Bluetooth, WiFi, Etc…)
- Robotics
- Camera and Video Capture Receiver Stationary, Wheel/Tank and Underwater Vehicle
- Unmanned Vehicles Terrestrial and Marine
- Machine Learning
- RTOS
- Research & Development (R & D)
Instructor, E-Mentor, STEAM, and Arts-Based Training
- Programming Language
- IoT
- PIC Microcontrollers
- Arduino
- Raspberry Pi
- Espressif
- Robotics
Follow Us
Luc Paquin – Curriculum Vitae – 2023
https://www.donluc.com/luc/
Web: https://www.donluc.com/
Facebook: https://www.facebook.com/neosteam.labs.9/
YouTube: https://www.youtube.com/@thesass2063
Twitter: https://twitter.com/labs_steam
Pinterest: https://www.pinterest.com/NeoSteamLabs/
Instagram: https://www.instagram.com/neosteamlabs/
Don Luc
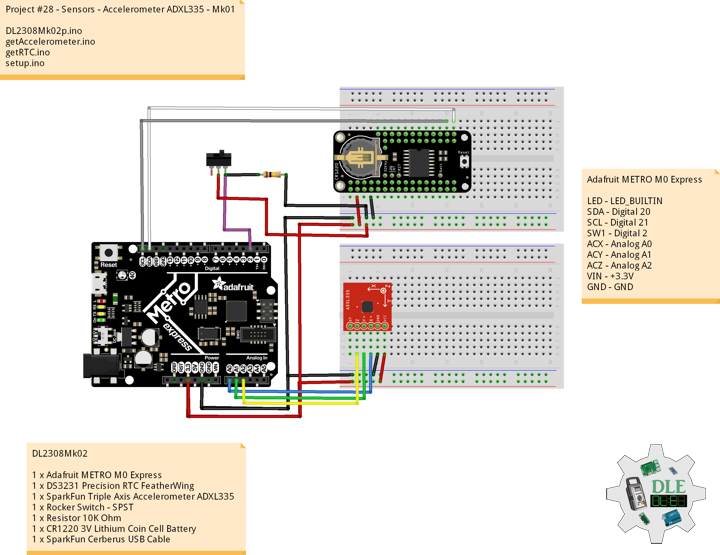
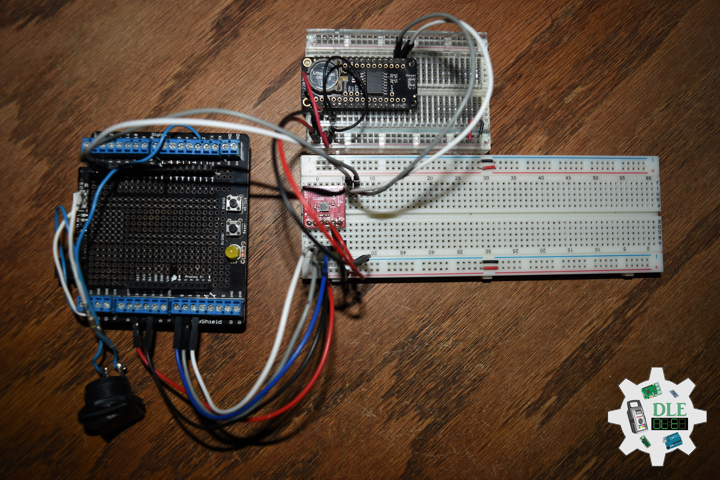
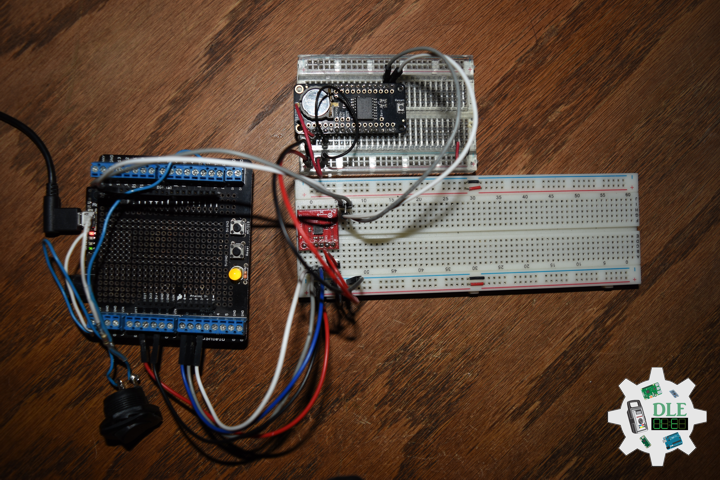
Project #28 – Sensors – Accelerometer ADXL335 – Mk01
——
#DonLucElectronics #DonLuc #Sensors #ADXL335 #Adafruit #SparkFun #Arduino #Project #Fritzing #Programming #Electronics #Microcontrollers #Consultant
——
——
——
——
Sensor
A sensor is a device that produces an output signal for the purpose of sensing a physical phenomenon. In the broadest definition, a sensor is a device, module, machine, or subsystem that detects events or changes in its environment and sends the information to other electronics, frequently a computer processor.
- Acoustic, sound, vibration
- Automotive
- Chemical
- Electric current, electric potential, magnetic, radio
- Environment, weather, moisture, humidity
- Flow, fluid velocity
- Ionizing radiation, subatomic particles
- Navigation instruments
- Position, angle, displacement, distance, speed, acceleration
- Optical, light, imaging, photon
- Pressure
- Force, density, level
- Thermal, heat, temperature
- Proximity, presence
- Sensor technology
- Speed sensor
- Others
- Etc…
SparkFun Triple Axis Accelerometer Breakout – ADXL335
Breakout board for the 3 axis ADXL335 from Analog Devices. This is the latest in a long, proven line of analog sensors, the holy grail of accelerometers. The ADXL335 is a triple axis MEMS accelerometer with extremely low noise and power consumption.
DL2308Mk02
1 x Adafruit METRO M0 Express
1 x DS3231 Precision RTC FeatherWing
1 x SparkFun Triple Axis Accelerometer ADXL335
1 x Rocker Switch – SPST
1 x Resistor 10K Ohm
1 x CR1220 3V Lithium Coin Cell Battery
1 x SparkFun Cerberus USB Cable
Adafruit METRO M0 Express
LED – LED_BUILTIN
SDA – Digital 20
SCL – Digital 21
SW1 – Digital 2
ACX – Analog A0
ACY – Analog A1
ACZ – Analog A2
VIN – +3.3V
GND – GND
——
DL2308Mk02p.ino
/****** Don Luc Electronics © ******
Software Version Information
Project #28 - Sensors - Accelerometer ADXL335 - Mk01
28-01
DL2308Mk02p.ino
1 x Adafruit METRO M0 Express
1 x DS3231 Precision RTC FeatherWing
1 x SparkFun Triple Axis Accelerometer ADXL335
1 x Rocker Switch - SPST
1 x Resistor 10K Ohm
1 x CR1220 3V Lithium Coin Cell Battery
1 x SparkFun Cerberus USB Cable
*/

// Include the Library Code
// DS3231 Precision RTC
#include <RTClib.h>
// Two Wire Interface (TWI/I2C)
#include <Wire.h>
// Keyboard
#include <Keyboard.h>

// Keyboard
String sKeyboard = "";

// DS3231 Precision RTC
RTC_DS3231 rtc;
String dateRTC = "";
String timeRTC = "";

// Accelerometer
int iX = A0;
int iY = A1;
int iZ = A2;
// Accelerometer
int X = 0;
int Y = 0;
int Z = 0;

// The number of the pushbutton pin
int iButton = 2;
// Variable for reading the pushbutton status
int buttonState = 0;

// Software Version Information
String sver = "28-01";

void loop() {

  // Date and Time RTC
  isRTC ();

  // Accelerometer
  isAccelerometer();

  // Read the state of the pushbutton value:
  buttonState = digitalRead(iButton);

  // Check if the pushbutton is pressed. If it is, the buttonState is HIGH:
  if (buttonState == HIGH) {

     Keyboard.println(sKeyboard);

  }

  // Delay 1 sec
  delay(1000);

}
getAccelerometer.ino
// Accelerometer
// Accelerometer
void isAccelerometer(){

  // Accelerometer X, Y, Z
  // X
  X = analogRead(iX);
  Serial.print("X: ");
  Serial.println(X);
  // Y
  Y = analogRead(iY);
  Serial.print("Y: ");
  Serial.println(Y);
  // Z
  Z = analogRead(iZ);
  Serial.print("Z: ");
  Serial.println(Z);

  sKeyboard = sKeyboard + String(X) + "|" + String(Y) + "|" + String(Z) + "|*";

}
getRTC.ino
// Date & Time
// DS3231 Precision RTC
void setupRTC() {

  // DS3231 Precision RTC
  if (! rtc.begin()) {
    Serial.println("Couldn't find RTC");
    Serial.flush();
    while (1) delay(10);
  }

  if (rtc.lostPower()) {
    Serial.println("RTC lost power, let's set the time!");
    // When time needs to be set on a new device, or after a power loss, the
    // following line sets the RTC to the date & time this sketch was compiled
    rtc.adjust(DateTime(F(__DATE__), F(__TIME__)));
    // This line sets the RTC with an explicit date & time, for example to set
    // January 21, 2014 at 3am you would call:
    //rtc.adjust(DateTime(2023, 8, 10, 11, 0, 0));
  }

}
// Date and Time RTC
void isRTC () {

  // Date and Time
  dateRTC = "";
  timeRTC = "";
  DateTime now = rtc.now();

  // Date
  dateRTC = now.year(), DEC;
  dateRTC = dateRTC + "/";
  dateRTC = dateRTC + now.month(), DEC;
  dateRTC = dateRTC + "/";
  dateRTC = dateRTC + now.day(), DEC;

  Serial.print("Date: ");
  Serial.println(dateRTC);

  // Time
  timeRTC = now.hour(), DEC;
  timeRTC = timeRTC + ":";
  timeRTC = timeRTC + now.minute(), DEC;
  timeRTC = timeRTC + ":";
  timeRTC = timeRTC + now.second(), DEC;

  Serial.print("Time: ");
  Serial.println(timeRTC);

  sKeyboard = "SEN|" + sver + "|" + String(dateRTC) + "|" +
  String(timeRTC) + "|";

}
setup.ino
// Setup
void setup()
{

  // Serial Begin
  Serial.begin(115200);
  Serial.println("Starting Serial work!");

  // Give display time to power on
  delay(100);

  // Wire - Inialize I2C Hardware
  Wire.begin();

  // Give display time to power on
  delay(100);

  // Date & Time RTC
  // DS3231 Precision RTC
  setupRTC();

  // Initialize control over the keyboard:
  Keyboard.begin();

  // Initialize the pushbutton pin as an input
  pinMode(iButton, INPUT);

  // Initialize digital pin LED_BUILTIN as an output
  pinMode(LED_BUILTIN, OUTPUT);
  // Turn the LED on HIGH
  digitalWrite(LED_BUILTIN, HIGH);

  delay( 5000 );

}
——
People can contact us: https://www.donluc.com/?page_id=1927
Technology Experience
- Programming Language
- Single-Board Microcontrollers (PIC, Arduino, Raspberry Pi,Espressif, etc…)
- IoT
- Wireless (Radio Frequency, Bluetooth, WiFi, Etc…)
- Robotics
- Camera and Video Capture Receiver Stationary, Wheel/Tank and Underwater Vehicle
- Unmanned Vehicles Terrestrial and Marine
- Machine Learning
- RTOS
- Research & Development (R & D)
Instructor, E-Mentor, STEAM, and Arts-Based Training
- Programming Language
- IoT
- PIC Microcontrollers
- Arduino
- Raspberry Pi
- Espressif
- Robotics
Follow Us
Luc Paquin – Curriculum Vitae – 2023
https://www.donluc.com/luc/
Web: https://www.donluc.com/
Facebook: https://www.facebook.com/neosteam.labs.9/
YouTube: https://www.youtube.com/@thesass2063
Twitter: https://twitter.com/labs_steam
Pinterest: https://www.pinterest.com/NeoSteamLabs/
Instagram: https://www.instagram.com/neosteamlabs/
Don Luc
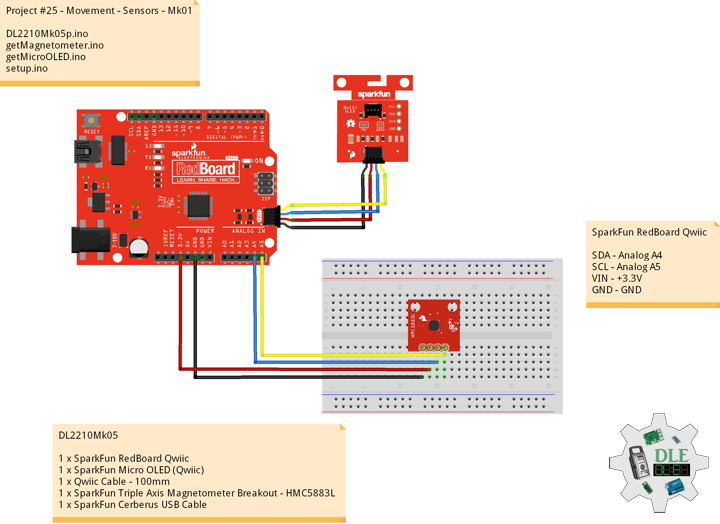
Project #25 – Movement – Sensors – Mk01
——
#DonLucElectronics #DonLuc #SparkFunRedBoard #Movement #Magnetometer #Arduino #Project #Fritzing #Programming #Electronics #Microcontrollers #Consultant
——
——
——
——
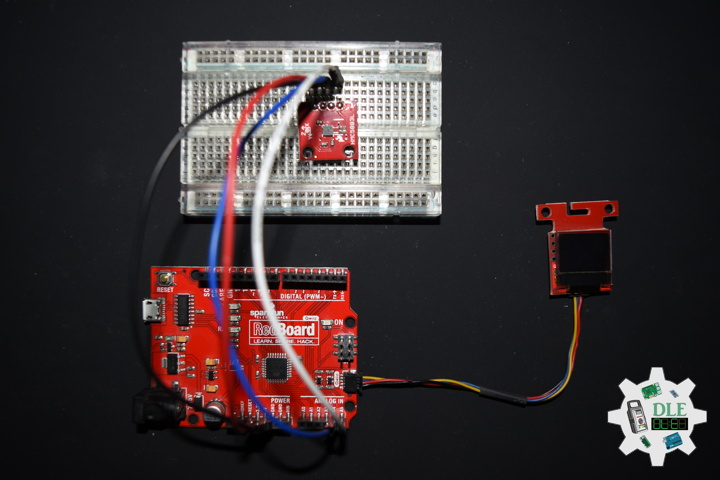
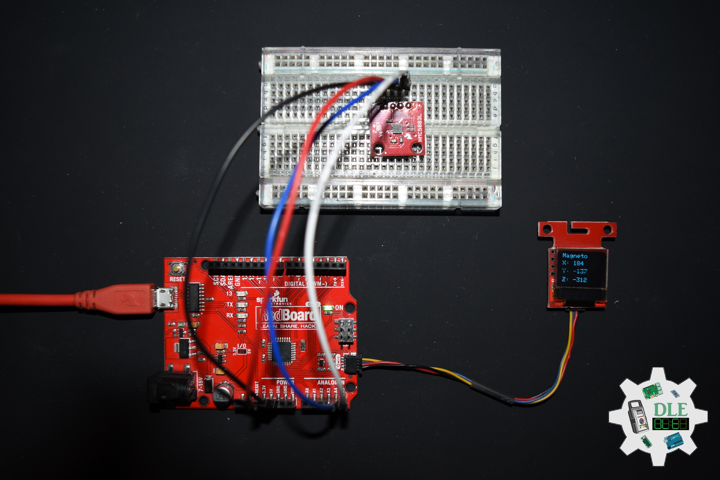
Movement
Accelerometers, gyroscopes, and magnetometers are the three main sensors we use for detecting motion and orientation. We can sense motion with an accelerometer.
Accelerometers are used to measure acceleration, that means linear motion in X, Y or Z. They can be used to detect when they are being moved around, detect motion, shock or vibration. They can also be used to detect gravitational pull in order to detect orientation or tilt.
Gyroscopes are used to measure rotational motion in X, Y or Z. They are often paired with accelerometers for inertial guidance systems, 3D motion capture and inverted pendulum type applications.
Magnetometers can sense where the strongest magnetic force is coming from, generally used to detect magnetic north, but can also be used for measuring magnetic fields. When combined with accelerometers and gyroscopes you can stabilize orientation calculations and also determine orientation with respect to the Earth.
Many 6-DoF sensors, which combine accelerometer and gyroscope or compass, accelerometer and magnetometer, and 9-DoF sensors that have 9DoF IMU accelerometers and gyroscopes and magnetometers.
DL2210Mk05
1 x SparkFun RedBoard Qwiic
1 x SparkFun Micro OLED (Qwiic)
1 x Qwiic Cable – 100mm
1 x SparkFun Triple Axis Magnetometer Breakout – HMC5883L
1 x SparkFun Cerberus USB Cable
SparkFun RedBoard Qwiic
SDA – Analog A4
SCL – Analog A5
VIN – +3.3V
GND – GND
DL2210Mk05p.ino
/* ***** Don Luc Electronics © *****
Software Version Information
Project #25 - Movement - Sensors - Mk01
25-01
DL2210Mk05p.ino
1 x SparkFun RedBoard Qwiic
1 x SparkFun Micro OLED (Qwiic)
1 x Qwiic Cable - 100mm
1 x SparkFun Triple Axis Magnetometer Breakout - HMC5883L
1 x SparkFun Cerberus USB Cable
*/

// Include the Library Code
// Two Wire Interface (TWI/I2C)
#include <Wire.h>
// Triple Axis Magnetometer
#include <HMC5883L.h>
// SparkFun Micro OLED
#include <SFE_MicroOLED.h>

// Triple Axis Magnetometer
HMC5883L compass;

// SparkFun Micro OLED
#define PIN_RESET 9
#define DC_JUMPER 1
// I2C declaration
MicroOLED oled(PIN_RESET, DC_JUMPER);

// Triple Axis Magnetometer
int X = 0;
int Y = 0;
int Z = 0;

// Software Version Information
String sver = "25-01";

void loop() {

  // Triple Axis Magnetometer
  isMagnetometer(),

  // Micro OLED
  isMicroOLED();

  // One delay in between reads
  delay(1000);

}
getMagnetometer.ino
// Magnetometer
// Setup Magnetometer
void isSetupMagnetometer(){

  // Magnetometer Serial
  // Initialize HMC5883L
  while (!compass.begin())
  {
    delay(500);
  }

  // Set measurement range
  // +/- 1.30 Ga: HMC5883L_RANGE_1_3GA (default)
  compass.setRange(HMC5883L_RANGE_1_3GA);

  // Set measurement mode
  // Continuous-Measurement: HMC5883L_CONTINOUS (default)
  compass.setMeasurementMode(HMC5883L_CONTINOUS);

  // Set data rate
  // 15.00Hz: HMC5883L_DATARATE_15HZ (default)
  compass.setDataRate(HMC5883L_DATARATE_15HZ);

  // Set number of samples averaged
  // 1 sample:  HMC5883L_SAMPLES_1 (default)
  compass.setSamples(HMC5883L_SAMPLES_1);

}
// Magnetometer
void isMagnetometer(){

  // Vector Norm
  Vector norm = compass.readNormalize();
  // Vector X, Y, Z
  // X Normalize
  X = norm.XAxis;
  // Y Normalize
  Y = norm.YAxis;
  // Z Normalize
  Z = norm.ZAxis;

}
getMicroOLED.ino
// SparkFun Micro OLED
// Setup Micro OLED
void isSetupMicroOLED() {

  // Initialize the OLED
  oled.begin();
  // Clear the display's internal memory
  oled.clear(ALL);
  // Display what's in the buffer (splashscreen)
  oled.display();

  // Delay 1000 ms
  delay(1000);

  // Clear the buffer.
  oled.clear(PAGE);

}
// Micro OLED
void isMicroOLED() {

  // Text Display Magnetometer
  // Clear the display
  oled.clear(PAGE);
  // Set cursor to top-left
  oled.setCursor(0, 0);
  // Set font to type 0
  oled.setFontType(0);
  // Magnetometer
  oled.print("Magneto");
  oled.setCursor(0, 12);
  // X Normalize
  oled.print("X: ");
  oled.print(X);
  oled.setCursor(0, 25);
  // Y Normalize
  oled.print("Y: ");
  oled.print(Y);
  oled.setCursor(0, 39);
  // Z Normalize
  oled.print("Z: ");
  oled.print(Z);
  oled.display();

}
setup.ino
// Setup
void setup() {

  // Give display time to power on
  delay(100);

  // Set up I2C bus
  Wire.begin();

  // Setup Triple Axis Magnetometer
  isSetupMagnetometer();

  // Setup Micro OLED
  isSetupMicroOLED();

}
——
People can contact us: https://www.donluc.com/?page_id=1927
Technology Experience
- Single-Board Microcontrollers (PIC, Arduino, Raspberry Pi,Espressif, etc…)
- IoT
- Wireless (Radio Frequency, Bluetooth, WiFi, Etc…)
- Robotics
- Camera and Video Capture Receiver Stationary, Wheel/Tank and Underwater Vehicle
- Unmanned Vehicles Terrestrial and Marine
- Machine Learning
- RTOS
- Research & Development (R & D)
Instructor and E-Mentor
- IoT
- PIC Microcontrollers
- Arduino
- Raspberry Pi
- Espressif
- Robotics
Follow Us
J. Luc Paquin – Curriculum Vitae – 2022 English & Español
https://www.jlpconsultants.com/luc/
Web: https://www.donluc.com/
Web: https://www.jlpconsultants.com/
Facebook: https://www.facebook.com/neosteam.labs.9/
YouTube: https://www.youtube.com/channel/UC5eRjrGn1CqkkGfZy0jxEdA
Twitter: https://twitter.com/labs_steam
Pinterest: https://www.pinterest.com/NeoSteamLabs/
Instagram: https://www.instagram.com/neosteamlabs/
Don Luc