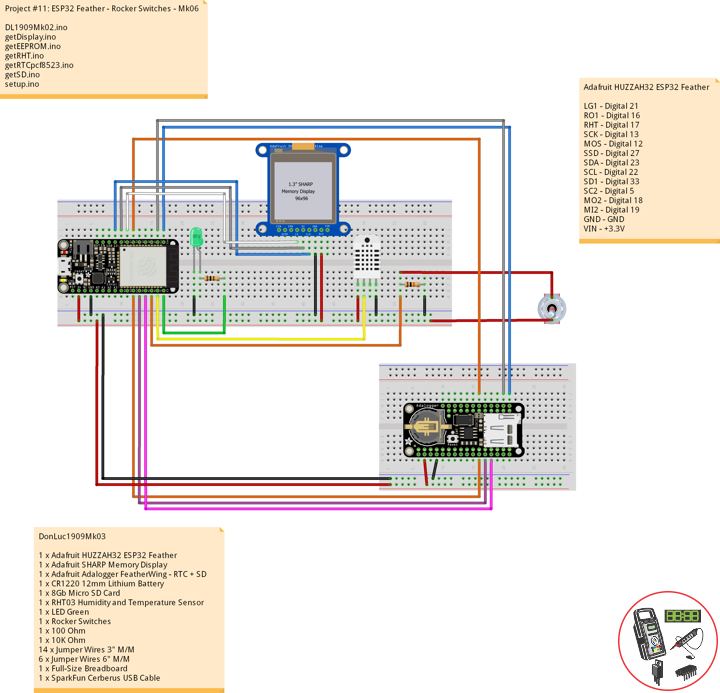
Program ESP32
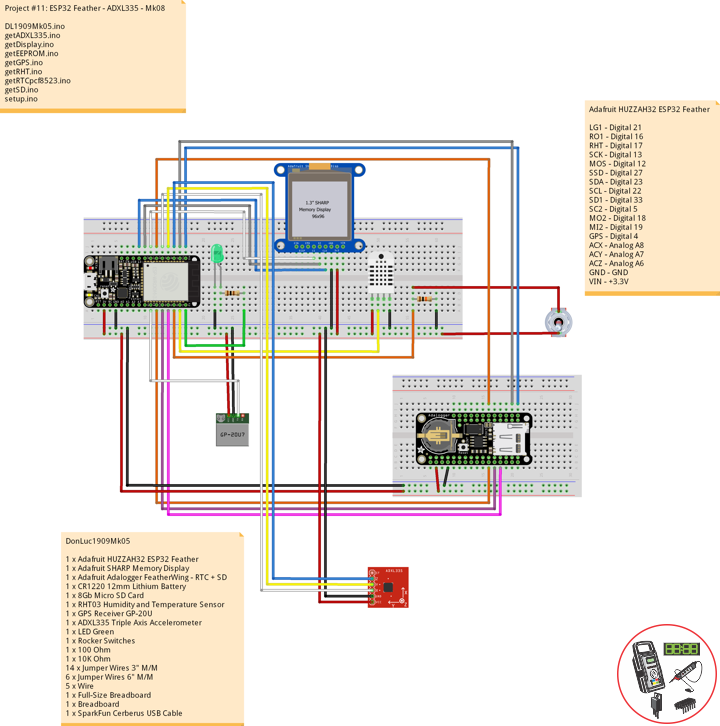
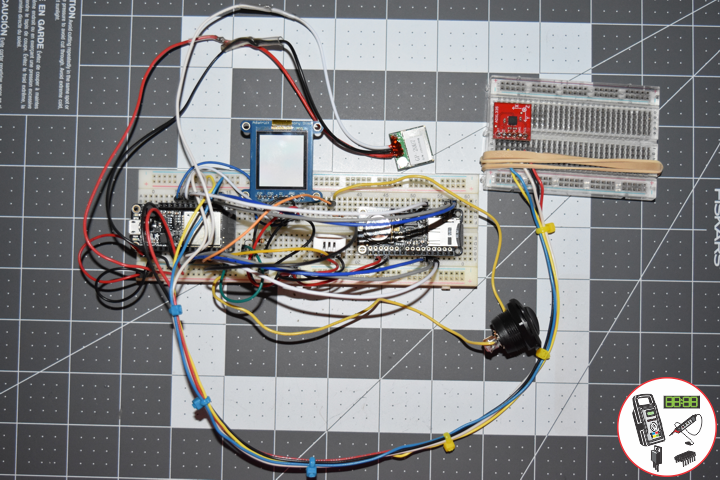
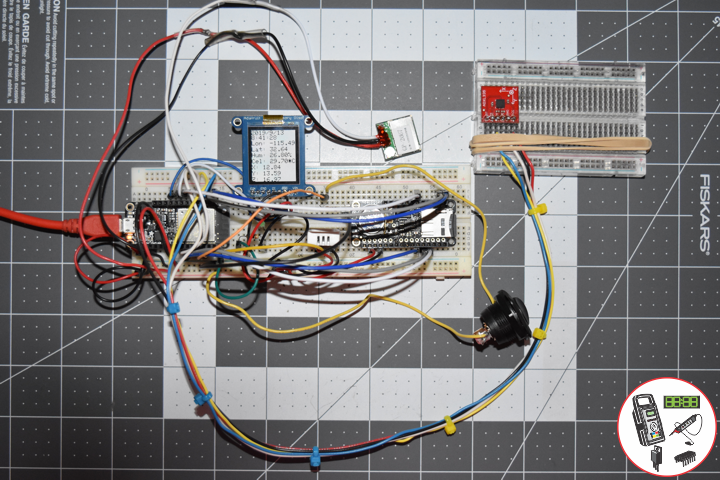
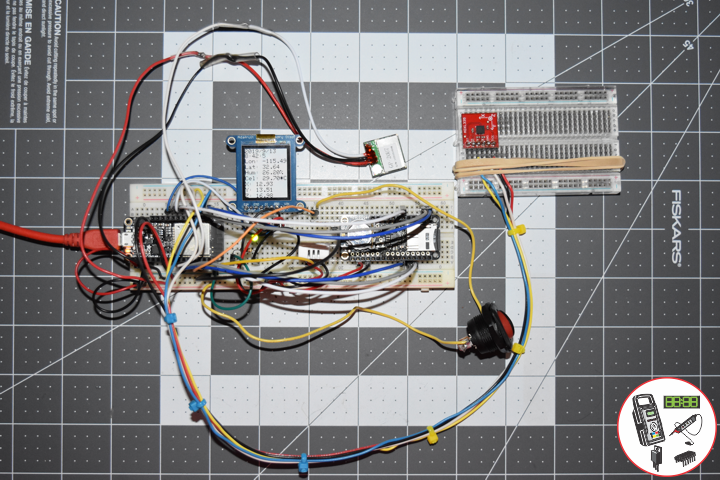
Project #11: ESP32 Feather – ADXL335 – Mk08
ESP32 Feather – ADXL335
——
——
——
——
——
——
ADXL335 Triple Axis Accelerometer
Breakout board for the 3 axis ADXL335 from Analog Devices. This is the latest in a long, proven line of analog sensors – the holy grail of accelerometers. The ADXL335 is a triple axis MEMS accelerometer with extremely low noise and power consumption – only 320uA! The sensor has a full sensing range of +/-3g.
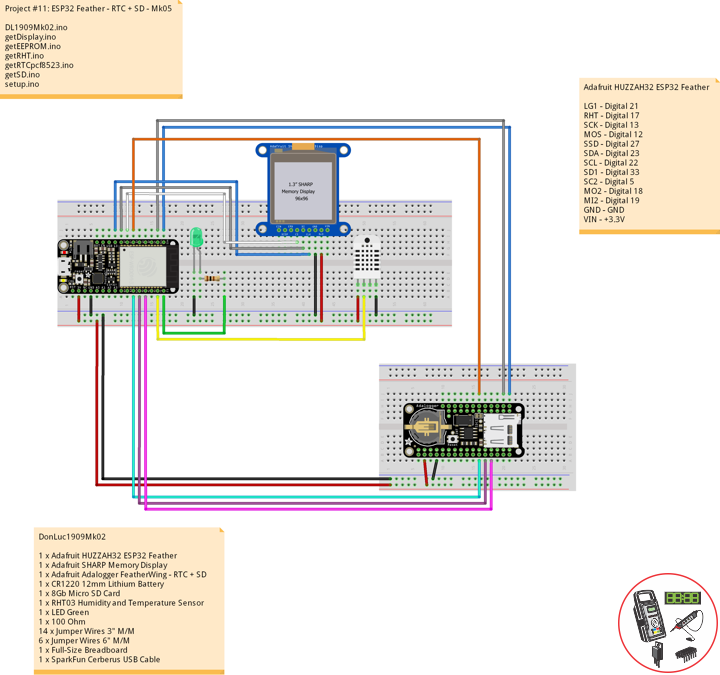
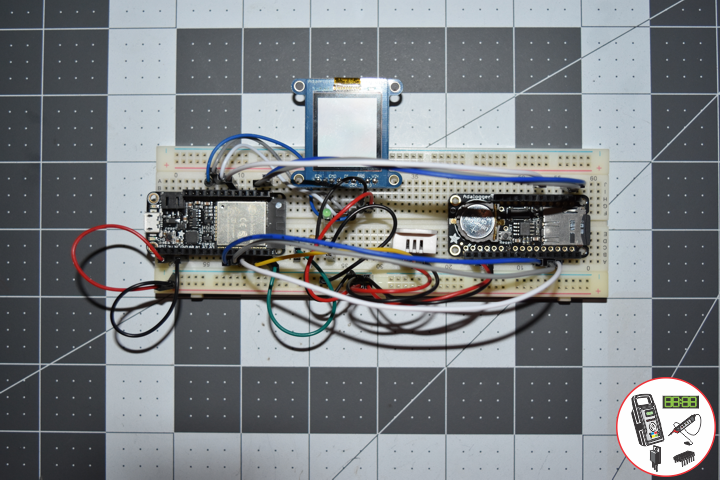
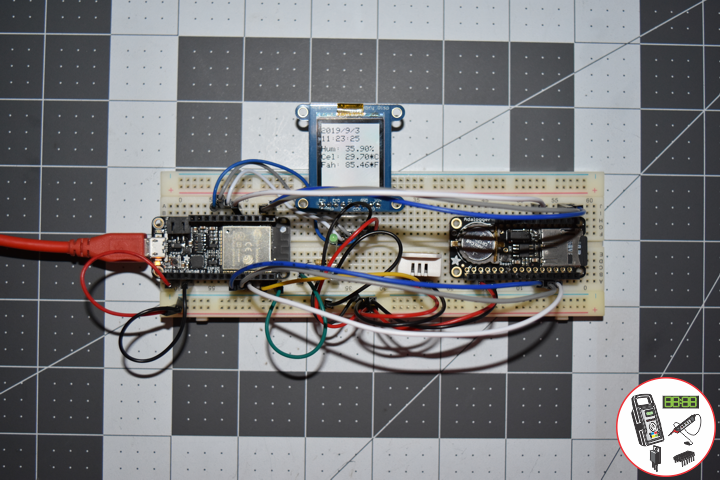
DonLuc1909Mk05
1 x Adafruit HUZZAH32 ESP32 Feather
1 x Adafruit SHARP Memory Display
1 x Adafruit Adalogger FeatherWing – RTC + SD
1 x CR1220 12mm Lithium Battery
1 x 8Gb Micro SD Card
1 x RHT03 Humidity and Temperature Sensor
1 x GPS Receiver GP-20U
1 x ADXL335 Triple Axis Accelerometer
1 x LED Green
1 x Rocker Switches
1 x 100 Ohm
1 x 10K Ohm
14 x Jumper Wires 3″ M/M
6 x Jumper Wires 6″ M/M
5 x Wire
1 x Full-Size Breadboard
1 x Breadboard
1 x SparkFun Cerberus USB Cable
Adafruit HUZZAH32 ESP32 Feather
LG1 – Digital 21
RO1 – Digital 16
RHT – Digital 17
SCK – Digital 13
MOS – Digital 12
SSD – Digital 27
SDA – Digital 23
SCL – Digital 22
SD1 – Digital 33
SC2 – Digital 5
MO2 – Digital 18
MI2 – Digital 19
GPS – Digital 4
ACX – Analog A8
ACY – Analog A7
ACZ – Analog A6
GND – GND
VIN – +3.3V
DL1909Mk05.ino
// ***** Don Luc Electronics *****
// Software Version Information
// Project #11: HUZZAH32 ESP32 Feather - ADXL335 - Mk08
// 09-05
// DL1909Mk05p.ino 11-08
// Adafruit HUZZAH32 ESP32 Feather Board
// SHARP Display
// LED Green
// Adalogger FeatherWing - RTC + SD
// EEPROM
// RHT03 Humidity and Temperature Sensor
// Rocker Switches
// GPS Receiver
// ADXL335 Triple Axis Accelerometer

// include Library Code
// SHARP Memory Display
#include <Adafruit_SharpMem.h>
#include <Adafruit_GFX.h>
// Date and Time
#include "RTClib.h"
// EEPROM library to read EEPROM with unique ID for unit
#include "EEPROM.h"
// RHT Humidity and Temperature Sensor
#include <SparkFun_RHT03.h>
// SD Card
#include "FS.h"
#include "SD.h"
#include "SPI.h"
// GPS Receiver
#include <TinyGPS++.h>
#include <HardwareSerial.h>
// ADXL335 Triple Axis Accelerometer
#include <ADXL335.h>

// SHARP Memory Display
// any pins can be used
#define SHARP_SCK  13
#define SHARP_MOSI 12
#define SHARP_SS   27
// Set the size of the display here, e.g. 144x168!
Adafruit_SharpMem display(SHARP_SCK, SHARP_MOSI, SHARP_SS, 144, 168);
// The currently-available SHARP Memory Display (144x168 pixels)
// requires > 4K of microcontroller RAM; it WILL NOT WORK on Arduino Uno
// or other <4K "classic" devices!
#define BLACK 0
#define WHITE 1
int minorHalfSize; // 1/2 of lesser of display width or height

// LED Green
int iLEDGreen =  21;                 // LED Green

// PCF8523 Precision RTC
RTC_PCF8523 rtc;
String dateRTC = "";
String timeRTC = "";

// RHT Humidity and Temperature Sensor
const int RHT03_DATA_PIN = 17;          // RHT03 data pin Digital 17
RHT03 rht;                              // This creates a RTH03 object, which we'll use to interact with the sensor
float latestHumidity;
float latestTempC;
float latestTempF;

// SD Card
const int chipSelect = 33;              // SD Card
String zzzzzz = "";

// Rocker Switches
int iRow1 = 16;                         // Rocker Switches Digital 16
int iRow1State = 0;                     // Variable for reading the pushbutton status

// ESP32 HardwareSerial
HardwareSerial tGPS(2);

// GPS Receiver
#define gpsRXPIN 4
#define gpsTXPIN 36                     // This one is unused and doesnt have a conection
// The TinyGPS++ object
TinyGPSPlus gps;
float TargetLat;
float TargetLon;
int Status = 0;

// ADXL335 Triple Axis Accelerometer
const int pin_x = A8;
const int pin_y = A7;
const int pin_z = A6;
const float aref = 3.3;
ADXL335 accel(pin_x, pin_y, pin_z, aref);
String latestX = "";
String latestY = "";
String latestZ = "";

// The current address in the EEPROM (i.e. which byte
// we're going to  read to next)
#define EEPROM_SIZE 64
String sver = "9-5.p";
// Unit ID information
String uid = "";

void loop() {

  // Receives NEMA data from GPS receiver
  // This sketch displays information every time a new sentence is correctly encoded.
  while ( tGPS.available() > 0)
    if (gps.encode( tGPS.read() ))
    {
     displayInfo();
    }

  if (millis() > 5000 && gps.charsProcessed() < 10)
  {
    while(true);
  }

  // Date and Time
  isRTC();

  // RHT03 Humidity and Temperature Sensor
  isRHT03();

  // SHARP Memory Display On
  isDisplayOn();

  // Rocker Switched
  // Read the state of the iRow1 value
  iRow1State = digitalRead(iRow1);

  // ADXL335 Triple Axis Accelerometer
  getADXL335();

  // Check if the pushbutton is pressed. If it is, the buttonState is HIGH:
  if (iRow1State == HIGH) {

    // iLEDGreen
    digitalWrite(iLEDGreen,  HIGH );
    // SD Card
    isSD();

  } else {

    // iLEDGreen
    digitalWrite(iLEDGreen,  LOW );

  }

  // Delay
  delay( 1000 );

}
getADXL335.ino
// ADXL335 Triple Axis Accelerometer
void getADXL335()
{

  // This is required to update the values
  accel.update();

  // This tells us how long the string is
  int string_width;

  float x;
  float y;
  float z;

  x = accel.getX();
  y = accel.getY();
  // If the project is laying flat and top up the z axis reads ~1G
  z = accel.getZ();

  latestX = formatFloat(x, 2, &string_width);
  latestY = formatFloat(y, 2, &string_width);
  latestZ = formatFloat(z, 2, &string_width);

}
// Format float library
String formatFloat(double value, int places, int* string_width)
{

  // If value is positive infinity
  if (isinf(value) > 0)
  {
    return "+Inf";
  }

  // Arduino does not seem to have negative infinity
  // keeping this code block for reference
  // if value is negative infinity
  if(isinf(value) < 0)
  {
    return "-Inf";
  }

  // If value is not a number
  if(isnan(value) > 0)
  {
    return "NaN";
  }

  // Always include a space for the dot
  int num_width = 1;

  // If the number of decimal places is less than 1
  if (places < 1)
  {

    // Set places to 1
    places = 1;

    // And truncate the value
    value = (float)((int)value);

  }

  // Add the places to the right of the decimal
  num_width += places;

  // If the value does not contain an integral part
  if (value < 1.0 && value > -1.0)
  {

    // Add one for the integral zero
    num_width++;

  }
  else
  {

    // Get the integral part and get the number of places to the left of decimal
    num_width += ((int)log10(abs(value))) + 1;

  }

  // If the value in less than 0
  if (value < 0.0)
  {

    // Add a space for the minus sign
    num_width++;

  }

  // Make a string the size of the number plus 1 for string terminator
  char s[num_width + 1];

  // Put the string terminator at the end
  s[num_width] = '\0';

  // Initalize the array to all zeros
  for (int i = 0; i < num_width; i++)
  {

    s[i] = '0';

  }

  // Characters that are not changed by the function below will be zeros
  // set the out variable string width lets the caller know what we came up with
  *string_width = num_width;

  // Use the avr-libc function dtosrtf to format the value
  return String(dtostrf(value,num_width,places,s));

}
getDisplay.ino
// SHARP Memory Display On
void isDisplayOn() {

    // Clear Display
    display.clearDisplay();
    // text display date, time, LED on
    display.setRotation(4);
    display.setTextSize(2);
    display.setTextColor(BLACK);
    display.setCursor(0,1);
    display.println( dateRTC );
    display.setCursor(0,17);
    display.println( timeRTC );
    //display.setTextSize(2);
    display.setCursor(0,35);
    display.print("Lon: ");
    display.println( TargetLon );
    display.setCursor(0,55);
    display.print("Lat: ");
    display.println( TargetLat );
    display.setCursor(0,74);
    display.print("Hum: ");
    display.print( latestHumidity );
    display.println("%");
    display.setCursor(0,94);
    display.print("Cel: ");
    display.print( latestTempC );
    display.println("*C");
    display.setCursor(0,114);
    display.print("X: ");
    display.println( latestX );
    display.setCursor(0,134);
    display.print("Y: ");
    display.println( latestY );
    display.setCursor(0,154);
    display.print("Z: ");
    display.println( latestZ );
    display.refresh();

}
// SHARP Memory Display - UID
void isDisplayUID() {

    // text display EEPROM
    display.setRotation(4);
    display.setTextSize(2);
    display.setTextColor(BLACK);
    display.setCursor(0,20);
    display.print( "UID: " );
    display.println( uid );
   // display.setTextSize();
    display.setTextColor(BLACK);
    display.setCursor(0,45);
    display.print( "VER: ");
    display.println( sver  );
    display.refresh();
    delay( 100 );

}
getEEPROM.ino
// EEPROM
void GetUID()
{

  // Get unit ID
  uid = "";
  for (int x = 0; x < 5; x++)
  {
    uid = uid + char(EEPROM.read(x));
  }

}
getGPS.ino
// GPS Receiver
void setupGPS() {

  // Setup GPS
  tGPS.begin(  9600 , SERIAL_8N1, gpsRXPIN, gpsTXPIN );

}
// GPS Vector Pointer Target
void displayInfo()
{

  // Location
  if (gps.location.isValid())
  {

    TargetLat = gps.location.lat();
    TargetLon = gps.location.lng();
    Status = 2;

  }
  else
  {

    Status = 0;

  }

}
getRHT.ino
// RHT03 Humidity and Temperature Sensor
void isRHT03(){

  // Call rht.update() to get new humidity and temperature values from the sensor.
  int updateRet = rht.update();

  // The humidity(), tempC(), and tempF() functions can be called -- after
  // a successful update() -- to get the last humidity and temperature value
  latestHumidity = rht.humidity();
  latestTempC = rht.tempC();
  latestTempF = rht.tempF();

}
getRTCpcf8523.ino
// PCF8523 Precision RTC
void setupRTC() {

  // pcf8523 Precision RTC
  if (! rtc.begin()) {
    while (1);
  }
  if (! rtc.initialized()) {
    // Following line sets the RTC to the date & time this sketch was compiled
    rtc.adjust(DateTime(F(__DATE__), F(__TIME__)));
    // This line sets the RTC with an explicit date & time, for example to set
    // January 21, 2014 at 3am you would call:
    // rtc.adjust(DateTime(2018, 9, 29, 12, 17, 0));
  }

}
// Date and Time RTC
void isRTC () {

  // Date and Time
  DateTime now = rtc.now();
  // Date
  dateRTC = now.year(), DEC;
  dateRTC = dateRTC + "/";
  dateRTC = dateRTC + now.month(), DEC;
  dateRTC = dateRTC + "/";
  dateRTC = dateRTC + now.day(), DEC;
  // Time
  timeRTC = now.hour(), DEC;
  timeRTC = timeRTC + ":";
  timeRTC = timeRTC + now.minute(), DEC;
  timeRTC = timeRTC + ":";
  timeRTC = timeRTC + now.second(), DEC;

}
getSD.ino
// SD Card
void setupSD() {

  // SD Card
    pinMode( chipSelect , OUTPUT );
    if(!SD.begin( chipSelect )){
        ;
        return;
    }
    uint8_t cardType = SD.cardType();

    if(cardType == CARD_NONE){
        ;
        return;
    }

    //Serial.print("SD Card Type: ");
    if(cardType == CARD_MMC){
        ;
    } else if(cardType == CARD_SD){
        ;
    } else if(cardType == CARD_SDHC){
        ;
    } else {
        ;
    }

    uint64_t cardSize = SD.cardSize() / (1024 * 1024);

}
// SD Card
void isSD() {

  zzzzzz = "";

  zzzzzz = uid + "|" + sver + "|" + dateRTC + "|" + timeRTC + "|" + Status + "|" + TargetLon + "|" + TargetLat + "|" + latestHumidity + "|" + latestTempC + "|" + latestTempF + "|" + latestX + "|" + latestY + "|" + latestZ + "|\r";

  char msg[zzzzzz.length() + 1];

  zzzzzz.toCharArray(msg, zzzzzz.length() + 1);

  appendFile(SD, "/espdata.txt", msg );

}
// List Dir
void listDir(fs::FS &fs, const char * dirname, uint8_t levels){
    dirname;
    File root = fs.open(dirname);
    if(!root){
        return;
    }
    if(!root.isDirectory()){
        return;
    }

    File file = root.openNextFile();
    while(file){
        if(file.isDirectory()){
            file.name();
            if(levels){
                listDir(fs, file.name(), levels -1);
            }
        } else {
            file.name();
            file.size();
        }
        file = root.openNextFile();
    }
}
// Write File
void writeFile(fs::FS &fs, const char * path, const char * message){
    path;
    File file = fs.open(path, FILE_WRITE);
    if(!file){
        return;
    }
    if(file.print(message)){
        ;
    } else {
        ;
    }
    file.close();
}
// Append File
void appendFile(fs::FS &fs, const char * path, const char * message){
    //Serial.printf("Appending to file: %s\n", path);
    path;
    File file = fs.open(path, FILE_APPEND);
    if(!file){
        return;
    }
    if(file.print(message)){
        ;
    } else {
        ;
    }
    file.close();
}
setup.ino
// Setup
void setup() {

  // EEPROM with unique ID
  EEPROM.begin(EEPROM_SIZE);

  // Get Unit ID
  GetUID();

  // GPS Receiver
  // Setup GPS
  setupGPS();

  // SHARP Display start & clear the display
  display.begin();
  display.clearDisplay();

  isDisplayUID();

  delay( 5000 );

  // Initialize the LED Green
  pinMode(iLEDGreen, OUTPUT);

  // PCF8523 Precision RTC
  setupRTC();

  // Date and Time RTC
  isRTC();

  // RHT03 Humidity and Temperature Sensor
  // Call rht.begin() to initialize the sensor and our data pin
  rht.begin(RHT03_DATA_PIN);

  // SD Card
  setupSD();

  // Rocker Switches
  pinMode(iRow1, INPUT);

}
Follow Us
Web: https://www.donluc.com/
Web: http://neosteamlabs.com/
Web: http://www.jlpconsultants.com/
YouTube: https://www.youtube.com/channel/UC5eRjrGn1CqkkGfZy0jxEdA
Facebook: https://www.facebook.com/neosteam.labs.9/
Instagram: https://www.instagram.com/neosteamlabs/
Pinterest: https://www.pinterest.com/NeoSteamLabs/
Twitter: https://twitter.com/labs_steam
Etsy: https://www.etsy.com/shop/NeoSteamLabs
Don Luc
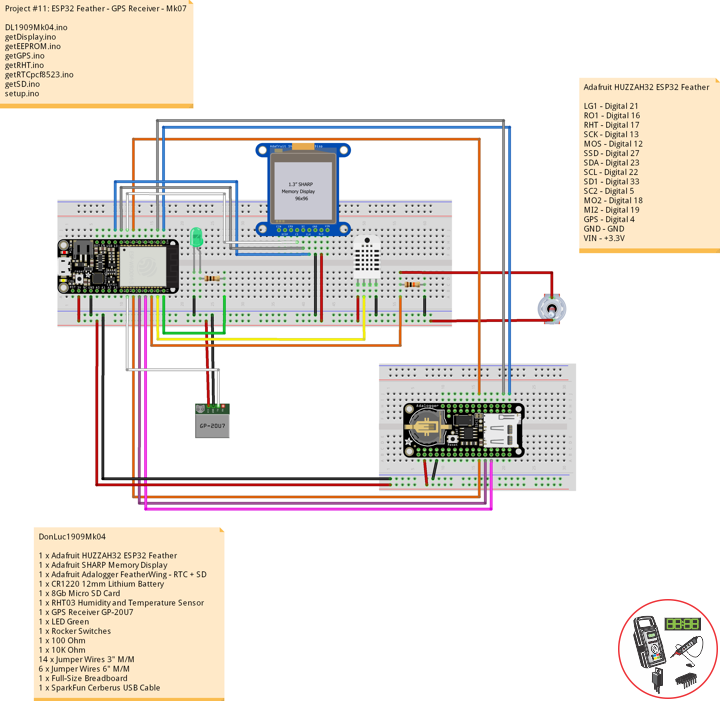
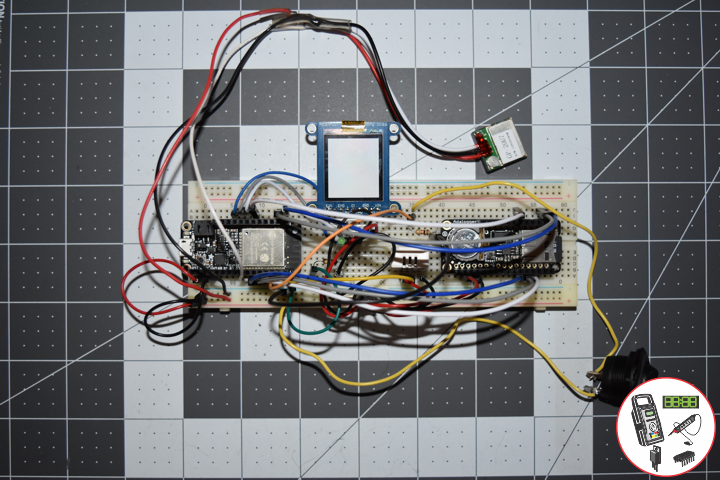
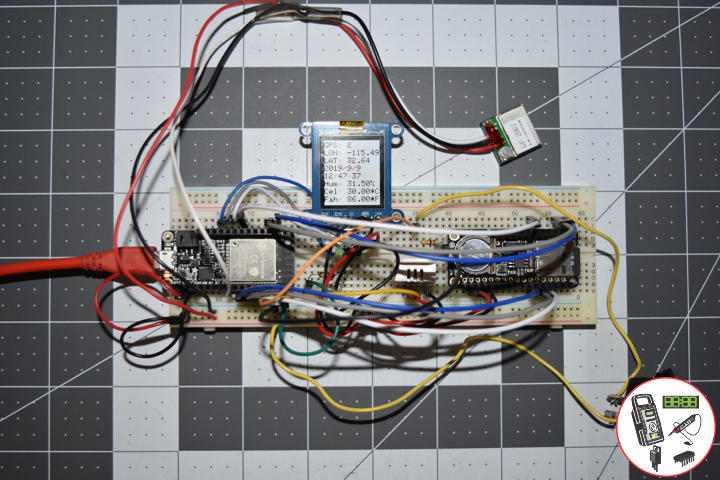
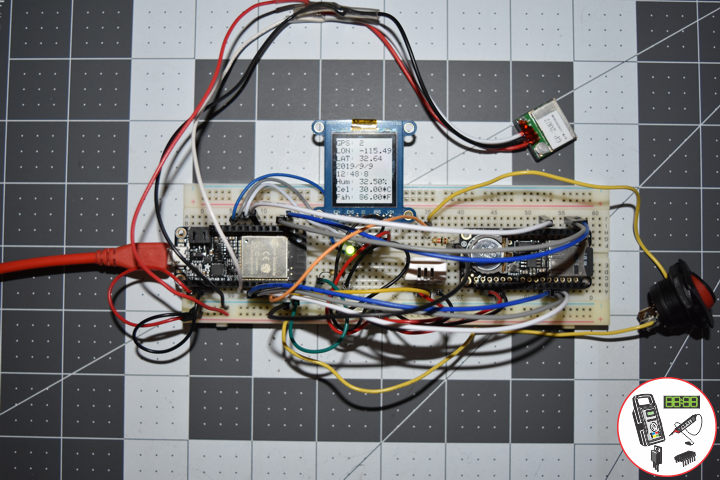
Project #11: ESP32 Feather – GPS Receiver – Mk07
ESP32 Feather – GPS Receiver
——
——
——
——
——
——
Global Positioning System
The Global Positioning System (GPS), originally Navstar GPS, is a satellite-based radionavigation system owned by the United States government and operated by the United States Air Force. It is a global navigation satellite system that provides geolocation and time information to a GPS receiver anywhere on or near the Earth where there is an unobstructed line of sight to four or more GPS satellites. Obstacles such as mountains and buildings block the relatively weak GPS signals.
The GPS does not require the user to transmit any data, and it operates independently of any telephonic or internet reception, though these technologies can enhance the usefulness of the GPS positioning information. The GPS provides critical positioning capabilities to military, civil, and commercial users around the world. The United States government created the system, maintains it, and makes it freely accessible to anyone with a GPS receiver.
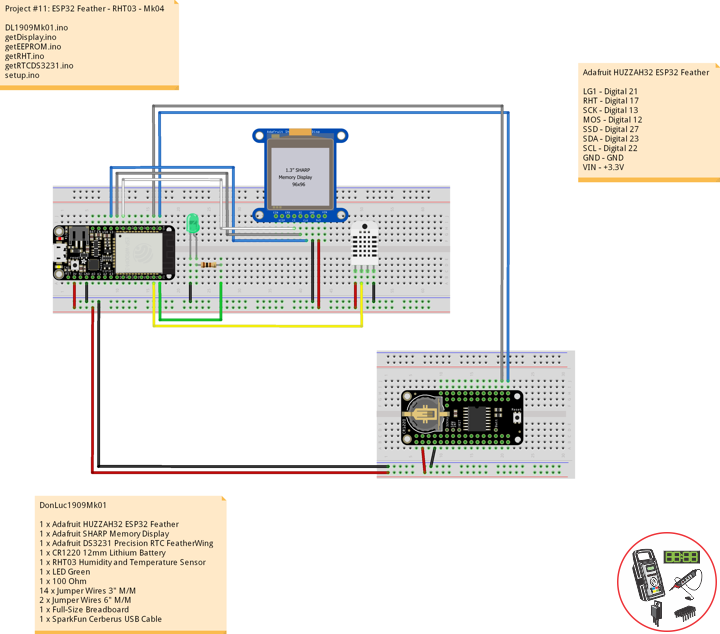
DonLuc1909Mk04
1 x Adafruit HUZZAH32 ESP32 Feather
1 x Adafruit SHARP Memory Display
1 x Adafruit Adalogger FeatherWing – RTC + SD
1 x CR1220 12mm Lithium Battery
1 x 8Gb Micro SD Card
1 x RHT03 Humidity and Temperature Sensor
1 x GPS Receiver GP-20U7
1 x LED Green
1 x Rocker Switches
1 x 100 Ohm
1 x 10K Ohm
14 x Jumper Wires 3″ M/M
6 x Jumper Wires 6″ M/M
1 x Full-Size Breadboard
1 x SparkFun Cerberus USB Cable
Adafruit HUZZAH32 ESP32 Feather
LG1 – Digital 21
RO1 – Digital 16
RHT – Digital 17
SCK – Digital 13
MOS – Digital 12
SSD – Digital 27
SDA – Digital 23
SCL – Digital 22
SD1 – Digital 33
SC2 – Digital 5
MO2 – Digital 18
MI2 – Digital 19
GPS – Digital 4
GND – GND
VIN – +3.3V
DL1909Mk04.ino
// ***** Don Luc Electronics *****
// Software Version Information
// Project #11: HUZZAH32 ESP32 Feather - GPS Receiver - Mk07
// 09-04
// DL1909Mk04p.ino 11-07
// Adafruit HUZZAH32 ESP32 Feather Board
// SHARP Display
// LED Green
// Adalogger FeatherWing - RTC + SD
// EEPROM
// RHT03 Humidity and Temperature Sensor
// Rocker Switches
// GPS Receiver

// include Library Code
// SHARP Memory Display
#include <Adafruit_SharpMem.h>
#include <Adafruit_GFX.h>
// Date and Time
#include "RTClib.h"
// EEPROM library to read EEPROM with unique ID for unit
#include "EEPROM.h"
// RHT Humidity and Temperature Sensor
#include <SparkFun_RHT03.h>
// SD Card
#include "FS.h"
#include "SD.h"
#include "SPI.h"
// GPS Receiver
#include <TinyGPS++.h>
#include <HardwareSerial.h>

// SHARP Memory Display
// any pins can be used
#define SHARP_SCK  13
#define SHARP_MOSI 12
#define SHARP_SS   27
// Set the size of the display here, e.g. 144x168!
Adafruit_SharpMem display(SHARP_SCK, SHARP_MOSI, SHARP_SS, 144, 168);
// The currently-available SHARP Memory Display (144x168 pixels)
// requires > 4K of microcontroller RAM; it WILL NOT WORK on Arduino Uno
// or other <4K "classic" devices!
#define BLACK 0
#define WHITE 1
int minorHalfSize; // 1/2 of lesser of display width or height

// LED Green
int iLEDGreen =  21;                 // LED Green

// PCF8523 Precision RTC
RTC_PCF8523 rtc;
String dateRTC = "";
String timeRTC = "";

// The current address in the EEPROM (i.e. which byte
// we're going to  read to next)
#define EEPROM_SIZE 64
String sver = "9-4.p";
// Unit ID information
String uid = "";

// RHT Humidity and Temperature Sensor
const int RHT03_DATA_PIN = 17;          // RHT03 data pin Digital 17
RHT03 rht;                              // This creates a RTH03 object, which we'll use to interact with the sensor
float latestHumidity;
float latestTempC;
float latestTempF;

// SD Card
const int chipSelect = 33;              // SD Card
String zzzzzz = "";

// Rocker Switches
int iRow1 = 16;                         // Rocker Switches Digital 16
int iRow1State = 0;                     // Variable for reading the pushbutton status

// ESP32 HardwareSerial
HardwareSerial tGPS(2);

// GPS Receiver
#define gpsRXPIN 4
#define gpsTXPIN 36                     // This one is unused and doesnt have a conection
// The TinyGPS++ object
TinyGPSPlus gps;
float TargetLat;
float TargetLon;
int Status = 0;

void loop() {

  // Receives NEMA data from GPS receiver
  // This sketch displays information every time a new sentence is correctly encoded.
  while ( tGPS.available() > 0)
    if (gps.encode( tGPS.read() ))
    {
     displayInfo();
    }

  if (millis() > 5000 && gps.charsProcessed() < 10)
  {
    while(true);
  }

  // Date and Time
  isRTC();

  // RHT03 Humidity and Temperature Sensor
  isRHT03();

  // SHARP Memory Display On
  isDisplayOn();

  // Rocker Switched
  // Read the state of the iRow1 value
  iRow1State = digitalRead(iRow1);

  // Check if the pushbutton is pressed. If it is, the buttonState is HIGH:
  if (iRow1State == HIGH) {

    // iLEDGreen
    digitalWrite(iLEDGreen,  HIGH );
    // SD Card
    isSD();

  } else {

    // iLEDGreen
    digitalWrite(iLEDGreen,  LOW );

  }

  // Delay
  delay( 1000 );

}
getDisplay.ino
// SHARP Memory Display On
void isDisplayOn() {

    // Clear Display
    display.clearDisplay();
    // text display date, time, LED on
    display.setRotation(4);
    display.setTextSize(2);
    display.setTextColor(BLACK);
    display.setCursor(0,5);
    display.print("GPS: ");
    display.println( Status );
    display.setCursor(0,25);
    display.print("LON: ");
    display.println( TargetLon );
    display.setCursor(0,45);
    display.print("LAT: ");
    display.println( TargetLat );
    display.setCursor(0,65);
    display.println( dateRTC );
    display.setCursor(0,85);
    display.println( timeRTC );
    display.setCursor(0,105);
    display.print("Hum: ");
    display.print( latestHumidity );
    display.println("%");
    display.setCursor(0,125);
    display.print("Cel: ");
    display.print( latestTempC );
    display.println("*C");
    display.setCursor(0,145);
    display.print("Fah: ");
    display.print( latestTempF );
    display.println("*F");
    display.refresh();

}
// SHARP Memory Display - UID
void isDisplayUID() {

    // text display EEPROM
    display.setRotation(4);
    display.setTextSize(2);
    display.setTextColor(BLACK);
    display.setCursor(0,20);
    display.print( "UID: " );
    display.println( uid );
   // display.setTextSize();
    display.setTextColor(BLACK);
    display.setCursor(0,45);
    display.print( "VER: ");
    display.println( sver  );
    display.refresh();
    delay( 100 );

}
getEEPROM.ino
// EEPROM
void GetUID()
{

  // Get unit ID
  uid = "";
  for (int x = 0; x < 5; x++)
  {
    uid = uid + char(EEPROM.read(x));
  }

}
getGPS.ino
// GPS Receiver
void setupGPS() {

  // Setup GPS
  tGPS.begin(  9600 , SERIAL_8N1, gpsRXPIN, gpsTXPIN );

}
// GPS Vector Pointer Target
void displayInfo()
{

  // Location
  if (gps.location.isValid())
  {

    TargetLat = gps.location.lat();
    TargetLon = gps.location.lng();
    Status = 2;

  }
  else
  {

    Status = 0;

  }

}
getRHT.ino
// RHT03 Humidity and Temperature Sensor
void isRHT03(){

  // Call rht.update() to get new humidity and temperature values from the sensor.
  int updateRet = rht.update();

  // The humidity(), tempC(), and tempF() functions can be called -- after
  // a successful update() -- to get the last humidity and temperature value
  latestHumidity = rht.humidity();
  latestTempC = rht.tempC();
  latestTempF = rht.tempF();

}
getRTCpcf8523.ino
// PCF8523 Precision RTC
void setupRTC() {

  // pcf8523 Precision RTC
  if (! rtc.begin()) {
    while (1);
  }
  if (! rtc.initialized()) {
    // Following line sets the RTC to the date & time this sketch was compiled
    rtc.adjust(DateTime(F(__DATE__), F(__TIME__)));
    // This line sets the RTC with an explicit date & time, for example to set
    // January 21, 2014 at 3am you would call:
    // rtc.adjust(DateTime(2018, 9, 29, 12, 17, 0));
  }

}
// Date and Time RTC
void isRTC () {

  // Date and Time
  DateTime now = rtc.now();
  // Date
  dateRTC = now.year(), DEC;
  dateRTC = dateRTC + "/";
  dateRTC = dateRTC + now.month(), DEC;
  dateRTC = dateRTC + "/";
  dateRTC = dateRTC + now.day(), DEC;
  // Time
  timeRTC = now.hour(), DEC;
  timeRTC = timeRTC + ":";
  timeRTC = timeRTC + now.minute(), DEC;
  timeRTC = timeRTC + ":";
  timeRTC = timeRTC + now.second(), DEC;

}
getSD.ino
// SD Card
void setupSD() {

  // SD Card
    pinMode( chipSelect , OUTPUT );
    if(!SD.begin( chipSelect )){
        ;
        return;
    }
    uint8_t cardType = SD.cardType();

    if(cardType == CARD_NONE){
        ;
        return;
    }

    //Serial.print("SD Card Type: ");
    if(cardType == CARD_MMC){
        ;
    } else if(cardType == CARD_SD){
        ;
    } else if(cardType == CARD_SDHC){
        ;
    } else {
        ;
    }

    uint64_t cardSize = SD.cardSize() / (1024 * 1024);

}
// SD Card
void isSD() {

  zzzzzz = "";

  zzzzzz = uid + "|" + sver + "|" + Status + "|" + TargetLon + "|" + TargetLat + "|" + dateRTC + "|" + timeRTC + "|" + latestHumidity + "|" + latestTempC + "|" + latestTempF + "|\r";

  char msg[zzzzzz.length() + 1];

  zzzzzz.toCharArray(msg, zzzzzz.length() + 1);

  appendFile(SD, "/espdata.txt", msg );

}
// List Dir
void listDir(fs::FS &fs, const char * dirname, uint8_t levels){
    dirname;
    File root = fs.open(dirname);
    if(!root){
        return;
    }
    if(!root.isDirectory()){
        return;
    }

    File file = root.openNextFile();
    while(file){
        if(file.isDirectory()){
            file.name();
            if(levels){
                listDir(fs, file.name(), levels -1);
            }
        } else {
            file.name();
            file.size();
        }
        file = root.openNextFile();
    }
}
// Write File
void writeFile(fs::FS &fs, const char * path, const char * message){
    path;
    File file = fs.open(path, FILE_WRITE);
    if(!file){
        return;
    }
    if(file.print(message)){
        ;
    } else {
        ;
    }
    file.close();
}
// Append File
void appendFile(fs::FS &fs, const char * path, const char * message){
    //Serial.printf("Appending to file: %s\n", path);
    path;
    File file = fs.open(path, FILE_APPEND);
    if(!file){
        return;
    }
    if(file.print(message)){
        ;
    } else {
        ;
    }
    file.close();
}
setup.ino
// Setup
void setup() {

  // EEPROM with unique ID
  EEPROM.begin(EEPROM_SIZE);

  // Get Unit ID
  GetUID();

  // GPS Receiver
  // Setup GPS
  setupGPS();

  // SHARP Display start & clear the display
  display.begin();
  display.clearDisplay();

  isDisplayUID();

  delay( 5000 );

  // Initialize the LED Green
  pinMode(iLEDGreen, OUTPUT);

  // PCF8523 Precision RTC
  setupRTC();

  // Date and Time RTC
  isRTC();

  // RHT03 Humidity and Temperature Sensor
  // Call rht.begin() to initialize the sensor and our data pin
  rht.begin(RHT03_DATA_PIN);

  // SD Card
  setupSD();

  // Rocker Switches
  pinMode(iRow1, INPUT);

}
Follow Us
Web: https://www.donluc.com/
Web: http://neosteamlabs.com/
Web: http://www.jlpconsultants.com/
YouTube: https://www.youtube.com/channel/UC5eRjrGn1CqkkGfZy0jxEdA
Facebook: https://www.facebook.com/neosteam.labs.9/
Instagram: https://www.instagram.com/neosteamlabs/
Pinterest: https://www.pinterest.com/NeoSteamLabs/
Twitter: https://twitter.com/labs_steam
Etsy: https://www.etsy.com/shop/NeoSteamLabs
Don Luc
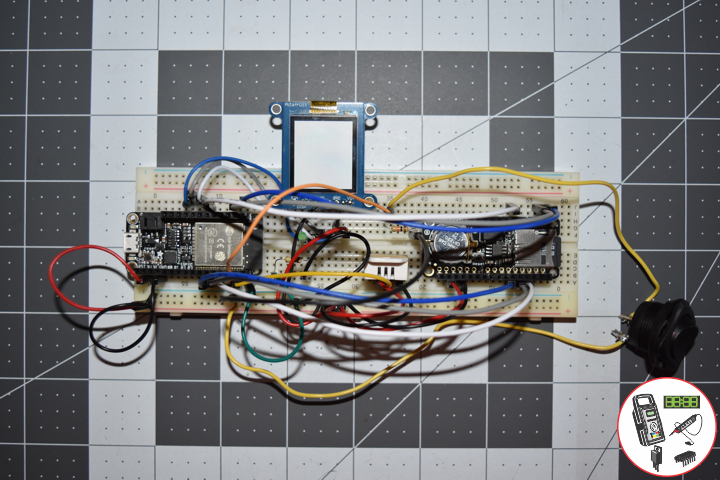
Project #11: ESP32 Feather – Rocker Switches – Mk06
ESP32 Feather – Rocker Switches
——
——
——
——
——
——
Rocker Switch – Round
These panel-mounting rocker switches simple SPST on-off. They mount into a 20.2mm diameter hole and are rated up to 16A @ 12v.
DonLuc1909Mk03
1 x Adafruit HUZZAH32 ESP32 Feather
1 x Adafruit SHARP Memory Display
1 x Adafruit Adalogger FeatherWing – RTC + SD
1 x CR1220 12mm Lithium Battery
1 x 8Gb Micro SD Card
1 x RHT03 Humidity and Temperature Sensor
1 x LED Green
1 x Rocker Switches
1 x 100 Ohm
1 x 10K Ohm
14 x Jumper Wires 3″ M/M
6 x Jumper Wires 6″ M/M
1 x Full-Size Breadboard
1 x SparkFun Cerberus USB Cable
Adafruit HUZZAH32 ESP32 Feather
LG1 – Digital 21
RO1 – Digital 16
RHT – Digital 17
SCK – Digital 13
MOS – Digital 12
SSD – Digital 27
SDA – Digital 23
SCL – Digital 22
SD1 – Digital 33
SC2 – Digital 5
MO2 – Digital 18
MI2 – Digital 19
GND – GND
VIN – +3.3V
DL1909Mk03.ino
// ***** Don Luc Electronics *****
// Software Version Information
// Project #11: HUZZAH32 ESP32 Feather - Rocker Switches - Mk06
// 09-03
// DL1909Mk03p.ino 11-06
// Adafruit HUZZAH32 ESP32 Feather Board
// SHARP Display
// LED Green
// Adalogger FeatherWing - RTC + SD
// EEPROM
// RHT03 Humidity and Temperature Sensor
// Rocker Switches

// include Library Code
// SHARP Memory Display
#include <Adafruit_SharpMem.h>
#include <Adafruit_GFX.h>
// Date and Time
#include "RTClib.h"
// EEPROM library to read EEPROM with unique ID for unit
#include "EEPROM.h"
// RHT Humidity and Temperature Sensor
#include <SparkFun_RHT03.h>
// SD Card
#include "FS.h"
#include "SD.h"
#include "SPI.h"

// SHARP Memory Display
// any pins can be used
#define SHARP_SCK  13
#define SHARP_MOSI 12
#define SHARP_SS   27
// Set the size of the display here, e.g. 144x168!
Adafruit_SharpMem display(SHARP_SCK, SHARP_MOSI, SHARP_SS, 144, 168);
// The currently-available SHARP Memory Display (144x168 pixels)
// requires > 4K of microcontroller RAM; it WILL NOT WORK on Arduino Uno
// or other <4K "classic" devices!
#define BLACK 0
#define WHITE 1
int minorHalfSize; // 1/2 of lesser of display width or height

// LED Green
int iLEDGreen =  21;                 // LED Green

// PCF8523 Precision RTC
RTC_PCF8523 rtc;
String dateRTC = "";
String timeRTC = "";

// The current address in the EEPROM (i.e. which byte
// we're going to  read to next)
#define EEPROM_SIZE 64
String sver = "9-3.p";
// Unit ID information
String uid = "";

// RHT Humidity and Temperature Sensor
const int RHT03_DATA_PIN = 17;          // RHT03 data pin Digital 17
RHT03 rht;                              // This creates a RTH03 object, which we'll use to interact with the sensor
float latestHumidity;
float latestTempC;
float latestTempF;

// SD Card
const int chipSelect = 33;              // SD Card
String zzzzzz = "";

// Rocker Switches
int iRow1 = 16;                          // Rocker Switches
int iRow1State = 0;                      // Variable for reading the pushbutton status

void loop() {

  // Date and Time
  isRTC();

  // RHT03 Humidity and Temperature Sensor
  isRHT03();

  // SHARP Memory Display On
  isDisplayOn();

  // Rocker Switched
  // Read the state of the iRow1 value
  iRow1State = digitalRead(iRow1);

  // check if the pushbutton is pressed. If it is, the buttonState is HIGH:
  if (iRow1State == HIGH) {

    // iLEDGreen
    digitalWrite(iLEDGreen,  HIGH );
    // SD Card
    isSD();

  } else {

    // iLEDGreen
    digitalWrite(iLEDGreen,  LOW );

  }

  // Delay
  delay( 1000 );

}
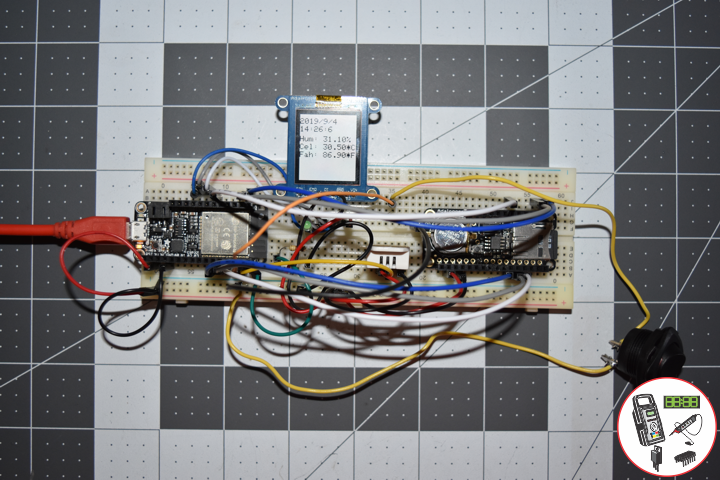
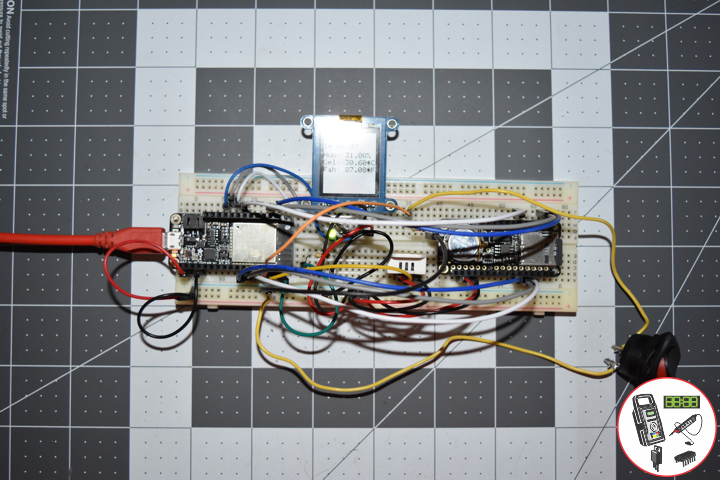
getDisplay.ino
// SHARP Memory Display On
void isDisplayOn() {

    // Clear Display
    display.clearDisplay();
    // text display date, time, LED on
    display.setRotation(4);
    display.setTextSize(2);
    display.setTextColor(BLACK);
    display.setCursor(0,10);
    display.println( dateRTC );
    display.setCursor(0,30);
    display.println( timeRTC );
    display.setTextSize(2);
    display.setCursor(0,55);
    display.print("Hum: ");
    display.print( latestHumidity );
    display.println("%");
    display.setCursor(0,75);
    display.print("Cel: ");
    display.print( latestTempC );
    display.println("*C");
    display.setCursor(0,95);
     display.print("Fah: ");
    display.print( latestTempF );
    display.println("*F");
    display.refresh();

}
// SHARP Memory Display - UID
void isDisplayUID() {

    // text display EEPROM
    display.setRotation(4);
    display.setTextSize(2);
    display.setTextColor(BLACK);
    display.setCursor(0,20);
    display.print( "UID: " );
    display.println( uid );
   // display.setTextSize();
    display.setTextColor(BLACK);
    display.setCursor(0,45);
    display.print( "VER: ");
    display.println( sver  );
    display.refresh();
    delay( 100 );

}
getEEPROM.ino
// EEPROM
void GetUID()
{

  // Get unit ID
  uid = "";
  for (int x = 0; x < 5; x++)
  {
    uid = uid + char(EEPROM.read(x));
  }

}
getRHT.ino
// RHT03 Humidity and Temperature Sensor
void isRHT03(){

  // Call rht.update() to get new humidity and temperature values from the sensor.
  int updateRet = rht.update();

  // The humidity(), tempC(), and tempF() functions can be called -- after
  // a successful update() -- to get the last humidity and temperature value
  latestHumidity = rht.humidity();
  latestTempC = rht.tempC();
  latestTempF = rht.tempF();

}
getRTCpcf8523.ino
// PCF8523 Precision RTC
void setupRTC() {

  // pcf8523 Precision RTC
  if (! rtc.begin()) {
    while (1);
  }
  if (! rtc.initialized()) {
    // Following line sets the RTC to the date & time this sketch was compiled
    rtc.adjust(DateTime(F(__DATE__), F(__TIME__)));
    // This line sets the RTC with an explicit date & time, for example to set
    // January 21, 2014 at 3am you would call:
    // rtc.adjust(DateTime(2018, 9, 29, 12, 17, 0));
  }

}
// Date and Time RTC
void isRTC () {

  // Date and Time
  DateTime now = rtc.now();
  // Date
  dateRTC = now.year(), DEC;
  dateRTC = dateRTC + "/";
  dateRTC = dateRTC + now.month(), DEC;
  dateRTC = dateRTC + "/";
  dateRTC = dateRTC + now.day(), DEC;
  // Time
  timeRTC = now.hour(), DEC;
  timeRTC = timeRTC + ":";
  timeRTC = timeRTC + now.minute(), DEC;
  timeRTC = timeRTC + ":";
  timeRTC = timeRTC + now.second(), DEC;

}
getSD.ino
// SD Card
void setupSD() {

  // SD Card
    pinMode( chipSelect , OUTPUT );
    if(!SD.begin( chipSelect )){
        ;
        return;
    }
    uint8_t cardType = SD.cardType();

    if(cardType == CARD_NONE){
        ;
        return;
    }

    //Serial.print("SD Card Type: ");
    if(cardType == CARD_MMC){
        ;
    } else if(cardType == CARD_SD){
        ;
    } else if(cardType == CARD_SDHC){
        ;
    } else {
        ;
    }

    uint64_t cardSize = SD.cardSize() / (1024 * 1024);

}
// SD Card
void isSD() {

  zzzzzz = "";

  zzzzzz = uid + "|" + sver + "|" + dateRTC + "|" + timeRTC + "|" + latestHumidity + "|" + latestTempC + "|" + latestTempF + "|\r";

  char msg[zzzzzz.length() + 1];

  zzzzzz.toCharArray(msg, zzzzzz.length() + 1);

  appendFile(SD, "/espdata.txt", msg );

}
// List Dir
void listDir(fs::FS &fs, const char * dirname, uint8_t levels){
    dirname;
    File root = fs.open(dirname);
    if(!root){
        return;
    }
    if(!root.isDirectory()){
        return;
    }

    File file = root.openNextFile();
    while(file){
        if(file.isDirectory()){
            file.name();
            if(levels){
                listDir(fs, file.name(), levels -1);
            }
        } else {
            file.name();
            file.size();
        }
        file = root.openNextFile();
    }
}
// Write File
void writeFile(fs::FS &fs, const char * path, const char * message){
    path;
    File file = fs.open(path, FILE_WRITE);
    if(!file){
        return;
    }
    if(file.print(message)){
        ;
    } else {
        ;
    }
    file.close();
}
// Append File
void appendFile(fs::FS &fs, const char * path, const char * message){
    //Serial.printf("Appending to file: %s\n", path);
    path;
    File file = fs.open(path, FILE_APPEND);
    if(!file){
        return;
    }
    if(file.print(message)){
        ;
    } else {
        ;
    }
    file.close();
}
setup.ino
// Setup
void setup() {

  // EEPROM with unique ID
  EEPROM.begin(EEPROM_SIZE);

  // Get Unit ID
  GetUID();

  // SHARP Display start & clear the display
  display.begin();
  display.clearDisplay();

  isDisplayUID();

  delay( 5000 );

  // Initialize the LED Green
  pinMode(iLEDGreen, OUTPUT);

  // PCF8523 Precision RTC
  setupRTC();

  // Date and Time RTC
  isRTC();

  // RHT03 Humidity and Temperature Sensor
  // Call rht.begin() to initialize the sensor and our data pin
  rht.begin(RHT03_DATA_PIN);

  // SD Card
  setupSD();

  // Rocker Switches
  pinMode(iRow1, INPUT);

}
Follow Us
Web: https://www.donluc.com/
Web: http://neosteamlabs.com/
Web: http://www.jlpconsultants.com/
YouTube: https://www.youtube.com/channel/UC5eRjrGn1CqkkGfZy0jxEdA
Facebook: https://www.facebook.com/neosteam.labs.9/
Instagram: https://www.instagram.com/neosteamlabs/
Pinterest: https://www.pinterest.com/NeoSteamLabs/
Twitter: https://twitter.com/labs_steam
Etsy: https://www.etsy.com/shop/NeoSteamLabs
Don Luc
Project #11: ESP32 Feather – RTC + SD – Mk05
ESP32 Feather – RTC + SD – Mk05
——
——
——
——
——
Adafruit Adalogger FeatherWing – RTC + SD
A Feather board without ambition is a Feather board without FeatherWings! This is the Adalogger FeatherWing: it adds both a battery-backed Real Time Clock and micro SD card storage to any Feather main board.
DonLuc1909Mk02
1 x Adafruit HUZZAH32 ESP32 Feather
1 x Adafruit SHARP Memory Display
1 x Adafruit Adalogger FeatherWing – RTC + SD
1 x CR1220 12mm Lithium Battery
1 x 8Gb Micro SD Card
1 x RHT03 Humidity and Temperature Sensor
1 x LED Green
1 x 100 Ohm
14 x Jumper Wires 3″ M/M
6 x Jumper Wires 6″ M/M
1 x Full-Size Breadboard
1 x SparkFun Cerberus USB Cable
Adafruit HUZZAH32 ESP32 Feather
LG1 – Digital 21
RHT – Digital 17
SCK – Digital 13
MOS – Digital 12
SSD – Digital 27
SDA – Digital 23
SCL – Digital 22
SD1 – Digital 33
SC2 – Digital 5
MO2 – Digital 18
MI2 – Digital 19
GND – GND
VIN – +3.3V
DL1909Mk02.ino
// ***** Don Luc Electronics *****
// Software Version Information
// Project #11: HUZZAH32 ESP32 Feather - Mk05
// 09-02
// DL1909Mk02p.ino 11-05
// Adafruit HUZZAH32 ESP32 Feather Board
// SHARP Display
// LED Green
// Adalogger FeatherWing - RTC + SD
// EEPROM
// RHT03 Humidity and Temperature Sensor

// include Library Code
// SHARP Memory Display
#include <Adafruit_SharpMem.h>
#include <Adafruit_GFX.h>
// Date and Time
#include "RTClib.h"
// EEPROM library to read EEPROM with unique ID for unit
#include "EEPROM.h"
// RHT Humidity and Temperature Sensor
#include <SparkFun_RHT03.h>
// SD Card
#include "FS.h"
#include "SD.h"
#include "SPI.h"

// SHARP Memory Display
// any pins can be used
#define SHARP_SCK  13
#define SHARP_MOSI 12
#define SHARP_SS   27
// Set the size of the display here, e.g. 144x168!
Adafruit_SharpMem display(SHARP_SCK, SHARP_MOSI, SHARP_SS, 144, 168);
// The currently-available SHARP Memory Display (144x168 pixels)
// requires > 4K of microcontroller RAM; it WILL NOT WORK on Arduino Uno
// or other <4K "classic" devices!
#define BLACK 0
#define WHITE 1
int minorHalfSize; // 1/2 of lesser of display width or height

// LED Green
int iLEDGreen =  21;                 // LED Green

// PCF8523 Precision RTC
RTC_PCF8523 rtc;
String dateRTC = "";
String timeRTC = "";

// The current address in the EEPROM (i.e. which byte
// we're going to  read to next)
#define EEPROM_SIZE 64
String sver = "9-2.p";
// Unit ID information
String uid = "";

// RHT Humidity and Temperature Sensor
const int RHT03_DATA_PIN = 17;          // RHT03 data pin Digital 17
RHT03 rht;                              // This creates a RTH03 object, which we'll use to interact with the sensor
float latestHumidity;
float latestTempC;
float latestTempF;

// SD Card
const int chipSelect = 33;              // SD Card
String zzzzzz = "";

void loop() {

  // iLEDGreen
  digitalWrite(iLEDGreen,  HIGH );
  // Date and Time
  isRTC();
  // RHT03 Humidity and Temperature Sensor
  isRHT03();
  // SHARP Memory Display On
  isDisplayOn();
  // SD Card
  isSD();
  // iLEDGreen
  digitalWrite(iLEDGreen,  LOW );
  // Delay 1
  delay( 10000 );

}
getDisplay.ino
// SHARP Memory Display On
void isDisplayOn() {

    // Clear Display
    display.clearDisplay();
    // text display date, time, LED on
    display.setRotation(4);
    display.setTextSize(2);
    display.setTextColor(BLACK);
    display.setCursor(0,10);
    display.println( dateRTC );
    display.setCursor(0,30);
    display.println( timeRTC );
    display.setTextSize(2);
    display.setCursor(0,55);
    display.print("Hum: ");
    display.print( latestHumidity );
    display.println("%");
    display.setCursor(0,75);
    display.print("Cel: ");
    display.print( latestTempC );
    display.println("*C");
    display.setCursor(0,95);
     display.print("Fah: ");
    display.print( latestTempF );
    display.println("*F");
    display.refresh();

}
// SHARP Memory Display - UID
void isDisplayUID() {

    // text display EEPROM
    display.setRotation(4);
    display.setTextSize(2);
    display.setTextColor(BLACK);
    display.setCursor(0,20);
    display.print( "UID: " );
    display.println( uid );
   // display.setTextSize();
    display.setTextColor(BLACK);
    display.setCursor(0,45);
    display.print( "VER: ");
    display.println( sver  );
    display.refresh();
    delay( 100 );

}
getEEPROM.ino
// EEPROM
void GetUID()
{

  // Get unit ID
  uid = "";
  for (int x = 0; x < 5; x++)
  {
    uid = uid + char(EEPROM.read(x));
  }

}
getRHT.ino
// RHT03 Humidity and Temperature Sensor
void isRHT03(){

  // Call rht.update() to get new humidity and temperature values from the sensor.
  int updateRet = rht.update();

  // The humidity(), tempC(), and tempF() functions can be called -- after
  // a successful update() -- to get the last humidity and temperature value
  latestHumidity = rht.humidity();
  latestTempC = rht.tempC();
  latestTempF = rht.tempF();

}
getRTCpcf8523.ino
// PCF8523 Precision RTC
void setupRTC() {

  // pcf8523 Precision RTC
  if (! rtc.begin()) {
    while (1);
  }
  if (! rtc.initialized()) {
    // Following line sets the RTC to the date & time this sketch was compiled
    rtc.adjust(DateTime(F(__DATE__), F(__TIME__)));
    // This line sets the RTC with an explicit date & time, for example to set
    // January 21, 2014 at 3am you would call:
    // rtc.adjust(DateTime(2018, 9, 29, 12, 17, 0));
  }

}
// Date and Time RTC
void isRTC () {

  // Date and Time
  DateTime now = rtc.now();
  // Date
  dateRTC = now.year(), DEC;
  dateRTC = dateRTC + "/";
  dateRTC = dateRTC + now.month(), DEC;
  dateRTC = dateRTC + "/";
  dateRTC = dateRTC + now.day(), DEC;
  // Time
  timeRTC = now.hour(), DEC;
  timeRTC = timeRTC + ":";
  timeRTC = timeRTC + now.minute(), DEC;
  timeRTC = timeRTC + ":";
  timeRTC = timeRTC + now.second(), DEC;

}
getSD.ino
// SD Card
void setupSD() {

  // SD Card
    pinMode( chipSelect , OUTPUT );
    if(!SD.begin( chipSelect )){
        ;
        return;
    }
    uint8_t cardType = SD.cardType();

    if(cardType == CARD_NONE){
        ;
        return;
    }

    //Serial.print("SD Card Type: ");
    if(cardType == CARD_MMC){
        ;
    } else if(cardType == CARD_SD){
        ;
    } else if(cardType == CARD_SDHC){
        ;
    } else {
        ;
    }

    uint64_t cardSize = SD.cardSize() / (1024 * 1024);

}
// SD Card
void isSD() {

  zzzzzz = "";

  zzzzzz = uid + "|" + sver + "|" + dateRTC + "|" + timeRTC + "|" + latestHumidity + "|" + latestTempC + "|" + latestTempF + "|\r";

  char msg[zzzzzz.length() + 1];

  zzzzzz.toCharArray(msg, zzzzzz.length() + 1);

  appendFile(SD, "/espdata.txt", msg );

}
// List Dir
void listDir(fs::FS &fs, const char * dirname, uint8_t levels){
    dirname;
    File root = fs.open(dirname);
    if(!root){
        return;
    }
    if(!root.isDirectory()){
        return;
    }

    File file = root.openNextFile();
    while(file){
        if(file.isDirectory()){
            file.name();
            if(levels){
                listDir(fs, file.name(), levels -1);
            }
        } else {
            file.name();
            file.size();
        }
        file = root.openNextFile();
    }
}
// Write File
void writeFile(fs::FS &fs, const char * path, const char * message){
    path;
    File file = fs.open(path, FILE_WRITE);
    if(!file){
        return;
    }
    if(file.print(message)){
        ;
    } else {
        ;
    }
    file.close();
}
// Append File
void appendFile(fs::FS &fs, const char * path, const char * message){
    //Serial.printf("Appending to file: %s\n", path);
    path;
    File file = fs.open(path, FILE_APPEND);
    if(!file){
        return;
    }
    if(file.print(message)){
        ;
    } else {
        ;
    }
    file.close();
}
setup.ino
// Setup
void setup() {

  // EEPROM with unique ID
  EEPROM.begin(EEPROM_SIZE);

  // Get Unit ID
  GetUID();

  // SHARP Display start & clear the display
  display.begin();
  display.clearDisplay();

  isDisplayUID();

  delay( 5000 );

  // Initialize the LED Green
  pinMode(iLEDGreen, OUTPUT);

  // PCF8523 Precision RTC
  setupRTC();

  // Date and Time RTC
  isRTC();

  // RHT03 Humidity and Temperature Sensor
  // Call rht.begin() to initialize the sensor and our data pin
  rht.begin(RHT03_DATA_PIN);

  // SD Card
  setupSD();

}
Follow Us
Web: https://www.donluc.com/
Web: http://neosteamlabs.com/
Web: http://www.jlpconsultants.com/
YouTube: https://www.youtube.com/channel/UC5eRjrGn1CqkkGfZy0jxEdA
Facebook: https://www.facebook.com/neosteam.labs.9/
Instagram: https://www.instagram.com/neosteamlabs/
Pinterest: https://www.pinterest.com/NeoSteamLabs/
Twitter: https://twitter.com/labs_steam
Etsy: https://www.etsy.com/shop/NeoSteamLabs
Don Luc
Project #11: ESP32 Feather – RHT03 – Mk04
Humidity and Temperature Sensor
——
——
——
——
——
——
RHT03 – Humidity and Temperature Sensor
The RHT03 is a low cost humidity and temperature sensor with a single wire digital interface. The sensor is calibrated and doesn’t require extra components so you can get right to measuring relative humidity and temperature.
DonLuc1909Mk01
1 x Adafruit HUZZAH32 ESP32 Feather
1 x Adafruit SHARP Memory Display
1 x Adafruit DS3231 Precision RTC FeatherWing
1 x CR1220 12mm Lithium Battery
1 x RHT03 Humidity and Temperature Sensor
1 x LED Green
1 x 100 Ohm
14 x Jumper Wires 3″ M/M
2 x Jumper Wires 6″ M/M
1 x Full-Size Breadboard
1 x SparkFun Cerberus USB Cable
Adafruit HUZZAH32 ESP32 Feather
LG1 – Digital 21
RHT – Digital 17
SCK – Digital 13
MOS – Digital 12
SSD – Digital 27
SDA – Digital 23
SCL – Digital 22
GND – GND
VIN – +3.3V
DL1909Mk01.ino
// ***** Don Luc Electronics *****
// Software Version Information
// Project #11: HUZZAH32 ESP32 Feather - Mk04
// 09-01
// DonLuc1909Mk01p.ino 11-04
// Adafruit HUZZAH32 ESP32 Feather Board
// SHARP Display
// LED Green
// DS3231 Precision RTC
// EEPROM
// RHT03 Humidity and Temperature Sensor

// include Library Code
#include <Adafruit_SharpMem.h>
#include <Adafruit_GFX.h>
#include <RTClib.h>
#include <Wire.h>
#include "EEPROM.h"
#include <SparkFun_RHT03.h>

// SHARP Memory Display
// any pins can be used
#define SHARP_SCK  13
#define SHARP_MOSI 12
#define SHARP_SS   27
// Set the size of the display here, e.g. 144x168!
Adafruit_SharpMem display(SHARP_SCK, SHARP_MOSI, SHARP_SS, 144, 168);
// The currently-available SHARP Memory Display (144x168 pixels)
// requires > 4K of microcontroller RAM; it WILL NOT WORK on Arduino Uno
// or other <4K "classic" devices!
#define BLACK 0
#define WHITE 1
int minorHalfSize; // 1/2 of lesser of display width or height

// LED Green
int iLEDGreen =  21;                 // LED Green

// DS3231 Precision RTC
RTC_DS3231 RTC;
String sDate;
String sTime;

// The current address in the EEPROM (i.e. which byte
// we're going to  read to next)
#define EEPROM_SIZE 64
String sver = "9-1.p";
// Unit ID information
String uid = "";

// RHT Humidity and Temperature Sensor
const int RHT03_DATA_PIN = 17;          // RHT03 data pin Digital 17
RHT03 rht;                              // This creates a RTH03 object, which we'll use to interact with the sensor
float latestHumidity;
float latestTempC;
float latestTempF;

void loop() {

  // iLEDGreen
  digitalWrite(iLEDGreen,  HIGH );
  // DS3231 Precision RTC
  timeRTC();
  // RHT03 Humidity and Temperature Sensor
  isRHT03();
  // SHARP Memory Display On
  isDisplayOn();
  // iLEDGreen
  digitalWrite(iLEDGreen,  LOW );
  // Delay 1
  delay( 1000 );

}
getDisplay.ino
// SHARP Memory Display On
void isDisplayOn() {

    // Clear Display
    display.clearDisplay();
    // text display date, time, LED on
    display.setRotation(4);
    display.setTextSize(2);
    display.setTextColor(BLACK);
    display.setCursor(0,10);
    display.println( sDate );
    display.setCursor(0,30);
    display.println( sTime );
    display.setTextSize(2);
    display.setCursor(0,55);
    display.print("Hum: ");
    display.print( latestHumidity );
    display.println("%");
    display.setCursor(0,75);
    display.print("Cel: ");
    display.print( latestTempC );
    display.println("*C");
    display.setCursor(0,95);
     display.print("Fah: ");
    display.print( latestTempF );
    display.println("*F");
    display.refresh();

}
// SHARP Memory Display - UID
void isDisplayUID() {

    // text display EEPROM
    display.setRotation(4);
    display.setTextSize(3);
    display.setTextColor(BLACK);
    display.setCursor(0,20);
    display.println( sver );
   // display.setTextSize();
    display.setTextColor(BLACK);
    display.setCursor(0,65);
    display.println( uid );
    display.refresh();
    delay( 100 );

}
getEEPROM.ino
// EEPROM
void GetUID()
{

  // Get unit ID
  uid = "";
  for (int x = 0; x < 5; x++)
  {
    uid = uid + char(EEPROM.read(x));
  }

}
getRHT.ino
// RHT03 Humidity and Temperature Sensor
void isRHT03(){

  // Call rht.update() to get new humidity and temperature values from the sensor.
  int updateRet = rht.update();

  // The humidity(), tempC(), and tempF() functions can be called -- after
  // a successful update() -- to get the last humidity and temperature value
  latestHumidity = rht.humidity();
  latestTempC = rht.tempC();
  latestTempF = rht.tempF();

}
getRTCDS3231.ino
// DS3231 Precision RTC
void setupRTC() {

  // DS3231 Precision RTC
  RTC.begin();
  if (! RTC.begin()) {
    while (1);
  }

  DateTime now = RTC.now();

  if (RTC.lostPower()) {
    // Following line sets the RTC to the date & time this sketch was compiled
    RTC.adjust(DateTime(F(__DATE__), F(__TIME__)));
  }

}
// timeRTC
void timeRTC() {

    // DS3231 Precision RTC
    sDate = "";
    sTime = "";

    DateTime now = RTC.now();

    // sData
    sDate += String(now.year(), DEC);
    sDate += "/";
    sDate += String(now.month(), DEC);
    sDate += "/";
    sDate += String(now.day(), DEC);

    // sTime
    sTime += String(now.hour(), DEC);
    sTime += ":";
    sTime += String(now.minute(), DEC);
    sTime += ":";
    sTime += String(now.second(), DEC);

}
setup.ino
// Setup
void setup() {

  // EEPROM with unique ID
  EEPROM.begin(EEPROM_SIZE);

  // Get Unit ID
  GetUID();

  // SHARP Display start & clear the display
  display.begin();
  display.clearDisplay();

  isDisplayUID();

  delay( 5000 );

  // Initialize the LED Green
  pinMode(iLEDGreen, OUTPUT);

  // DS3231 Precision RTC
  setupRTC();

  // DS3231 Precision RTC
  timeRTC();

  // RHT03 Humidity and Temperature Sensor
  // Call rht.begin() to initialize the sensor and our data pin
  rht.begin(RHT03_DATA_PIN);

}
Follow Us
Web: https://www.donluc.com/
Web: http://neosteamlabs.com/
Web: http://www.jlpconsultants.com/
YouTube: https://www.youtube.com/channel/UC5eRjrGn1CqkkGfZy0jxEdA
Facebook: https://www.facebook.com/neosteam.labs.9/
Instagram: https://www.instagram.com/neosteamlabs/
Pinterest: https://www.pinterest.com/NeoSteamLabs/
Twitter: https://twitter.com/labs_steam
Etsy: https://www.etsy.com/shop/NeoSteamLabs
Don Luc
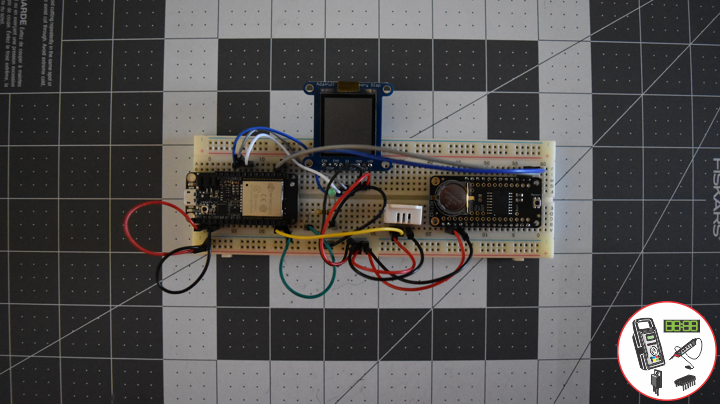
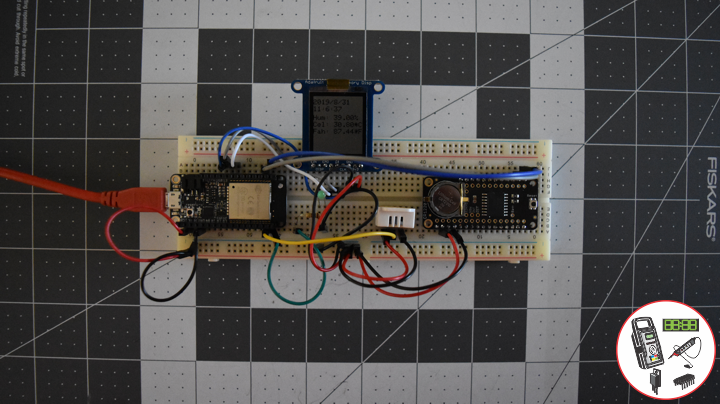
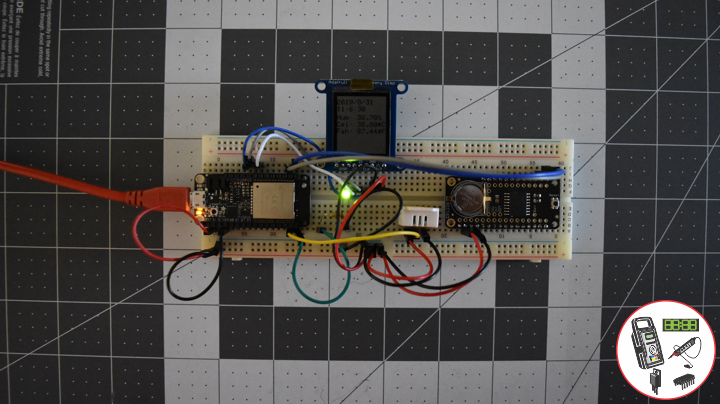
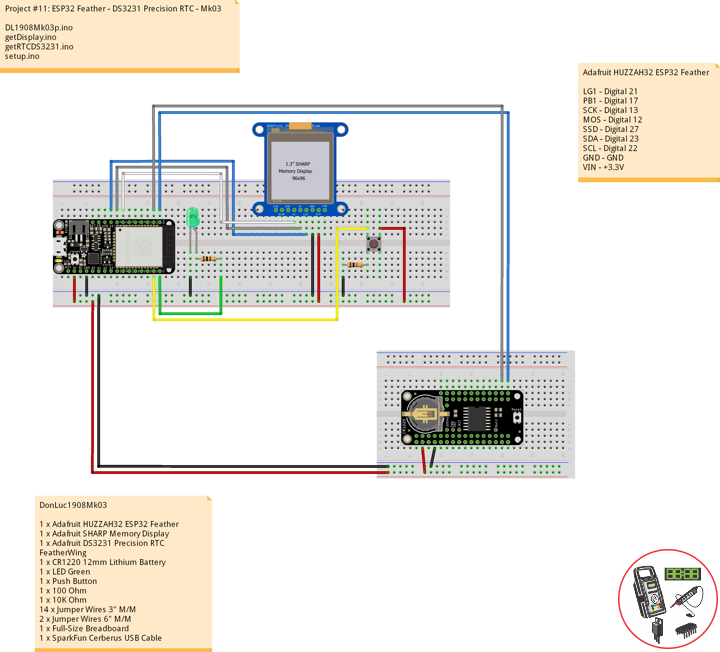
Project #11: ESP32 Feather – DS3231 Precision RTC – Mk03
Adafruit HUZZAH32 ESP32 Feather
——
——
——
——
——
——
Adafruit DS3231 Precision RTC FeatherWing
A Feather board without ambition is a Feather board without FeatherWings! This is the DS3231 Precision RTC FeatherWing: it adds an extremely accurate I2C-integrated Real Time Clock (RTC) with a Temperature Compensated Crystal Oscillator to any Feather main board. This RTC is the most precise you can get in a small, low power package. Most RTCs use an external 32kHz timing crystal that is used to keep time with low current draw.
With a CR1220 12mm lithium battery plugged into the top of the FeatherWing, you can get years of precision timekeeping, even when main power is lost. Great for datalogging and clocks, or anything where you need to really know the time.
DonLuc1908Mk03
1 x Adafruit HUZZAH32 ESP32 Feather
1 x Adafruit SHARP Memory Display
1 x Adafruit DS3231 Precision RTC FeatherWing
1 x CR1220 12mm Lithium Battery
1 x LED Green
1 x Push Button
1 x 100 Ohm
1 x 10K Ohm
14 x Jumper Wires 3″ M/M
2 x Jumper Wires 6″ M/M
1 x Full-Size Breadboard
1 x SparkFun Cerberus USB Cable
Adafruit HUZZAH32 ESP32 Feather
LG1 – Digital 21
PB1 – Digital 17
SCK – Digital 13
MOS – Digital 12
SSD – Digital 27
SDA – Digital 23
SCL – Digital 22
GND – GND
VIN – +3.3V
DL1908Mk03p.ino
// ***** Don Luc Electronics *****
// Software Version Information
// Project #11: HUZZAH32 ESP32 Feather - DS3231 Precision RTC - Mk03
// 08-03
// DonLuc1908Mk03p.ino 08-03
// Adafruit HUZZAH32 ESP32 Feather Board
// SHARP Display
// LED Green
// Push Button
// DS3231 Precision RTC

// include Library Code
#include <Adafruit_SharpMem.h>
#include <Adafruit_GFX.h>
#include <RTClib.h>
#include <Wire.h>

// SHARP Memory Display
// any pins can be used
#define SHARP_SCK  13
#define SHARP_MOSI 12
#define SHARP_SS   27
// Set the size of the display here, e.g. 144x168!
Adafruit_SharpMem display(SHARP_SCK, SHARP_MOSI, SHARP_SS, 144, 168);
// The currently-available SHARP Memory Display (144x168 pixels)
// requires > 4K of microcontroller RAM; it WILL NOT WORK on Arduino Uno
// or other <4K "classic" devices!
#define BLACK 0
#define WHITE 1
int minorHalfSize; // 1/2 of lesser of display width or height

// LED Green
int iLEDGreen =  21;                 // LED Green
int stateLEDGreen = LOW;             // stateLEDGreen

// Button
int iBut1 = 17;                      // Button 1
int ButState1;                       // Variable for reading the button status
int previous = LOW;                  // previous
long lTime = 0;                      // lTime
long debounce = 500;                 // debounce

// DS3231 Precision RTC
RTC_DS3231 RTC;
String sDate;
String sTime;

void loop() {

  // Read the state of the button value
  ButState1 = digitalRead(iBut1);

  // Check if the button is pressed
  if (ButState1 == HIGH && previous == LOW && millis() - lTime > debounce)
  {

     if(stateLEDGreen == HIGH)
     {

        // stateLEDGreen = LOW
        stateLEDGreen = LOW;
        // DS3231 Precision RTC
        timeRTC();
        // SHARP Memory Display Off
        isDisplayOff();


     } else
     {

        // stateLEDGreen = HIGH
        stateLEDGreen = HIGH;
        // DS3231 Precision RTC
        timeRTC();
        // SHARP Memory Display On
        isDisplayOn();

    }
    lTime = millis();

  }

  // iLEDGreen
  digitalWrite(iLEDGreen, stateLEDGreen);
  previous == ButState1;

}
getDisplay.ino
// SHARP Memory Display On
void isDisplayOn() {

    // Clear Display
    display.clearDisplay();
    // text display date, time, LED on
    display.setRotation(4);
    display.setTextSize(2);
    display.setTextColor(BLACK);
    display.setCursor(10,10);
    display.println( sDate );
    display.setCursor(10,30);
    display.println( sTime );
    display.setTextSize(3);
    display.setCursor(10,55);
    display.println("LED On");
    display.refresh();

}
// SHARP Memory Display Off
void isDisplayOff() {

    // Clear Display
    display.clearDisplay();
    // text display date, time, LED off
    display.setRotation(4);
    display.setTextSize(2);
    display.setTextColor(BLACK);
    display.setCursor(10,10);
    display.println( sDate );
    display.setCursor(10,30);
    display.println( sTime );
    display.setTextSize(3);
    display.setCursor(10,55);
    display.println("LED Off");
    display.refresh();

}
getRTCDS3231.ino
// DS3231 Precision RTC
void setupRTC() {

  // DS3231 Precision RTC
  RTC.begin();
  if (! RTC.begin()) {
    while (1);
  }

  DateTime now = RTC.now();

  if (RTC.lostPower()) {
    // Following line sets the RTC to the date & time this sketch was compiled
    RTC.adjust(DateTime(F(__DATE__), F(__TIME__)));
  }

}
// timeRTC
void timeRTC() {

    // DS3231 Precision RTC
    sDate = "";
    sTime = "";

    DateTime now = RTC.now();

    // sData
    sDate += String(now.year(), DEC);
    sDate += "/";
    sDate += String(now.month(), DEC);
    sDate += "/";
    sDate += String(now.day(), DEC);

    // sTime
    sTime += String(now.hour(), DEC);
    sTime += ":";
    sTime += String(now.minute(), DEC);
    sTime += ":";
    sTime += String(now.second(), DEC);

}
setup.ino
// Setup
void setup() {

  // SHARP Display start & clear the display
  display.begin();
  display.clearDisplay();

  // Button 1
  // Initialize the button as an input
  pinMode(iBut1, INPUT);

  // Initialize the LED Green
  pinMode(iLEDGreen, OUTPUT);

  // DS3231 Precision RTC
  setupRTC();

  // stateLEDGreen = LOW
  stateLEDGreen = LOW;
  // DS3231 Precision RTC
  timeRTC();
  // SHARP Memory Display Off
  isDisplayOff();

}
Follow Us
Web: https://www.donluc.com/
Web: http://neosteamlabs.com/
Web: http://www.jlpconsultants.com/
YouTube: https://www.youtube.com/channel/UC5eRjrGn1CqkkGfZy0jxEdA
Facebook: https://www.facebook.com/neosteam.labs.9/
Instagram: https://www.instagram.com/neosteamlabs/
Pinterest: https://www.pinterest.com/NeoSteamLabs/
Twitter: https://twitter.com/labs_steam
Etsy: https://www.etsy.com/shop/NeoSteamLabs
Don Luc
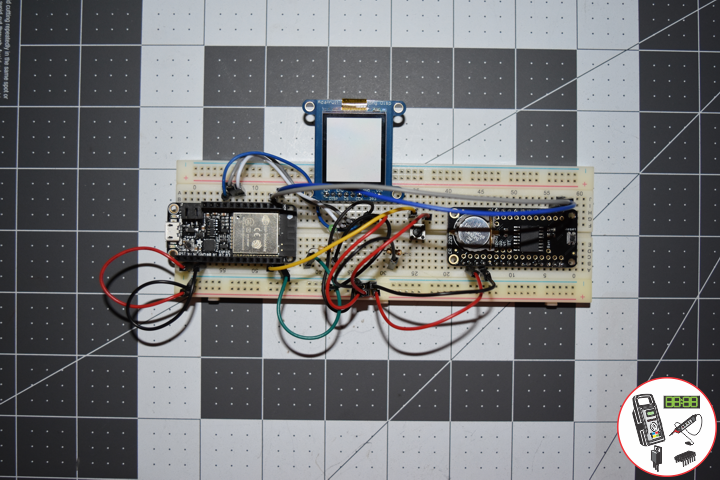
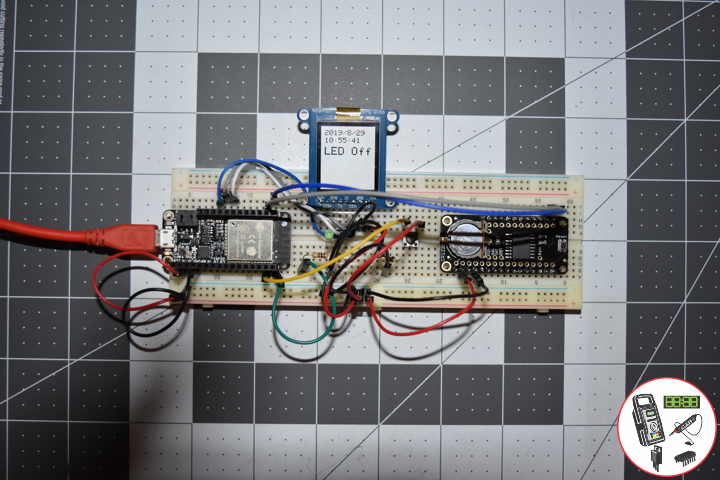
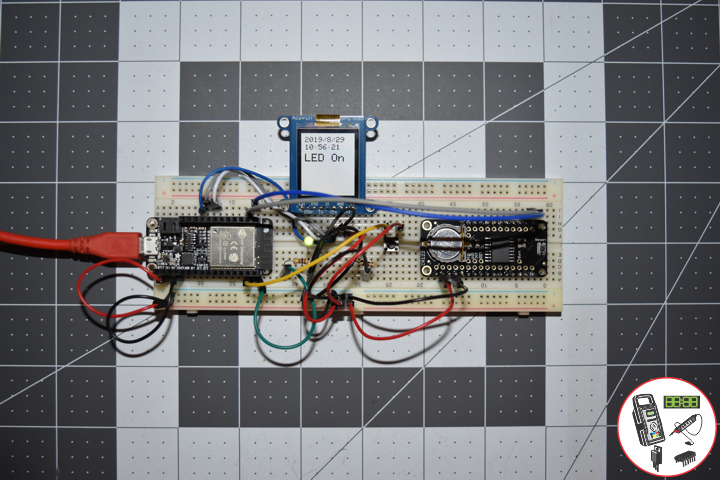
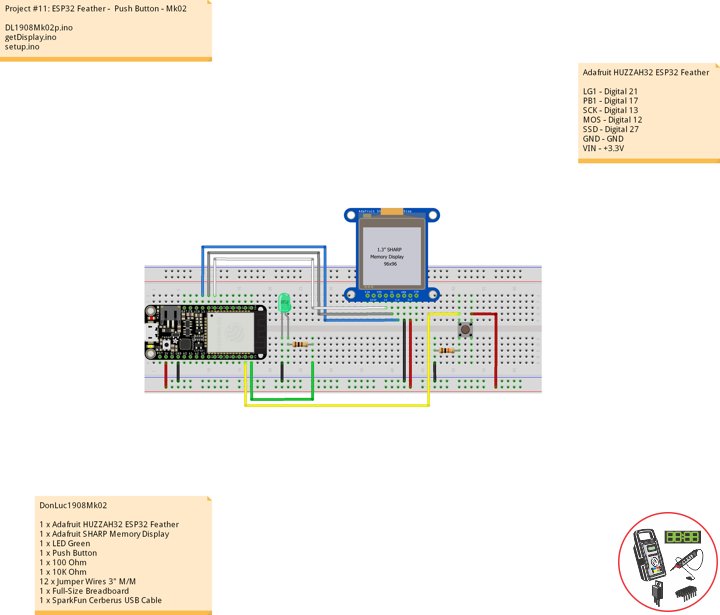
Project #11: ESP32 Feather – Push Button – Mk02
ESP32 Feather – Push Button – Mk02
——
——
——
——
——
——
Momentary Pushbutton Switch
This is a standard 12mm square momentary button. What we really like is the large button head and good tactile feel (it ‘clicks’ really well). This button is great for user input on a PCB or a good, big reset button on a breadboard. Breadboard friendly!
DonLuc1908Mk02
1 x Adafruit HUZZAH32 ESP32 Feather
1 x Adafruit SHARP Memory Display
1 x LED Green
1 x Push Button
1 x 100 Ohm
1 x 10K Ohm
12 x Jumper Wires 3″ M/M
1 x Full-Size Breadboard
1 x SparkFun Cerberus USB Cable
Adafruit HUZZAH32 ESP32 Feather
LG1 – Digital 21
PB1 – Digital 17
SCK – Digital 13
MOS – Digital 12
SSD – Digital 27
GND – GND
VIN – +3.3V
Follow Us
Web: http://neosteamlabs.com/
Web: https://www.donluc.com/
Web: http://www.jlpconsultants.com/
YouTube: https://www.youtube.com/channel/UC5eRjrGn1CqkkGfZy0jxEdA
Facebook: https://www.facebook.com/neosteam.labs.9/
Instagram: https://www.instagram.com/neosteamlabs/
Pinterest: https://www.pinterest.com/NeoSteamLabs/
Twitter: https://twitter.com/labs_steam
Etsy: https://www.etsy.com/shop/NeoSteamLabs
DL1908Mk02p.ino
// ***** Don Luc Electronics *****
// Software Version Information
// Project #11: HUZZAH32 ESP32 Feather - Push Button - Mk02
// 08-02
// DonLuc1908Mk02p.ino 08-02
// Adafruit HUZZAH32 ESP32 Feather Board
// SHARP Display
// LED Green
// Push Button

// include Library Code
#include <Adafruit_SharpMem.h>
#include <Adafruit_GFX.h>

// SHARP Memory Display
// any pins can be used
#define SHARP_SCK  13
#define SHARP_MOSI 12
#define SHARP_SS   27
// Set the size of the display here, e.g. 144x168!
Adafruit_SharpMem display(SHARP_SCK, SHARP_MOSI, SHARP_SS, 144, 168);
// The currently-available SHARP Memory Display (144x168 pixels)
// requires > 4K of microcontroller RAM; it WILL NOT WORK on Arduino Uno
// or other <4K "classic" devices!
#define BLACK 0
#define WHITE 1
int minorHalfSize; // 1/2 of lesser of display width or height

// LED Green
int iLEDGreen =  21;                 // LED Green
int stateLEDGreen = LOW;             // stateLEDGreen

// Button
int iBut1 = 17;                      // Button 1
int ButState1;                       // Variable for reading the button status
int previous = LOW;                  // previous
long lTime = 0;                      // lTime
long debounce = 500;                 // debounce

void loop() {

  // Read the state of the button value
  ButState1 = digitalRead(iBut1);

  // Check if the button is pressed
  if (ButState1 == HIGH && previous == LOW && millis() - lTime > debounce)
  {

     if(stateLEDGreen == HIGH)
     {

        // stateLEDGreen = LOW
        stateLEDGreen = LOW;
        // SHARP Memory Display Off
        isDisplayOff();

     } else
     {

        // stateLEDGreen = HIGH
        stateLEDGreen = HIGH;
        // SHARP Memory Display On
        isDisplayOn();

    }
    lTime = millis();

  }

  // iLEDGreen
  digitalWrite(iLEDGreen, stateLEDGreen);
  previous == ButState1;

}
getDisplay.ino
// SHARP Memory Display On
void isDisplayOn() {

    // Clear Display
    display.clearDisplay();
    // text display tests
    display.setRotation(4);
    //display.clearDisplay();
    display.setTextSize(5);
    display.setTextColor(BLACK);
    display.setCursor(10,25);
    display.println("LED");
    display.setCursor(10,75);
    display.println("On");
    display.refresh();

}
// SHARP Memory Display Off
void isDisplayOff() {

    // Clear Display
    display.clearDisplay();
    // text display tests
    display.setRotation(4);
    //display.clearDisplay();
    display.setTextSize(5);
    display.setTextColor(BLACK);
    display.setCursor(10,25);
    display.println("LED");
    display.setCursor(10,75);
    display.println("Off");
    display.refresh();

}
setup.ino
// Setup
void setup() {

  // SHARP Display start & clear the display
  display.begin();
  display.clearDisplay();

  // Button 1
  // Initialize the button as an input
  pinMode(iBut1, INPUT);

  // Initialize the LED Green
  pinMode(iLEDGreen, OUTPUT);

}
Don Luc
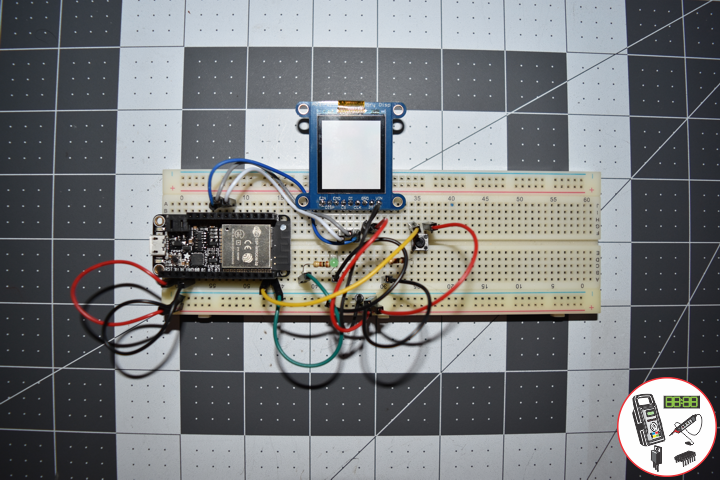
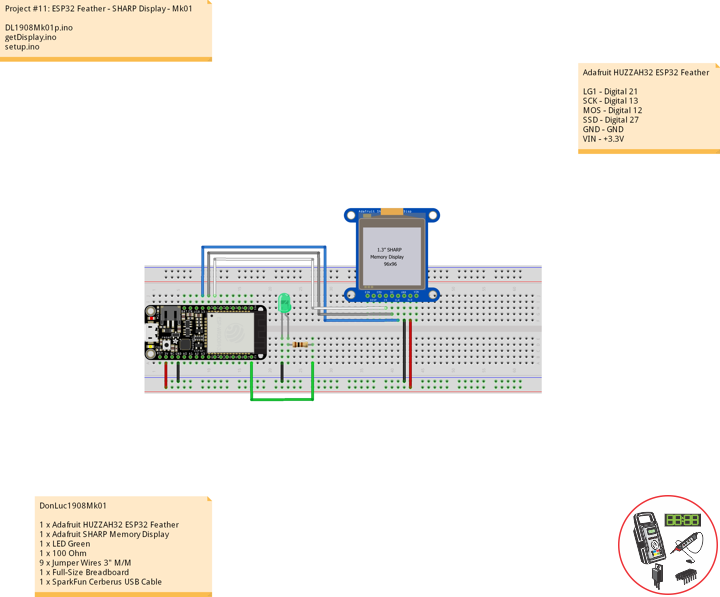
Project #11: ESP32 Feather – SHARP Display – Mk01
ESP32 Feather – SHARP Display
——
——
——
——
——
——
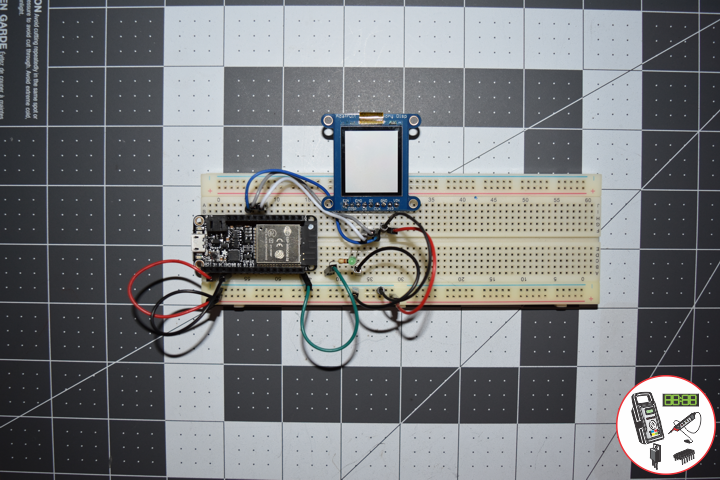
Adafruit HUZZAH32 ESP32 Feather Board
The HUZZAH32 is our ESP32-based Feather, made with the official WROOM32 module. We packed everything you love about Feathers: built in USB-to-Serial converter, automatic bootloader reset, Lithium Ion/Polymer charger, and just about all of the GPIOs brought out so you can use it with any of our Feather Wings.
That module nestled in at the end of this Feather contains a dual-core ESP32 chip, 4 MB of SPI Flash, tuned antenna, and all the passives you need to take advantage of this powerful new processor. The ESP32 has both WiFi and Bluetooth Classic/LE support. That means it’s perfect for just about any wireless or Internet-connected project.
Adafruit SHARP Memory Display Breakout – 1.3″ 168×144 Monochrome
The 1.3″ 168×144 SHARP Memory LCD display is a cross between an eInk (e-paper) display and an LCD. It has the ultra-low power usage of eInk and the fast-refresh rates of an LCD. This model has a gray background, and pixels show up as black-on-gray for a nice e-reader type display. It does not have a backlight, but it is daylight readable. For dark/night reading you may need to illuminate the LCD area with external LEDs.
DonLuc1908Mk01
1 x Adafruit HUZZAH32 ESP32 Feather
1 x Adafruit SHARP Memory Display
1 x LED Green
1 x 100 Ohm
9 x Jumper Wires 3″ M/M
1 x Full-Size Breadboard
1 x SparkFun Cerberus USB Cable
Adafruit HUZZAH32 ESP32 Feather
LG1 – Digital 21
SCK – Digital 13
MOS – Digital 12
SSD – Digital 27
GND – GND
VIN – +3.3V
DL1908Mk01p.ino
// ***** Don Luc Electronics *****
// Software Version Information
// Project #11: HUZZAH32 ESP32 Feather - SHARP Display - Mk01
// 08-01
// DonLuc1908Mk01p.ino 08-01
// Adafruit HUZZAH32 ESP32 Feather Board
// SHARP Display
// LED Green

// include Library Code
#include <Adafruit_SharpMem.h>
#include <Adafruit_GFX.h>

// SHARP Memory Display
// any pins can be used
#define SHARP_SCK  13
#define SHARP_MOSI 12
#define SHARP_SS   27
// Set the size of the display here, e.g. 144x168!
Adafruit_SharpMem display(SHARP_SCK, SHARP_MOSI, SHARP_SS, 144, 168);
// The currently-available SHARP Memory Display (144x168 pixels)
// requires > 4K of microcontroller RAM; it WILL NOT WORK on Arduino Uno
// or other <4K "classic" devices!
#define BLACK 0
#define WHITE 1
int minorHalfSize; // 1/2 of lesser of display width or height

// LED Green
int iLEDGreen =  21;          // LED Green

void loop() {

  // iLEDGreen Off
  digitalWrite(iLEDGreen, LOW);
  // SHARP Memory Display Off
  isDisplayOff();
  delay(2000);
  // iLEDGreen On
  digitalWrite(iLEDGreen, HIGH);
  // SHARP Memory Display On
  isDisplayOn();
  delay(2000);

}
getDisplay.ino
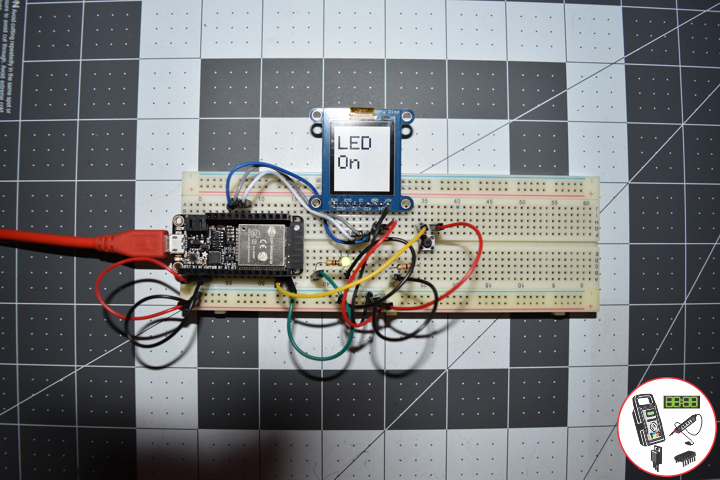
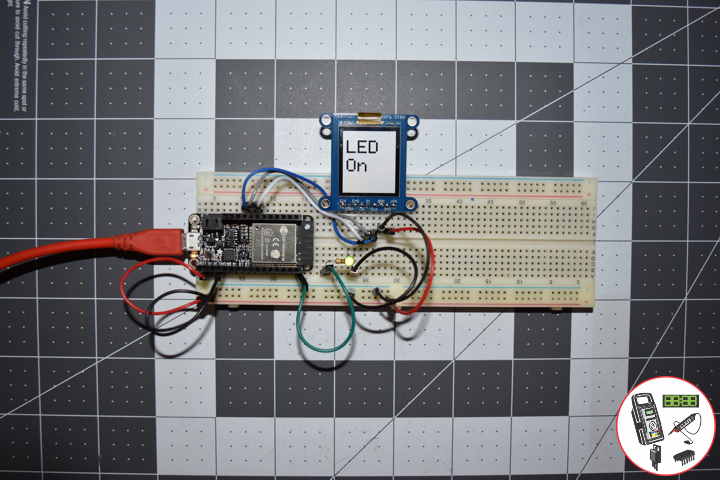
// SHARP Memory Display On
void isDisplayOn() {
// Clear Display
display.clearDisplay();
// text display tests
display.setRotation(4);
//display.clearDisplay();
display.setTextSize(5);
display.setTextColor(BLACK);
display.setCursor(10,25);
display.println("LED");
display.setCursor(10,75);
display.println("On");
display.refresh();
}
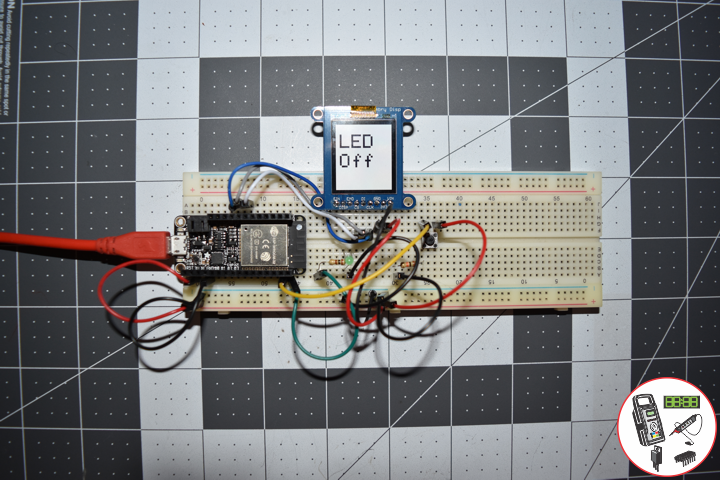
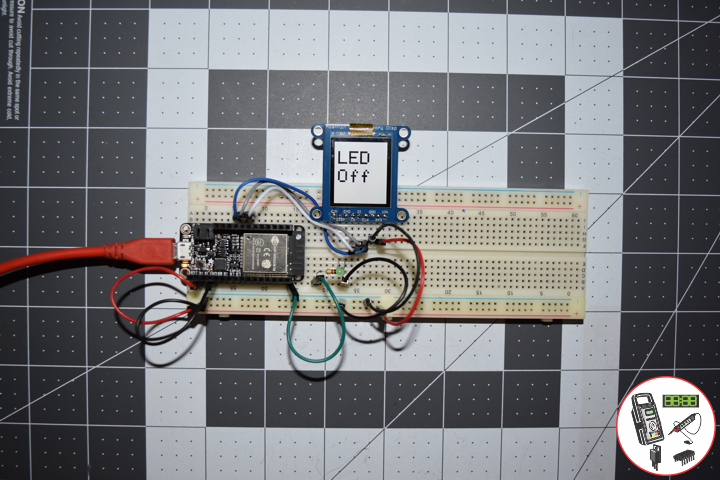
// SHARP Memory Display Off
void isDisplayOff() {
// Clear Display
display.clearDisplay();
// text display tests
display.setRotation(4);
//display.clearDisplay();
display.setTextSize(5);
display.setTextColor(BLACK);
display.setCursor(10,25);
display.println("LED");
display.setCursor(10,75);
display.println("Off");
display.refresh();
}
setup.ino
// Setup
void setup() {

  // SHARP Display start & clear the display
  display.begin();
  display.clearDisplay();

  // Initialize the LED Green
  pinMode(iLEDGreen, OUTPUT);

}
Don Luc