——
#DonLucElectronics #DonLuc #Lamps #NeoPixels #Keyboard #Adafruit #SparkFun #Arduino #Project #Fritzing #Programming #Electronics #Microcontrollers #Consultant
——
——
——
——
——
NeoPixels
The WS2812 Integrated Light Source, or NeoPixel in Adafruit parlance, is the latest advance in the quest for a simple, scalable and affordable full-color LED. Red, green and blue LEDs are integrated alongside a driver chip into a tiny surface-mount package controlled through a single wire. They can be used individually, chained into longer strings or assembled into still more interesting form-factors.
NeoPixels don’t just light up on their own; they require a microcontroller, such as Arduino, and some programming. We provide some sample code to get you started. To create your own effects and animation, you’ll need some programming practice. If this is a new experience, work through some of the beginning Arduino tutorials to get a feel for the language.
NeoPixel Stick – 8 x 5050 RGB LED
Make your own little LED strip arrangement with this stick of NeoPixel LEDs. We crammed 8 of the tiny 5050 smart RGB LEDs onto a PCB with mounting holes and a chainable design. Use only one microcontroller pin to control as many as you can chain together. Each LED is addressable as the driver chip is inside the LED. Each one has constant current drive so the color will be very consistent even if the voltage varies, and no external choke resistors are required making the design slim. Power the whole thing with 5VDC and you’re ready to rock. The LEDs are “Chainable” by connecting the output of one stick into the input of another. There is a single data line with a very timing-specific protocol.
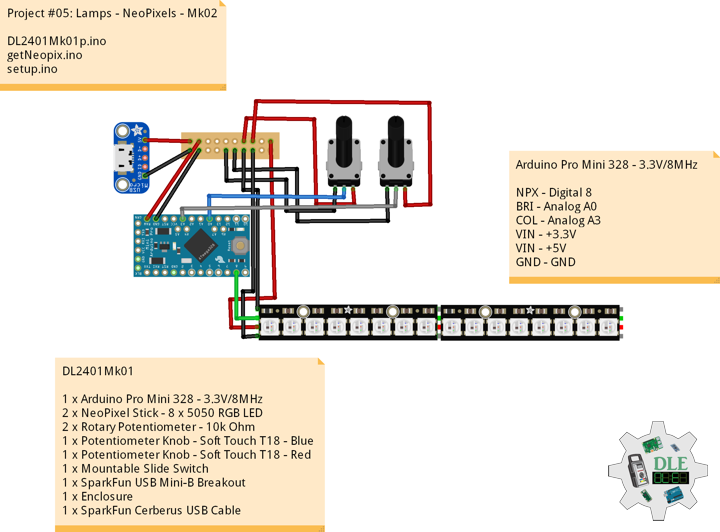
DL2401Mk01
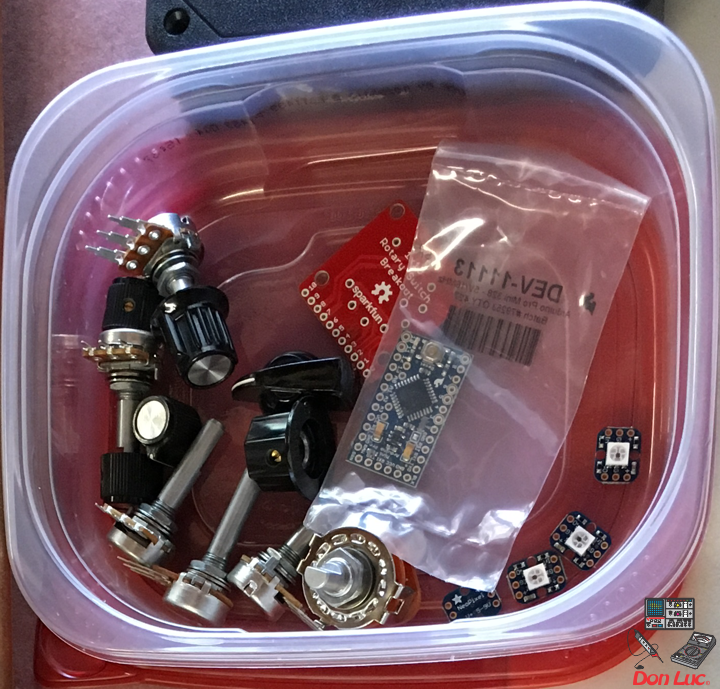
1 x Arduino Pro Mini 328 – 3.3V/8MHz
2 x NeoPixel Stick – 8 x 5050 RGB LED
2 x Rotary Potentiometer – 10k Ohm
1 x Potentiometer Knob – Soft Touch T18 – Blue
1 x Potentiometer Knob – Soft Touch T18 – Red
1 x Mountable Slide Switch
1 x SparkFun USB Mini-B Breakout
1 x Enclosure
1 x SparkFun Cerberus USB Cable
Arduino Pro Mini 328 – 3.3V/8MHz
NPX – Digital 8
BRI – Analog A0
COL – Analog A3
VIN – +3.3V
VIN – +5V
GND – GND
——
DL2401Mk01p.ino
/****** Don Luc Electronics © ******
Software Version Information
Project #05: Lamps - NeoPixels - Mk02
05-02
DL2401Mk01p.ino
1 x Arduino Pro Mini 328 - 3.3V/8MHz
2 x NeoPixel Stick - 8 x 5050 RGB LED
2 x Rotary Potentiometer - 10k Ohm
1 x Potentiometer Knob - Soft Touch T18 - Blue
1 x Potentiometer Knob - Soft Touch T18 - Red
1 x Mountable Slide Switch
1 x SparkFun USB Mini-B Breakout
1 x Enclosure
1 x SparkFun Cerberus USB Cable
*/

// Include the Library Code
// NeoPixel
#include <Adafruit_NeoPixel.h>

// NeoPixels
#define PIN 8
// How many NeoPixels are attached to the Arduino => 16
#define NUMPIXELS 16
Adafruit_NeoPixel pixels = Adafruit_NeoPixel(NUMPIXELS, PIN, NEO_GRB + NEO_KHZ800);

// Color
// Red
int red = 0;
// Green
int green = 0;
// Blue
int blue = 0;

// 2 x Panel Mount 1K potentiometer
// Brighten
const int iSensorBrighten = A0;
int BrightenValue = 0;
int sensorMin = 1023;        // minimum sensor value
int sensorMax = 0;           // maximum sensor value

// Color
const int iSensorColor = A3;
int y = 0;
int ColorVal = 0;

// Software Version Information
String sver = "05-02";

void loop() {

  // Color
  isRangeColor();

  // Brighten
  isNeopix();

}
getNeopix.ino
// Neopix
void isNeopix() {

  for(int i=0; i<NUMPIXELS; i++){

    // Neopix
    BrightenValue = analogRead( iSensorBrighten );

    // Apply the calibration to the sensor reading
    BrightenValue = map(BrightenValue, sensorMin, sensorMax, 0, 255);

    // In case the sensor value is outside the range seen during calibration
    BrightenValue = constrain(BrightenValue, 0, 255);

    pixels.setBrightness( BrightenValue );

    // The pixels.Color takes RGB values, from 0,0,0 up to 255,255,255
    pixels.setPixelColor(i, pixels.Color(red,green,blue));

    // This sends the updated pixel color to the hardware
    pixels.show();

  }

}
// Range Color
void isRangeColor() {

  // Range Color
  ColorVal = analogRead( iSensorColor );
  y = (ColorVal / 127);

  switch ( y ) {
    case  0:
      // White
      red = 255;
      green = 255;
      blue = 255;
      break;
    case 1:
      // Yellow
      red = 255;
      green = 255;
      blue = 0;
      isNeopix();
      break;
    case 2:
      // Pink
      red = 255;
      green = 153;
      blue = 203;
      isNeopix();
      break;
    case 3:
      // Blue
      red = 0;
      green = 102;
      blue = 204;
      isNeopix();
      isNeopix();
      break;
    case 4:
      // Green
      red = 0;
      green = 255;
      blue = 0;
      isNeopix();
      break;
    case 5:
      // Orange
      red = 255;
      green = 102;
      blue = 0;
      isNeopix();
      break;
    case 6:
      // Violet
      red = 204;
      green = 102;
      blue = 204;
      isNeopix();
      break;
    case 7:
      // Red
      red = 255;
      green = 0;
      blue = 0;
      isNeopix();
      break;
  }

}
setup.ino
// Setup
void setup()
{

  // This initializes the NeoPixel library
  pixels.begin();
  delay(50);

}
——
People can contact us: https://www.donluc.com/?page_id=1927
Teacher, Instructor, E-Mentor, R&D and Consulting
- Programming Language
- Single-Board Microcontrollers (PIC, Arduino, Raspberry Pi, Arm, Silicon Labs, Espressif, Etc…)
- IoT
- Wireless (Radio Frequency, Bluetooth, WiFi, Etc…)
- Robotics
- Automation
- Camera and Video Capture Receiver Stationary, Wheel/Tank and Underwater Vehicle
- Unmanned Vehicles Terrestrial and Marine
- Machine Learning
- Artificial Intelligence (AI)
- RTOS
- eHealth Sensors, Biosensor, and Biometric
- Research & Development (R & D)
- Consulting
Follow Us
Luc Paquin – Curriculum Vitae – 2024
https://www.donluc.com/luc/
Web: https://www.donluc.com/
Facebook: https://www.facebook.com/neosteam.labs.9/
YouTube: https://www.youtube.com/@thesass2063
Twitter: https://twitter.com/labs_steam
Pinterest: https://www.pinterest.com/NeoSteamLabs/
Instagram: https://www.instagram.com/neosteamlabs/
Don Luc

