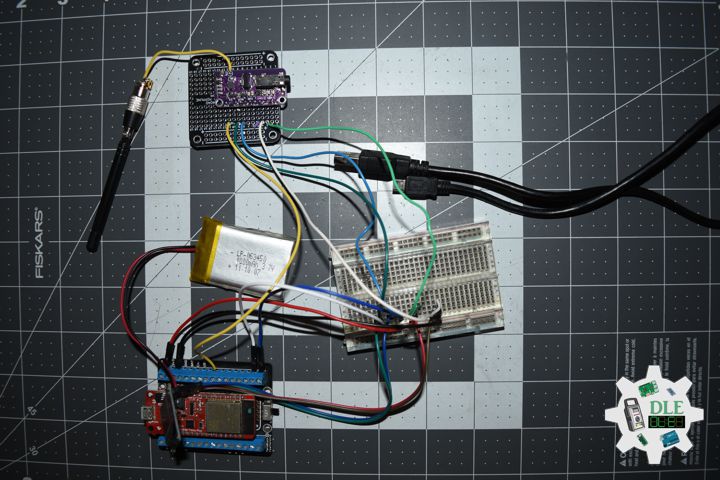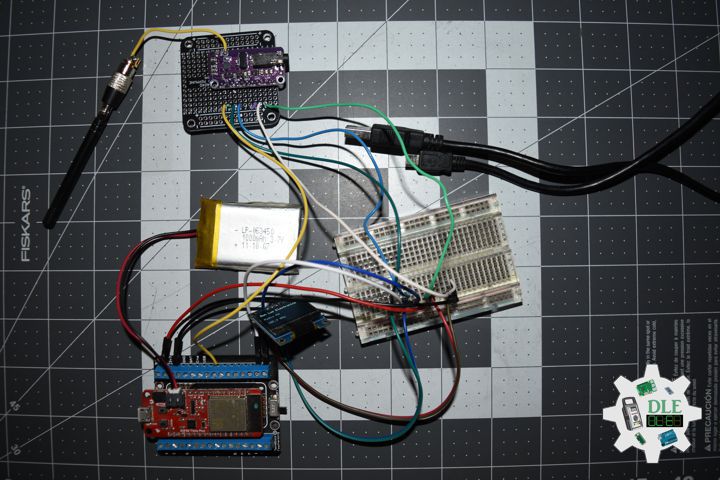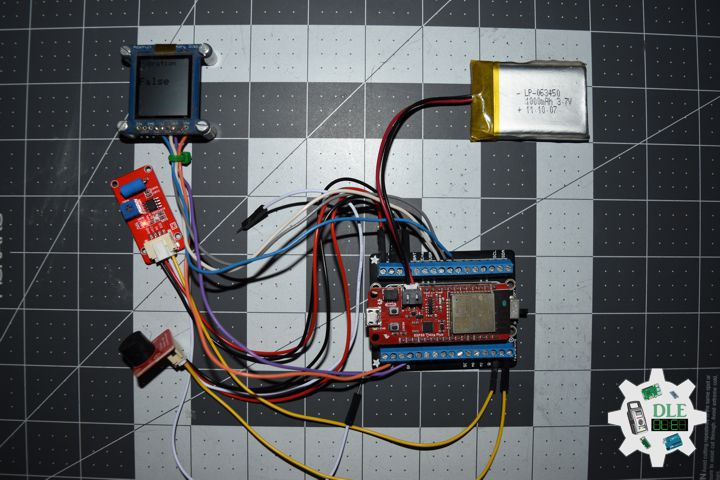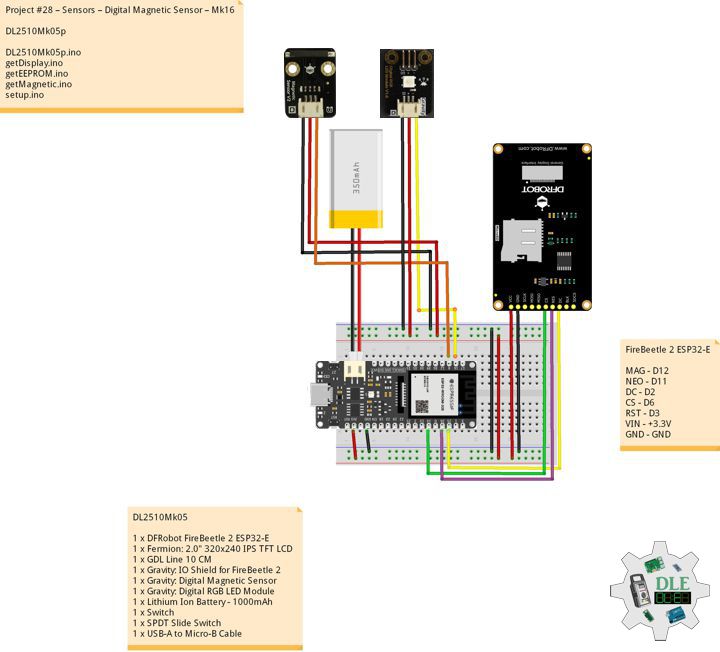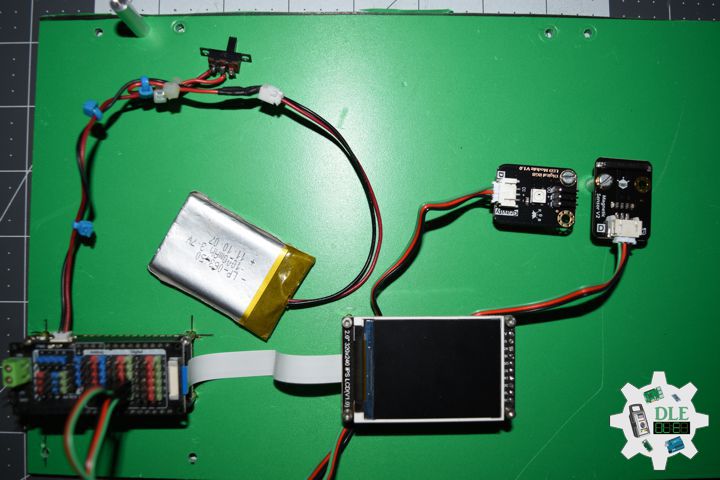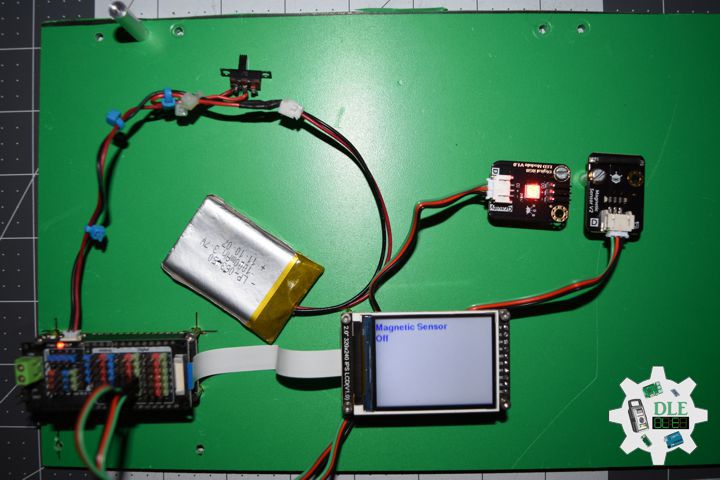
Project #26 – Radio Frequency – SI4713 FM – Mk28

——-

#DonLucElectronics #DonLuc #Si4730FM #RadioFrequency #SparkFunESP32WROOM #Display #IoT #Project #Fritzing #Programming #Electronics #Microcontrollers #Consultant

——
SI4713 FM

——

SI4713 FM

——

SI4713 FM

——

Si4713 FM Radio Transmitter (LW, MW, SW, FM)

When you mention Arduino radio, you always think of modern FM radio (88-108 MHz in Europe). The LW, MW and SW band cover the range from 0.2 to 30 MHz. SW is especially interesting. Radio waves in the shortwave band can be reflected or refracted from a layer of electrically charged atoms in the atmosphere called the ionosphere. Thus shortwave radio can be used for very long distance communication, sometimes entire continents or beyond.

Below I will present to you the development of a radio that covers all the bands mentioned above. The “Heart” of this radio is Si4713 IC from Silicon Labs.

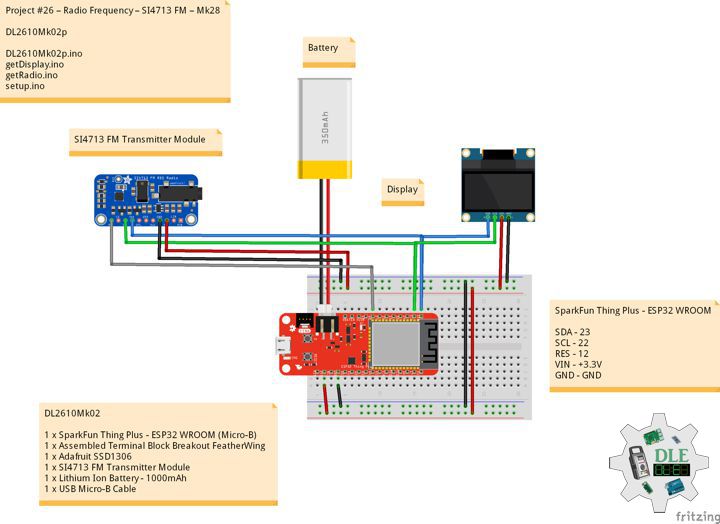
DL2610Mk02

1 x SparkFun Thing Plus – ESP32 WROOM (Micro-B)
1 x Assembled Terminal Block Breakout FeatherWing
1 x Adafruit SSD1306
1 x SI4713 FM Transmitter Module
1 x Lithium Ion Battery – 1000mAh
1 x USB Micro-B Cable

DL2610Mk02p

DL2610Mk02p.ino

/****** Don Luc Electronics © ******
Software Version Information
Project #26 – Radio Frequency – SI4713 FM – Mk28
26-28
DL2610Mk02p.ino
DL2610Mk02
1 x SparkFun Thing Plus - ESP32 WROOM (Micro-B}
1 x Assembled Terminal Block Breakout FeatherWing
1 x Adafruit SSD1306
1 x SI4713 FM Transmitter Module
1 x Lithium Ion Battery - 1000mAh
1 x USB Micro-B Cable
*/

// Include the Library Code
// Wire
#include "Wire.h"
// Adafruit SSD1306
#include <Adafruit_SSD1306.h>
// SI4713 FM Transmitter
#include <Adafruit_Si4713.h>

// SI4713 FM Transmitter
// _BV
#define _BV(n) (1 << n)
// RESET PIN
#define RESETPIN 12
// FM STATION
// 10230 == 102.30 MHz
#define FMSTATION 10230      
// SI4713 FM Transmitter
Adafruit_Si4713 radio = Adafruit_Si4713(RESETPIN);

// Adafruit SSD1306
#define SCREEN_WIDTH 128
#define SCREEN_HEIGHT 64
#define OLED_RESET -1
Adafruit_SSD1306 display(SCREEN_WIDTH, SCREEN_HEIGHT, &Wire, OLED_RESET);

// Software Version Information
String sver = "26-28";

void loop() {
  
  // is SI4713FM
  isSI4713FM();
  
}

getDisplay.ino

// Adafruit SSD1306
// isDisplayUID
void isDisplayUID(){

    // Intentar ambas direcciones
  if(!display.begin(SSD1306_SWITCHCAPVCC, 0x3C)) {
    //Serial.println("Error con 0x3C, probando 0x3D...");
    if(!display.begin(SSD1306_SWITCHCAPVCC, 0x3D)) {
      //Serial.println("Error OLED en ambas direcciones");
      return;
    }
  }
  
  // Clear Display
  display.clearDisplay();
  display.setTextSize(1);
  display.setTextColor(SSD1306_WHITE);
  // Don Luc Electronics
  display.setCursor(0,0);
  display.println("Don Luc Electronics");
  // Motor Drive
  display.setCursor(0,10);
  display.print("Radio FM");
 // Version
  display.setCursor(0,20);
  display.print("Version");
  display.setCursor(0,30);
  display.print( sver );
  // Display
  display.display();

}
// isDisplay FM
void isDisplayFM(){

  // Clear Display
  display.clearDisplay();
  display.setTextSize(1);
  display.setTextColor(SSD1306_WHITE);
  // Don Luc Electronics
  display.setCursor(0,0);
  display.println("Don Luc Electronics");
  // FM
  display.setCursor(0,20);
  display.print("Radio FM");
  // 102.3 MHz
  display.setCursor(0,40);
  display.print( "102.3 MHz" );
  // Display
  display.display();

}

getRadio.ino

// SI4713 FM Transmitter\
// Setup SI4713 FM
void isSetupSI4713FM(){

  // Begin with address 0x63 (CS high default)
  if (! radio.begin()) {  
    
    Serial.println("Couldn't find radio?");
    while (1);

  }

  // dBuV, 88-115 max
  radio.setTXpower(115);

  // 102.3 MHz
  radio.tuneFM(FMSTATION);

  // This will tell you the status in case you want to read it from the chip
  radio.readTuneStatus();

  // Current Frequency
  radio.currFreq;
  
  // Current Frequency dBuV
  radio.currdBuV;

  // Current Frequency Antenna Capacitor
  radio.currAntCap;

  // Begin the RDS/RDBS transmission
  radio.beginRDS();

  // DON-LUC
  radio.setRDSstation("DON-LUC");

  // "Don Lucito Radio!
  radio.setRDSbuffer( "Don Lucito Radio!");

  // Set GP1 and GP2 to output
  radio.setGPIOctrl(_BV(1) | _BV(2)); 

}
// is SI4713FM
void isSI4713FM(){

  // Read ASQ
  radio.readASQ();

  // Current Frequency ASQ: 0x
  Serial.println(radio.currASQ, HEX);

  // Current Entry-Level
  Serial.println(radio.currInLevel);

  // Toggle GPO1
  radio.setGPIO(_BV(1));
  // Delay
  delay(500);

  // Toggle GPO2
  radio.setGPIO(_BV(2));
  // Delay
  delay(500);

}

setup.ino

// Setup
void setup()
{

  // Delay
  delay( 100 );

  // Serial Begin
  Serial.begin(9600);

  // Delay
  delay(100);

  // Delay
  delay( 100 );

  // Adafruit SSD1306 - UID
  // Don Luc Electronics
  // Versioc
  isDisplayUID();
  
  // Delay
  delay( 5000 );

  // isDisplay FM
  isDisplayFM();

  // Delay
  delay( 1000 );

  // Setup SI4713 FM
  isSetupSI4713FM();

  // Delay
  delay( 1000 );

}

——

People can contact us: https://www.donluc.com/?page_id=1927

Consultant, R&D, Electronics, IoT, Teacher and Instructor

  • Programming Language
  • Single-Board Microcontrollers (PIC, Arduino, Raspberry Pi, Arm, Silicon Labs, Espressif, Etc…)
  • IoT
  • Wireless (Radio Frequency, Bluetooth, WiFi, Etc…)
  • Robotics
  • Automation
  • Camera and Video Capture Receiver Stationary, Wheel/Tank , Underwater and UAV Vehicle
  • Unmanned Vehicles Terrestrial, Marine and UAV
  • Machine Learning
  • Artificial Intelligence (AI)
  • RTOS
  • Sensors, eHealth Sensors, Biosensor, and Biometric
  • Research & Development (R & D)
  • Consulting

Follow Us

Luc Paquin – Curriculum Vitae – 2026
https://www.donluc.com/luc/LucPaquinCVEng2026Mk01.pdf
https://www.donluc.com/luc/

Web: https://www.donluc.com/
Web: https://www.jlpconsultants.com/
Facebook: https://www.facebook.com/neosteam.labs.9/
YouTube: https://www.youtube.com/@thesass2063
DFRobot: https://learn.dfrobot.com/user-10186.html
TikTok: https://www.tiktok.com/@luc.paquin8
Hackster: https://www.hackster.io/luc-paquin
LinkedIn: https://www.linkedin.com/in/jlucpaquin/

Don Luc

Project #12: Robotics – Joystick – Mk35

——

#DonLucElectronics #DonLuc #Robotics #Joystick #L298N #MotorDC #SparkFunRedBoard #Project #Fritzing #Programming #Electronics #Microcontrollers #Consultant

——

Joystick

——

Joystick

——

Joystick

——

Thumb Joystick

The classic ‘PS2-style’ analog joystick. Features smooth dual-axis control (two 10k pots) and a satisfying integrated push-button click.

SparkFun Thumb Joystick Breakout

Stop struggling with weird pin spacing. This breakout board routes the Thumb Joystick connections to a standard 0.1″ header for easy breadboarding.

DL2603Mk01

1 x SparkFun RedBoard Qwiic
1 x Thumb Joystick
1 x SparkFun Thumb Joystick Breakout
1 x L298N DC Motor Driver Module
2 x Motor DC
1 x Power Switch
1 x 18650 Battery Holder (11 Volts)
3 x 18650 Battery
1 x Micro USB Cable

DL2603Mk01p

DL2603Mk01p.ino

/****** Don Luc Electronics © ******
Software Version Information
Project #12: Robotics - Joystick - Mk35
12-35
DL2603Mk01p.ino
DL2603Mk01
1 x SparkFun RedBoard Qwiic
1 x Thumb Joystick
1 x SparkFun Thumb Joystick Breakout
1 x L298N DC Motor Driver Module
2 x Motor DC
1 x Power Switch
1 x 18650 Battery Holder (11 Volts)
3 x 18650 Battery
1 x Micro USB Cable
*/

// Include the Library Code

// Joystick
// Vertical
const int VERT = A0;
int vertical;
// Horizontal
const int HORIZ = A1;
int horizontal;
// Sel
const int SEL = 7;
int select;

// Motor DC 1 
int motor1pin1 = 2;
int motor1pin2 = 3;

// Motor DC 2
int motor2pin1 = 4;
int motor2pin2 = 5;

// Software Version Information
String sver = "12-35";

void loop() {

  // is Joystick
  isJoystick();

}

getJoystick.ino

// Joystick
// is Joystick
void isJoystick(){

  // Vertical
  vertical = analogRead(VERT);

  // Moving Forward
  if (vertical < 20) {
      
    // Moving Forward
    digitalWrite(motor1pin1, HIGH);
    digitalWrite(motor1pin2, LOW);
    digitalWrite(motor2pin1, HIGH); 
    digitalWrite(motor2pin2, LOW);    
    
  }
  
  // Moving Backwards
  if (vertical > 500) {
    
    // Moving Backwards
    digitalWrite(motor1pin1, LOW);
    digitalWrite(motor1pin2, HIGH);
    digitalWrite(motor2pin1, LOW); 
    digitalWrite(motor2pin2, HIGH);
  
  }

  // Horizontal
  horizontal = analogRead(HORIZ);

  // Moving Right
  if (horizontal < 25){

    // Moving Right
    digitalWrite(motor1pin1, LOW);
    digitalWrite(motor1pin2, HIGH);
    digitalWrite(motor2pin1, LOW); 
    digitalWrite(motor2pin2, LOW);

  }

// Moving Left
  if (horizontal > 500 ){

    // Moving Left
    digitalWrite(motor1pin1, LOW);
    digitalWrite(motor1pin2, LOW);
    digitalWrite(motor2pin1, LOW); 
    digitalWrite(motor2pin2, HIGH);

  }

  // LOW (0) if pressed
  select = digitalRead(SEL);

  // Select
  if (select == LOW) {
      
    // Stop
    digitalWrite(motor1pin1, LOW);
    digitalWrite(motor1pin2, LOW);
    digitalWrite(motor2pin1, LOW); 
    digitalWrite(motor2pin2, LOW);

  }

}

setup.ino

// Setup
void setup()
{
 
  // Motor DC 1
  pinMode(motor1pin1, OUTPUT);
  pinMode(motor1pin2, OUTPUT);

  // Motor DC 2
  pinMode(motor2pin1, OUTPUT);
  pinMode(motor2pin2, OUTPUT);

  // SEL Input
  pinMode(SEL, INPUT_PULLUP);

}

——

People can contact us: https://www.donluc.com/?page_id=1927

Consultant, R&D, Electronics, IoT, Teacher and Instructor

  • Programming Language
  • Single-Board Microcontrollers (PIC, Arduino, Raspberry Pi, Arm, Silicon Labs, Espressif, Etc…)
  • IoT
  • Wireless (Radio Frequency, Bluetooth, WiFi, Etc…)
  • Robotics
  • Automation
  • Camera and Video Capture Receiver Stationary, Wheel/Tank , Underwater and UAV Vehicle
  • Unmanned Vehicles Terrestrial, Marine and UAV
  • Machine Learning
  • Artificial Intelligence (AI)
  • RTOS
  • Sensors, eHealth Sensors, Biosensor, and Biometric
  • Research & Development (R & D)
  • Consulting

Follow Us

Luc Paquin – Curriculum Vitae – 2026
https://www.donluc.com/luc/LucPaquinCVEng2026Mk01.pdf
https://www.donluc.com/luc/

Web: https://www.donluc.com/
Web: https://www.jlpconsultants.com/
Facebook: https://www.facebook.com/neosteam.labs.9/
YouTube: https://www.youtube.com/@thesass2063
DFRobot: https://learn.dfrobot.com/user-10186.html
Elecrow: https://www.elecrow.com/share/sharepj/center/no/760816d385ebb1edc0732fd873bfbf13
TikTok: https://www.tiktok.com/@luc.paquin8
Hackster: https://www.hackster.io/luc-paquin
LinkedIn: https://www.linkedin.com/in/jlucpaquin/

Don Luc
Project #12: Robotics – 4WD Robot Car – Mk34

——

#DonLucElectronics #DonLuc #L298N #MotorDC #ESP32CAM #ESP32 #IoT #Project #Fritzing #Programming #Electronics #Microcontrollers #Consultant

——

4WD Robot Car

——

4WD Robot Car

——

4WD Robot Car

——

4WD Robot Car

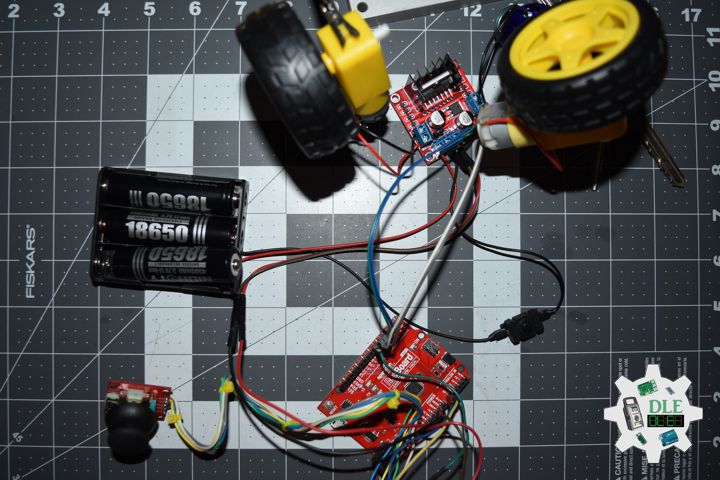
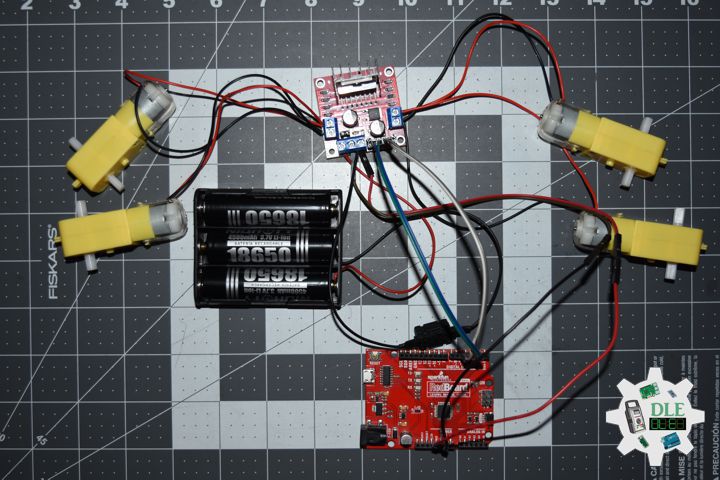
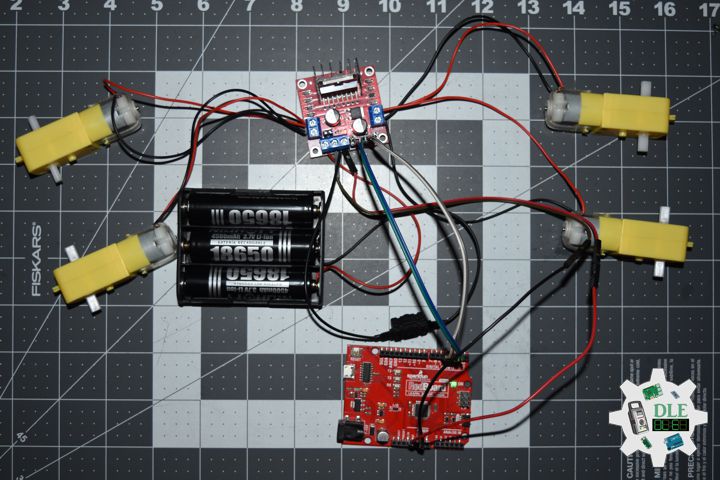
4WD Robot Car uses SparkFun RedBoard Qwiic as the main control board and is combined with L298N motor drive board, forming a powerful intelligent mobile device. As for L298N motor drive board, since it provides stable power output and flexible steering control, it is responsible for driving wheels.

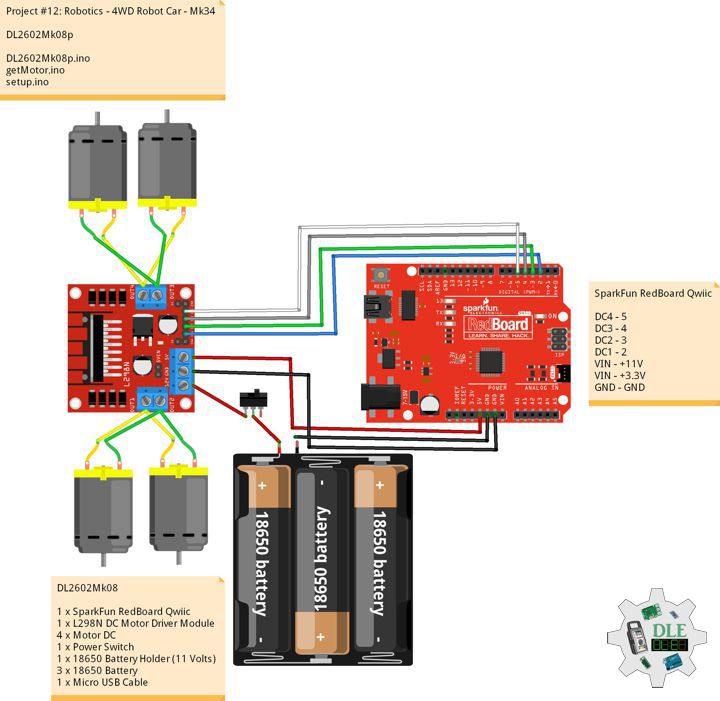
DL2602Mk08

1 x SparkFun RedBoard Qwiic
1 x L298N DC Motor Driver Module
4 x Motor DC
1 x Power Switch
1 x 18650 Battery Holder (11 Volts)
3 x 18650 Battery
1 x Micro USB Cable

DL2602Mk08p

DL2602Mk08p.ino

/****** Don Luc Electronics © ******
Software Version Information
Project #12: Robotics - 4WD Robot Car - Mk34
12-34
DL2602Mk08p.ino
DL2602Mk08
1 x SparkFun RedBoard Qwiic
1 x L298N DC Motor Driver Module
4 x Motor DC
1 x Power Switch
1 x 18650 Battery Holder (11 Volts)
3 x 18650 Battery
1 x Micro USB Cable
*/

// Include the Library Code

// Motor DC 1 
int motor1pin1 = 2;
int motor1pin2 = 3;

// Motor DC 2
int motor2pin1 = 4;
int motor2pin2 = 5;

// Software Version Information
String sver = "12-34";

void loop() {

  // is Motor
  isMotor();

}

getMotor.ino

// Motor
// is Motor
void isMotor(){

  // Moving Forward
  digitalWrite(motor1pin1, HIGH);
  digitalWrite(motor1pin2, LOW);
  digitalWrite(motor2pin1, HIGH); 
  digitalWrite(motor2pin2, LOW);
  delay(3000);

  // Stop
  digitalWrite(motor1pin1, LOW);
  digitalWrite(motor1pin2, LOW);
  digitalWrite(motor2pin1, LOW); 
  digitalWrite(motor2pin2, LOW);
  delay(3000);

  // Moving Backwards
  digitalWrite(motor1pin1, LOW);
  digitalWrite(motor1pin2, HIGH);
  digitalWrite(motor2pin1, LOW); 
  digitalWrite(motor2pin2, HIGH);
  delay(3000);

  // Stop
  digitalWrite(motor1pin1, LOW);
  digitalWrite(motor1pin2, LOW);
  digitalWrite(motor2pin1, LOW); 
  digitalWrite(motor2pin2, LOW);
  delay(3000);

  // Moving Right
  digitalWrite(motor1pin1, LOW);
  digitalWrite(motor1pin2, HIGH);
  digitalWrite(motor2pin1, LOW); 
  digitalWrite(motor2pin2, LOW);
  delay(3000);

  // Stop
  digitalWrite(motor1pin1, LOW);
  digitalWrite(motor1pin2, LOW);
  digitalWrite(motor2pin1, LOW); 
  digitalWrite(motor2pin2, LOW);
  delay(3000);

  // Moving Left
  digitalWrite(motor1pin1, LOW);
  digitalWrite(motor1pin2, LOW);
  digitalWrite(motor2pin1, LOW); 
  digitalWrite(motor2pin2, HIGH);
  delay(3000);

  // Stop
  digitalWrite(motor1pin1, LOW);
  digitalWrite(motor1pin2, LOW);
  digitalWrite(motor2pin1, LOW); 
  digitalWrite(motor2pin2, LOW);
  delay(3000);

}

setup.ino

// Setup
void setup()
{
 
  // Motor DC 1
  pinMode(motor1pin1, OUTPUT);
  pinMode(motor1pin2, OUTPUT);

  // Motor DC 2
  pinMode(motor2pin1, OUTPUT);
  pinMode(motor2pin2, OUTPUT);

}

——

People can contact us: https://www.donluc.com/?page_id=1927

Consultant, R&D, Electronics, IoT, Teacher and Instructor

  • Programming Language
  • Single-Board Microcontrollers (PIC, Arduino, Raspberry Pi, Arm, Silicon Labs, Espressif, Etc…)
  • IoT
  • Wireless (Radio Frequency, Bluetooth, WiFi, Etc…)
  • Robotics
  • Automation
  • Camera and Video Capture Receiver Stationary, Wheel/Tank , Underwater and UAV Vehicle
  • Unmanned Vehicles Terrestrial, Marine and UAV
  • Machine Learning
  • Artificial Intelligence (AI)
  • RTOS
  • Sensors, eHealth Sensors, Biosensor, and Biometric
  • Research & Development (R & D)
  • Consulting

Follow Us

Luc Paquin – Curriculum Vitae – 2026
https://www.donluc.com/luc/LucPaquinCVEng2026Mk01.pdf
https://www.donluc.com/luc/

Web: https://www.donluc.com/
Web: https://www.jlpconsultants.com/
Facebook: https://www.facebook.com/neosteam.labs.9/
YouTube: https://www.youtube.com/@thesass2063
DFRobot: https://learn.dfrobot.com/user-10186.html
Elecrow: https://www.elecrow.com/share/sharepj/center/no/760816d385ebb1edc0732fd873bfbf13
TikTok: https://www.tiktok.com/@luc.paquin8
Hackster: https://www.hackster.io/luc-paquin
LinkedIn: https://www.linkedin.com/in/jlucpaquin/

Don Luc

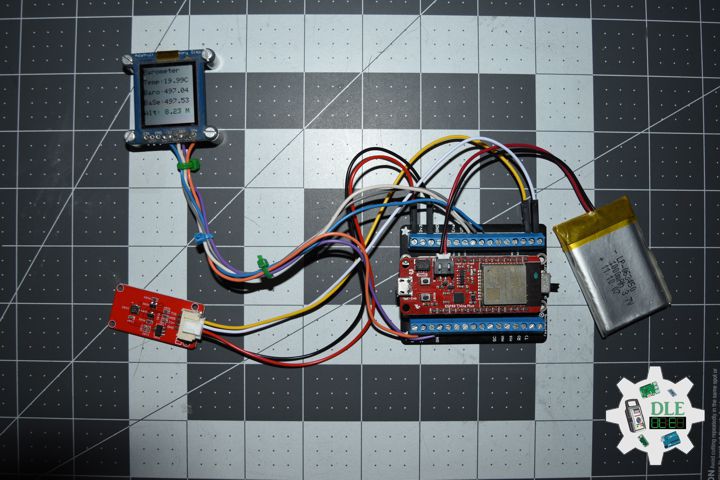
Project #28 – Sensors – Barometer – Mk25

——

#DonLucElectronics #DonLuc #Barometer #SparkFunESP32WROOM #ESP32 #Display #IoT #Project #Fritzing #Programming #Electronics #Microcontrollers #Consultant

——

Barometer

——

Barometer

——

Barometer

——

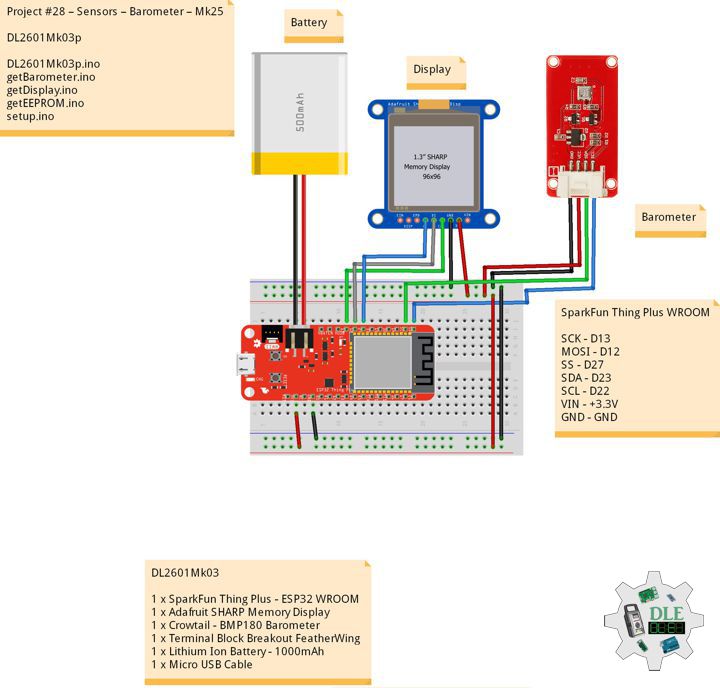
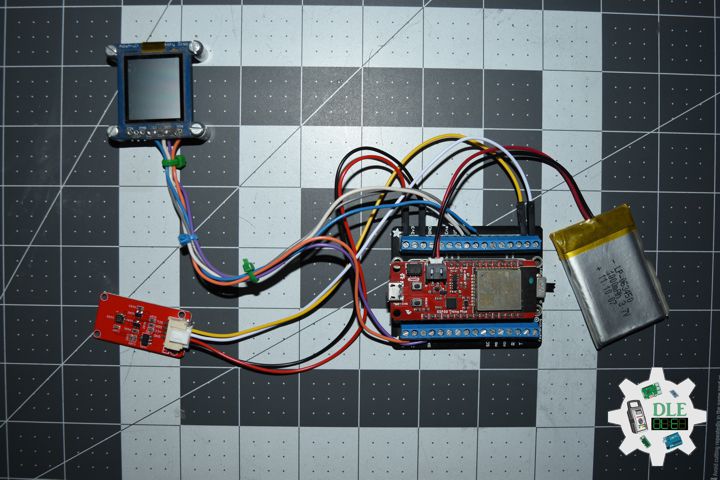
Crowtail – BMP180 Barometer

The BMP180 offers a pressure measuring range of 300 to 1100 hPa with an accuracy down to 0.02 hPa in advanced resolution mode. It’s based on piezo-resistive technology for high accuracy, ruggedness and long term stability. These come factory-calibrated, with the calibration coefficients already stored in ROM.

DL2601Mk03

1 x SparkFun Thing Plus – ESP32 WROOM
1 x Adafruit SHARP Memory Display
1 x Crowtail – BMP180 Barometer
1 x Terminal Block Breakout FeatherWing
1 x Lithium Ion Battery – 1000mAh
1 x Micro USB Cable

DL2601Mk03p

DL2601Mk03p.ino

/****** Don Luc Electronics © ******
Software Version Information
Project #28 – Sensors – Barometer – Mk25
28-25
DL2601Mk03p.ino
DL2601Mk03
1 x SparkFun Thing Plus - ESP32 WROOM
1 x Adafruit SHARP Memory Display
1 x Crowtail - BMP180 Barometer
1 x Terminal Block Breakout FeatherWing
1 x Lithium Ion Battery - 1000mAh
1 x Micro USB Cable
*/

// Include the Library Code
// EEPROM Library to Read and Write EEPROM with Unique ID for Unit
#include "EEPROM.h"
// Wire
#include <Wire.h>
// SHARP Memory Display
#include <Adafruit_SharpMem.h>
#include <Adafruit_GFX.h>
// BMP180 Barometer
#include <SFE_BMP180.h>

// BMP180 Barometer
SFE_BMP180 pressure;
// Altitude 8.23
#define ALTITUDE 8.23
// Status
char status;
// Temperature
double dTemp;
String sT;
// Pressure
double dPre;
String sP;
// Sea Level ALTITUDE
double dP0;
String sP0;
// ALTITUDE
double dAlt;
String sA;

// SHARP Memory Display
#define SHARP_SCK  13
#define SHARP_MOSI 12
#define SHARP_SS   27
// Set the size of the display here, e.g. 144x168!
Adafruit_SharpMem display(SHARP_SCK, SHARP_MOSI, SHARP_SS, 144, 168);
// The currently-available SHARP Memory Display (144x168 pixels)
// requires > 4K of microcontroller RAM; it WILL NOT WORK on Arduino Uno
// or other <4K "classic" devices.
#define BLACK 0
#define WHITE 1

// Software Version Information
// EEPROM Unique ID Information
#define EEPROM_SIZE 64
String uid = "";

// Software Version Information
String sver = "28-25";

void loop() {
  
  // Barometer Sensor
  isBarometer();

  // isDisplay Barometer
  isDisplayBarometer();

  // Delay 1 Second
  delay( 1000 );

}

getBarometer.ino

// Barometer Sensor
// is Barometer
void isBarometer(){

  // Temperature 
  status = pressure.getTemperature( dTemp );

  
     if (status != 0) {
  
       status = pressure.getPressure( dPre, dTemp );
       
       if (status != 0) {

         // Temperature 
         sT = dTemp;
      
         // Pressure
         sP = dPre;

         // Sea Level ALTITUDE
         sP0 = pressure.sealevel( dPre, ALTITUDE );

         sA = ALTITUDE;

       }

     }

}

getDisplay.ino

// SHARP Memory Display
// SHARP Memory Display - UID
void isDisplayUID() {

    // Text Display 
    // Clear Display
    display.clearDisplay();
    display.setRotation(4);
    display.setTextSize(3);
    display.setTextColor(BLACK);
    // Don Luc Electronics
    display.setCursor(0,10);
    display.println( "Don Luc" );
    display.setTextSize(2);
    display.setCursor(0,40);
    display.println( "Electronics" );
    // Version
    //display.setTextSize(3);
    display.setCursor(0,70);
    display.println( "Version" );
    //display.setTextSize(2);
    display.setCursor(0,95);   
    display.println( sver );
    // EEPROM
    display.setCursor(0,120);
    display.println( "EEPROM" );
    display.setCursor(0,140);   
    display.println( uid );
    // Refresh
    display.refresh();
    delay( 100 );
    
}
// Display Barometer
void isDisplayBarometer() {

    // Text Display Barometer
    // Clear Display
    display.clearDisplay();
    display.setRotation(4);
    display.setTextSize(2);
    display.setTextColor(BLACK);
    // Barometer Sensor
    display.setCursor(0,5);
    display.println( "Barometer" );
    display.setCursor(0,35);
    // Temperature 
    display.print( "Temp: " );
    display.setCursor(60,35);
    display.print( sT );
    display.setCursor(120,35);
    display.println( "C" );
    // Pressure
    display.setCursor(0,65);
    display.print( "Baro: " );
    display.setCursor(60,65);
    display.println( sP );
    // Sea Level ALTITUDE
    display.setCursor(0,95);
    display.print( "BaSe: " );
    display.setCursor(60,95);
    display.println( sP0 );
    // ALTITUDE
    display.setCursor(0,125);
    display.print( "Alt: " );
    display.setCursor(60,125);
    display.print( sA );
    display.setCursor(120,125);
    display.println( "M" );
    // Refresh
    display.refresh();
    delay( 100 );

}

getEEPROM.ino

// isUID EEPROM Unique ID
void isUID()
{
  
  // Is Unit ID
  uid = "";
  for (int x = 0; x < 7; x++)
  {
    uid = uid + char(EEPROM.read(x));
  }
  
}

setup.ino

// Setup
void setup()
{
 
  // Delay
  delay( 100 );

   // EEPROM Size
  EEPROM.begin(EEPROM_SIZE);
  
  // EEPROM Unique ID
  isUID();

  // Delay
  delay( 100 );

  // SHARP Display Start & Clear the Display
  display.begin();
  // Clear Display
  display.clearDisplay();

  // Delay
  delay( 100 );
  
  // Initialize the sensor (it is important to get calibration values
  // stored on the device).
  pressure.begin();

  // Delay
  delay( 2000 );

  // Temperature
  pressure.startTemperature();

  // Pressure
  pressure.startPressure(3);

  // Delay
  delay( 100 );

  // Display UID
  // Don Luc
  // Electronic
  // Version
  // EEPROM
  isDisplayUID();

  // Delay 5 Second
  delay( 5000 );

}

——

People can contact us: https://www.donluc.com/?page_id=1927

Consultant, R&D, Electronics, IoT, Teacher and Instructor

  • Programming Language
  • Single-Board Microcontrollers (PIC, Arduino, Raspberry Pi, Arm, Silicon Labs, Espressif, Etc…)
  • IoT
  • Wireless (Radio Frequency, Bluetooth, WiFi, Etc…)
  • Robotics
  • Automation
  • Camera and Video Capture Receiver Stationary, Wheel/Tank , Underwater and UAV Vehicle
  • Unmanned Vehicles Terrestrial, Marine and UAV
  • Machine Learning
  • Artificial Intelligence (AI)
  • RTOS
  • Sensors, eHealth Sensors, Biosensor, and Biometric
  • Research & Development (R & D)
  • Consulting

Follow Us

Luc Paquin – Curriculum Vitae – 2026
https://www.donluc.com/luc/LucPaquinCVEng2026Mk01.pdf
https://www.donluc.com/luc/

Web: https://www.donluc.com/
Web: https://www.jlpconsultants.com/
Facebook: https://www.facebook.com/neosteam.labs.9/
YouTube: https://www.youtube.com/@thesass2063
DFRobot: https://learn.dfrobot.com/user-10186.html
Elecrow: https://www.elecrow.com/share/sharepj/center/no/760816d385ebb1edc0732fd873bfbf13
TikTok: https://www.tiktok.com/@luc.paquin8
Hackster: https://www.hackster.io/luc-paquin
LinkedIn: https://www.linkedin.com/in/jlucpaquin/

Don Luc
Project #28 – Sensors – Vibration – Mk24

——

#DonLucElectronics #DonLuc #Vibration #Buzzer #SparkFunESP32WROOM #ESP32 #Display #IoT #Project #Fritzing #Programming #Electronics #Microcontrollers #Consultant

——

Vibration

——

Vibration

——

Vibration

——

Crowtail – Vibration Sensor 2.0

The Crowtail – Vibration Sensor is Used to trigger the effect of various vibration with Normally closed type vibration sensor SW – 420. It is widely used to reported the theft alarm, intelligent car, earthquake alarm, motorcycle alarm, etc. This module is compared with the normally open type vibration sensor module, vibration trigger for longer periods of time, can drive the relay module .

Crowtail – Buzzer 2.0

The buzzer module is for making sound in your project. It sounds when activated by a logic HIGH signal. The buzzer module can be also connected to an analog pluse-width modulation (PWM) output to generate various of tones.

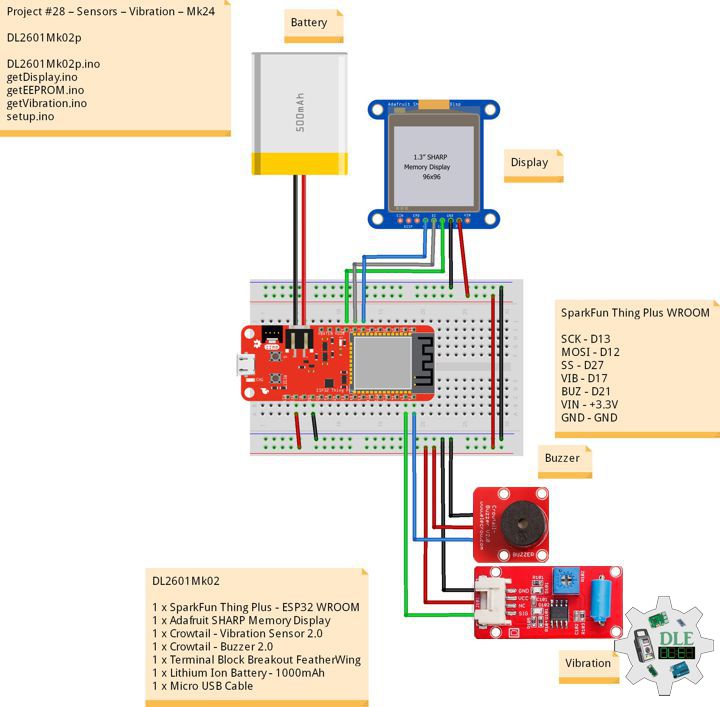
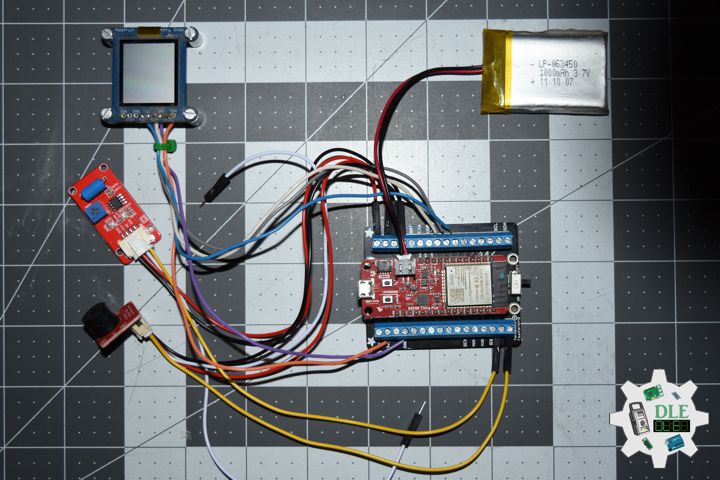
DL2601Mk02

1 x SparkFun Thing Plus – ESP32 WROOM
1 x Adafruit SHARP Memory Display
1 x Crowtail – Vibration Sensor 2.0
1 x Crowtail – Buzzer 2.0
1 x Terminal Block Breakout FeatherWing
1 x Lithium Ion Battery – 1000mAh
1 x Micro USB Cable

DL2601Mk02p

DL2601Mk02p.ino

/****** Don Luc Electronics © ******
Software Version Information
Project #28 – Sensors – Vibration – Mk24
28-24
DL2601Mk02p.ino
DL2601Mk02
1 x SparkFun Thing Plus - ESP32 WROOM
1 x Adafruit SHARP Memory Display
1 x Crowtail - Vibration Sensor 2.0
1 x Crowtail - Buzzer 2.0
1 x Terminal Block Breakout FeatherWing
1 x Lithium Ion Battery - 1000mAh
1 x Micro USB Cable
*/

// Include the Library Code
// EEPROM Library to Read and Write EEPROM with Unique ID for Unit
#include "EEPROM.h"
// SHARP Memory Display
#include <Adafruit_SharpMem.h>
#include <Adafruit_GFX.h>

// Vibration Sensor
// Declare the pin for the Vibration sensor
int iVibration = 17;
// Declare the pin for the buzzer
int iBuzzer = 21;
// Initialize soundValue to 0
int iVibrationValue = 0;
// Vibration
String sVibration = "";

// SHARP Memory Display
#define SHARP_SCK  13
#define SHARP_MOSI 12
#define SHARP_SS   27
// Set the size of the display here, e.g. 144x168!
Adafruit_SharpMem display(SHARP_SCK, SHARP_MOSI, SHARP_SS, 144, 168);
// The currently-available SHARP Memory Display (144x168 pixels)
// requires > 4K of microcontroller RAM; it WILL NOT WORK on Arduino Uno
// or other <4K "classic" devices.
#define BLACK 0
#define WHITE 1

// Software Version Information
// EEPROM Unique ID Information
#define EEPROM_SIZE 64
String uid = "";

// Software Version Information
String sver = "28-24";

void loop() {
  
  // Vibration Sensor
  isVibration();

  // isDisplayVibration
  isDisplayVibration();

}

getDisplay.ino

// SHARP Memory Display
// SHARP Memory Display - UID
void isDisplayUID() {

    // Text Display 
    // Clear Display
    display.clearDisplay();
    display.setRotation(4);
    display.setTextSize(3);
    display.setTextColor(BLACK);
    // Don Luc Electronics
    display.setCursor(0,10);
    display.println( "Don Luc" );
    display.setTextSize(2);
    display.setCursor(0,40);
    display.println( "Electronics" );
    // Version
    //display.setTextSize(3);
    display.setCursor(0,70);
    display.println( "Version" );
    //display.setTextSize(2);
    display.setCursor(0,95);   
    display.println( sver );
    // EEPROM
    display.setCursor(0,120);
    display.println( "EEPROM" );
    display.setCursor(0,140);   
    display.println( uid );
    // Refresh
    display.refresh();
    delay( 100 );
    
}
// Display Vibration
void isDisplayVibration() {

    // Text Display Vibration
    // Clear Display
    display.clearDisplay();
    display.setRotation(4);
    display.setTextSize(2);
    display.setTextColor(BLACK);
    // Sound Sensor
    display.setCursor(0,5);
    display.println( "Vibration" );
    display.setTextSize(3);
    display.setCursor(0,55);
    display.println( sVibration );
    // Refresh
    display.refresh();
    delay( 100 );

}

getEEPROM.ino

// isUID EEPROM Unique ID
void isUID()
{
  
  // Is Unit ID
  uid = "";
  for (int x = 0; x < 7; x++)
  {
    uid = uid + char(EEPROM.read(x));
  }
  
}

getVibration.ino

// Vibration Sensor
// is Vibration
void isVibration(){

  // Sound
  iVibrationValue = digitalRead( iVibration );

  // If the sensor value is HIGH?
  if( iVibrationValue == HIGH )
	{
		
    // Buzzer
    digitalWrite( iBuzzer, LOW);

    // No, return false
    sVibration = "False";


	}
	else
	{
		
  
    // Buzzer
    digitalWrite( iBuzzer, HIGH);

    // Yes, return true
    sVibration = "True";


	}

}

setup.ino

// Setup
void setup()
{
 
  // Delay
  delay( 100 );

   // EEPROM Size
  EEPROM.begin(EEPROM_SIZE);
  
  // EEPROM Unique ID
  isUID();

  // Delay
  delay( 100 );

  // SHARP Display Start & Clear the Display
  display.begin();
  // Clear Display
  display.clearDisplay();

  // Delay
  delay( 100 );

  // Vibration Sensor
  pinMode( iVibration, INPUT);
  // Buzzer
  pinMode(iBuzzer, OUTPUT);

  // Delay
  delay( 100 );

  // Display UID
  // Don Luc
  // Electronic
  // Version
  // EEPROM
  isDisplayUID();

  // Delay 5 Second
  delay( 5000 );

}

——

People can contact us: https://www.donluc.com/?page_id=1927

Consultant, R&D, Electronics, IoT, Teacher and Instructor

  • Programming Language
  • Single-Board Microcontrollers (PIC, Arduino, Raspberry Pi, Arm, Silicon Labs, Espressif, Etc…)
  • IoT
  • Wireless (Radio Frequency, Bluetooth, WiFi, Etc…)
  • Robotics
  • Automation
  • Camera and Video Capture Receiver Stationary, Wheel/Tank , Underwater and UAV Vehicle
  • Unmanned Vehicles Terrestrial, Marine and UAV
  • Machine Learning
  • Artificial Intelligence (AI)
  • RTOS
  • Sensors, eHealth Sensors, Biosensor, and Biometric
  • Research & Development (R & D)
  • Consulting

Follow Us

Luc Paquin – Curriculum Vitae – 2026
https://www.donluc.com/luc/LucPaquinCVEng2026Mk01.pdf
https://www.donluc.com/luc/

Web: https://www.donluc.com/
Web: https://www.jlpconsultants.com/
Facebook: https://www.facebook.com/neosteam.labs.9/
YouTube: https://www.youtube.com/@thesass2063
DFRobot: https://learn.dfrobot.com/user-10186.html
Elecrow: https://www.elecrow.com/share/sharepj/center/no/760816d385ebb1edc0732fd873bfbf13
TikTok: https://www.tiktok.com/@luc.paquin8
Hackster: https://www.hackster.io/luc-paquin
LinkedIn: https://www.linkedin.com/in/jlucpaquin/

Don Luc
Project #28 – Sensors – Digital Magnetic Sensor – Mk16

——

#DonLucElectronics #DonLuc #Magnetic #FireBeetle2ESP32E #ESP32 #DFRobot #Display #IoT #Project #Fritzing #Programming #Electronics #Microcontrollers #Consultant

——

Digital Magnetic Sensor

——

Digital Magnetic Sensor

——

Digital Magnetic Sensor

——

Gravity: Digital Magnetic Sensor

Detect nearby magnetic objects with this digital magnetic sensor, offering a 3.3 Volt – 5 Volt range, easy interfaces, high quality connector, and compact size.

Gravity: Digital RGB LED Module

Gravity: Digital RGB LED Module is a cascadable single RGB LED module compatible with RGB LED strip. Compared to the traditional RGB LED module, where three control signal pins are required for a single LED, this module only needs one signal pin for all LEDs in cascade. Thanks to such individual module design, RGB LED strip built by such independent modules can realize extremely low power consumption

DL2510Mk05

1 x DFRobot FireBeetle 2 ESP32-E
1 x Fermion: 2.0″ 320×240 IPS TFT LCD
1 x GDL Line 10 CM
1 x Gravity: IO Shield for FireBeetle 2
1 x Gravity: Digital Magnetic Sensor
1 x Gravity: Digital RGB LED Module
1 x Lithium Ion Battery – 1000mAh
1 x Switch
1 x USB 3.0 to Type-C Cable

DL2510Mk05p

DL2510Mk05p.ino

/****** Don Luc Electronics © ******
Software Version Information
Project #28 – Sensors – Digital Magnetic Sensor – Mk16
28-16
DL2509Mk055.ino
DL2509Mk04
1 x DFRobot FireBeetle 2 ESP32-E
1 x Fermion: 2.0" 320x240 IPS TFT LCD
1 x GDL Line 10 CM
1 x Gravity: IO Shield for FireBeetle 2
1 x Gravity: Digital Magnetic Sensor
1 x Gravity: Digital RGB LED Module
1 x Lithium Ion Battery - 1000mAh
1 x Switch
1 x USB 3.0 to Type-C Cable
*/

// Include the Library Code
// EEPROM Library to Read and Write EEPROM
// with Unique ID for Unit
#include "EEPROM.h"
// Arduino
#include "Arduino.h"
// DFRobot Display GDL API
#include <DFRobot_GDL.h>
// Adafruit NeoPixel
#include <Adafruit_NeoPixel.h>

// Which pin on the Arduino is connected to the NeoPixels?
#define iNeo D11
// How many NeoPixels are attached to the Arduino?
#define NUMPIXELS 1
// When setting up the NeoPixel library.
Adafruit_NeoPixel pixels(NUMPIXELS, iNeo, NEO_GRB + NEO_KHZ800);

// Connect Magnetic sensor
int iMagnetic = D12;
String oo = "";

// Defined ESP32
#define TFT_DC  D2
#define TFT_CS  D6
#define TFT_RST D3

/*dc=*/ /*cs=*/ /*rst=*/
// DFRobot Display 240x320
DFRobot_ST7789_240x320_HW_SPI screen(TFT_DC, TFT_CS, TFT_RST);

// EEPROM Unique ID Information
#define EEPROM_SIZE 64
String uid = "";

// Software Version Information
String sver = "28-16";

void loop() {
  
  // Magnetic
  // isMagnetic
  isMagnetic();

  // isDisplayMagnetic
  isDisplayMagnetic();

  // Delay
  delay( 1000 );
  
}

getDisplay.ino

// DFRobot Display 240x320
// DFRobot Display 240x320 - UID
void isDisplayUID(){

  // DFRobot Display 240x320
  // Text Display
  // Text Wrap
  screen.setTextWrap(false);
  // Rotation
  screen.setRotation(3);
  // Fill Screen => black
  screen.fillScreen(0x0000);
  // Text Color => white
  screen.setTextColor(0xffff);
  // Font => Free Sans Bold 12pt
  screen.setFont(&FreeSansBold12pt7b);
  // TextSize => 1.5
  screen.setTextSize(1.5);
  // Don Luc Electronics
  screen.setCursor(0, 30);
  screen.println("Don Luc Electronics");
  // SD
  screen.setCursor(0, 60);
  screen.println("Magnetic Sensor");
  // Version
  screen.setCursor(0, 90);
  screen.println("Version");
  screen.setCursor(0, 120);
  screen.println( sver );
  // EEPROM
  screen.setCursor(0, 150);
  screen.println("EEPROM");
  screen.setCursor(0, 180);
  screen.println( uid );

}
// isDisplayMagnetic
void isDisplayMagnetic(){

  // DFRobot Display 240x320
  // Text Display
  // Text Wrap
  screen.setTextWrap(false);
  // Rotation
  screen.setRotation(3);
  // Fill Screen => white
  screen.fillScreen(0xffff);
  // Text Color => blue
  screen.setTextColor(0x001F);
  // Font => Free Sans Bold 12pt
  screen.setFont(&FreeSansBold12pt7b);
  // TextSize => 1.5
  screen.setTextSize(1.5);
  // Geiger
  screen.setCursor(0, 30);
  screen.println("Magnetic Sensor");
  // On - Off
  screen.setCursor(0, 60);
  screen.println( oo );
  
}

getEEPROM.ino

// EEPROM
// isUID EEPROM Unique ID
void isUID() {
  
  // Is Unit ID
  uid = "";
  for (int x = 0; x < 7; x++)
  {
    uid = uid + char(EEPROM.read(x));
  }

}

getMagnetic.ino

// Magnetic
// isMagnetic
void isMagnetic(){
  
  // Set all pixel colors to 'Off'
  pixels.clear();
  
  //Read Magnetic sensor signal
  if(digitalRead(iMagnetic) == HIGH) { 
        
       // The first NeoPixel in a strand is #0, second is 1, all the way up
       // to the count of pixels minus one. // For each pixel...
       for(int i=0; i<NUMPIXELS; i++) { 

          // pixels.Color() takes RGB values, from 0,0,0 up to 255,255,255
          // Gree
          pixels.setPixelColor(i, pixels.Color(0, 255, 0));

          // Send the updated pixel colors to the hardware.
          pixels.show(); 

        }

      // On
      oo = "On";


  }
   else{
        
      // The first NeoPixel in a strand is #0, second is 1, all the way up
       // to the count of pixels minus one. // For each pixel...
       for(int i=0; i<NUMPIXELS; i++) { 

          // pixels.Color() takes RGB values, from 0,0,0 up to 255,255,255
          // Red
          pixels.setPixelColor(i, pixels.Color(255, 0, 0));

          // Send the updated pixel colors to the hardware.
          pixels.show(); 

      }

      // Off
      oo = "Off";
      
  }

}

setup.ino

// Setup
void setup()
{
 
  // Delay
  delay( 100 );

  // EEPROM Size
  EEPROM.begin(EEPROM_SIZE);

  // EEPROM Unique ID
  isUID();

  // Delay
  delay( 100 );

  // INITIALIZE NeoPixel strip object
  pixels.begin();

  // Delay
  delay( 100 );

  // Set touch sensor pin to input mode
  pinMode(iMagnetic, INPUT); 

  // Delay
  delay(100);
  
  // DFRobot Display 240x320
  screen.begin();

  // Delay
  delay(100);

  // DFRobot Display 240x320 - UID
  // Don Luc Electronics
  // Version
  // EEPROM
  isDisplayUID();

  // Delay 5 Second
  delay( 5000 );

}

——

People can contact us: https://www.donluc.com/?page_id=1927

Consultant, R&D, Electronics, IoT, Teacher and Instructor

  • Programming Language
  • Single-Board Microcontrollers (PIC, Arduino, Raspberry Pi, Arm, Silicon Labs, Espressif, Etc…)
  • IoT
  • Wireless (Radio Frequency, Bluetooth, WiFi, Etc…)
  • Robotics
  • Automation
  • Camera and Video Capture Receiver Stationary, Wheel/Tank , Underwater and UAV Vehicle
  • Unmanned Vehicles Terrestrial, Marine and UAV
  • Machine Learning
  • Artificial Intelligence (AI)
  • RTOS
  • Sensors, eHealth Sensors, Biosensor, and Biometric
  • Research & Development (R & D)
  • Consulting

Follow Us

Luc Paquin – Curriculum Vitae – 2024
https://www.donluc.com/luc/

Web: https://www.donluc.com/
Facebook: https://www.facebook.com/neosteam.labs.9/
YouTube: https://www.youtube.com/@thesass2063
Twitter: https://twitter.com/labs_steam
Pinterest: https://www.pinterest.com/NeoSteamLabs/
Instagram: https://www.instagram.com/neosteamlabs/
DFRobot: https://learn.dfrobot.com/user-10186.html
Elecrow: https://www.elecrow.com/share/sharepj/center/no/760816d385ebb1edc0732fd873bfbf13
TikTok: https://www.tiktok.com/@luc.paquin8
Hackster: https://www.hackster.io/luc-paquin
LinkedIn: https://www.linkedin.com/in/jlucpaquin/

Don Luc
Project #28 – Sensors – Touch Sensor – Mk15

——

#DonLucElectronics #DonLuc #TouchSensor #FireBeetle2ESP32E #ESP32 #DFRobot #Display #IoT #Project #Fritzing #Programming #Electronics #Microcontrollers #Consultant

——

Touch Sensor

——

Touch Sensor

——

Touch Sensor

——

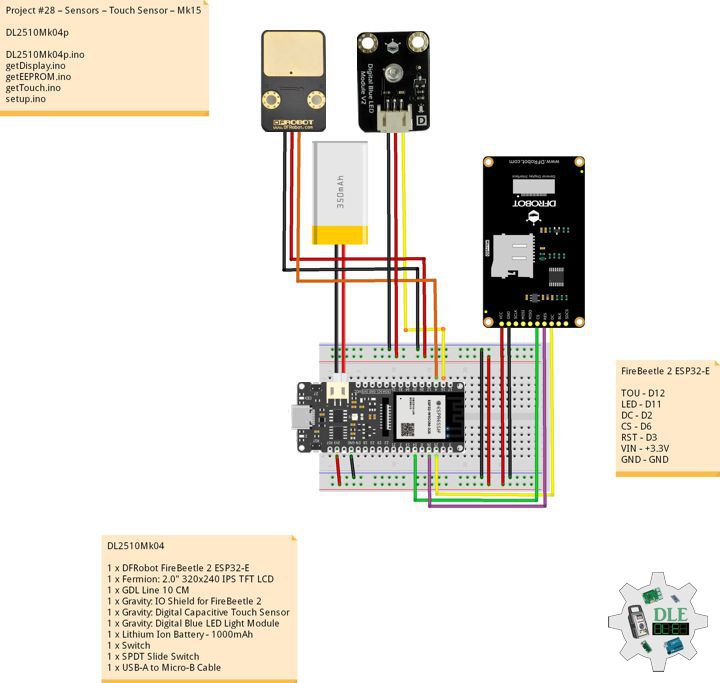
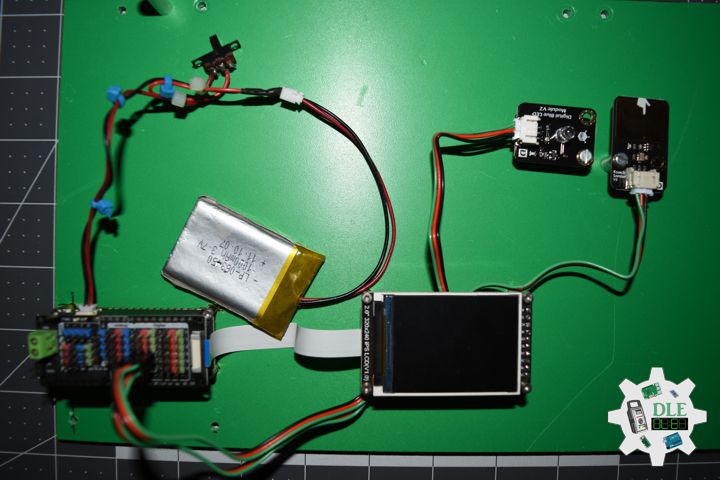
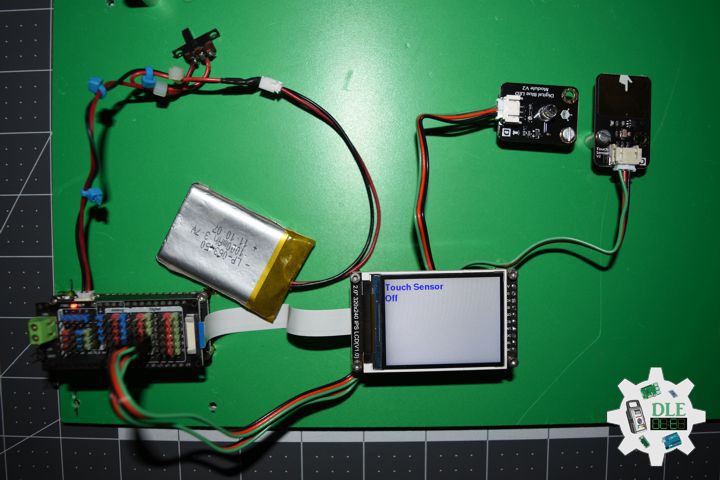
Gravity: Digital Capacitive Touch Sensor

This little sensor can “Feel” people and metal touch and feedback a High / Low voltage level. Even isolated by cloth or paper, it still can feel the touch. The sensitivity will decrease as the isolation getting thick.

Gravity: Digital Blue LED Light Module

This Blue LED light module has a shiny blue color.

DL2510Mk04

1 x DFRobot FireBeetle 2 ESP32-E
1 x Fermion: 2.0″ 320×240 IPS TFT LCD
1 x GDL Line 10 CM
1 x Gravity: IO Shield for FireBeetle 2
1 x Gravity: Digital Capacitive Touch Sensor
1 x Gravity: Digital Blue LED Light Module
1 x Lithium Ion Battery – 1000mAh
1 x Switch
1 x USB-A to Micro-B Cable

DL2510Mk04p

DL2510Mk04p.ino

/****** Don Luc Electronics © ******
Software Version Information
Project #28 – Sensors – Touch Sensor – Mk15
28-15
DL2509Mk04p.ino
DL2509Mk04
1 x DFRobot FireBeetle 2 ESP32-E
1 x Fermion: 2.0" 320x240 IPS TFT LCD
1 x GDL Line 10 CM
1 x Gravity: IO Shield for FireBeetle 2
1 x Gravity: Digital Capacitive Touch Sensor
1 x Gravity: Digital Blue LED Light Module
1 x Lithium Ion Battery - 1000mAh
1 x Switch
1 x USB-A to Micro-B Cable
*/

// Include the Library Code
// EEPROM Library to Read and Write EEPROM
// with Unique ID for Unit
#include "EEPROM.h"
// Arduino
#include "Arduino.h"
// DFRobot Display GDL API
#include <DFRobot_GDL.h>

// Connect LED on pin D11
int ledPin = D11;

// Connect Touch sensor
int iTouch = D12;
String oo = "";

// Defined ESP32
#define TFT_DC  D2
#define TFT_CS  D6
#define TFT_RST D3

/*dc=*/ /*cs=*/ /*rst=*/
// DFRobot Display 240x320
DFRobot_ST7789_240x320_HW_SPI screen(TFT_DC, TFT_CS, TFT_RST);

// EEPROM Unique ID Information
#define EEPROM_SIZE 64
String uid = "";

// Software Version Information
String sver = "28-15";

void loop() {
  
  // Touch
  // isTouch
  isTouch();

  // isDisplayTouch
  isDisplayTouch();

  // Delay
  delay( 1000 );
  
}

getDisplay.ino

// DFRobot Display 240x320
// DFRobot Display 240x320 - UID
void isDisplayUID(){

  // DFRobot Display 240x320
  // Text Display
  // Text Wrap
  screen.setTextWrap(false);
  // Rotation
  screen.setRotation(3);
  // Fill Screen => black
  screen.fillScreen(0x0000);
  // Text Color => white
  screen.setTextColor(0xffff);
  // Font => Free Sans Bold 12pt
  screen.setFont(&FreeSansBold12pt7b);
  // TextSize => 1.5
  screen.setTextSize(1.5);
  // Don Luc Electronics
  screen.setCursor(0, 30);
  screen.println("Don Luc Electronics");
  // SD
  screen.setCursor(0, 60);
  screen.println("Touch Sensor");
  // Version
  screen.setCursor(0, 90);
  screen.println("Version");
  screen.setCursor(0, 120);
  screen.println( sver );
  // EEPROM
  screen.setCursor(0, 150);
  screen.println("EEPROM");
  screen.setCursor(0, 180);
  screen.println( uid );

}
// isDisplayTouch
void isDisplayTouch(){

  // DFRobot Display 240x320
  // Text Display
  // Text Wrap
  screen.setTextWrap(false);
  // Rotation
  screen.setRotation(3);
  // Fill Screen => white
  screen.fillScreen(0xffff);
  // Text Color => blue
  screen.setTextColor(0x001F);
  // Font => Free Sans Bold 12pt
  screen.setFont(&FreeSansBold12pt7b);
  // TextSize => 1.5
  screen.setTextSize(1.5);
  // Geiger
  screen.setCursor(0, 30);
  screen.println("Touch Sensor");
  // On - Off
  screen.setCursor(0, 60);
  screen.println( oo );
  
}

getEEPROM.ino

// EEPROM
// isUID EEPROM Unique ID
void isUID() {
  
  // Is Unit ID
  uid = "";
  for (int x = 0; x < 7; x++)
  {
    uid = uid + char(EEPROM.read(x));
  }

}

getTouch.ino

// Touch
// isTouch
void isTouch(){
  
  //Read Touch sensor signal
  if(digitalRead(iTouch) == HIGH) { 
        
      // if Touch sensor is HIGH, then turn on
      digitalWrite(ledPin, HIGH);

      // On
      oo = "On";


     }
   else{
        
      // if Touch sensor is LOW, then turn off the led
      digitalWrite(ledPin, LOW);

      // Off
      oo = "Off";
      
     }
  
}

setup.ino

// Setup
void setup()
{
 
  // Delay
  delay( 100 );

  // EEPROM Size
  EEPROM.begin(EEPROM_SIZE);

  // EEPROM Unique ID
  isUID();

  // Delay
  delay( 100 );

  // Set ledPin to output mode
  pinMode(ledPin, OUTPUT);

  // Delay
  delay( 100 );

  // Set touch sensor pin to input mode
  pinMode(iTouch, INPUT); 

  // Delay
  delay(100);
  
  // DFRobot Display 240x320
  screen.begin();

  // Delay
  delay(100);

  // DFRobot Display 240x320 - UID
  // Don Luc Electronics
  // Version
  // EEPROM
  isDisplayUID();

  // Delay 5 Second
  delay( 5000 );

}

——

People can contact us: https://www.donluc.com/?page_id=1927

Consultant, R&D, Electronics, IoT, Teacher and Instructor

  • Programming Language
  • Single-Board Microcontrollers (PIC, Arduino, Raspberry Pi, Arm, Silicon Labs, Espressif, Etc…)
  • IoT
  • Wireless (Radio Frequency, Bluetooth, WiFi, Etc…)
  • Robotics
  • Automation
  • Camera and Video Capture Receiver Stationary, Wheel/Tank , Underwater and UAV Vehicle
  • Unmanned Vehicles Terrestrial, Marine and UAV
  • Machine Learning
  • Artificial Intelligence (AI)
  • RTOS
  • Sensors, eHealth Sensors, Biosensor, and Biometric
  • Research & Development (R & D)
  • Consulting

Follow Us

Luc Paquin – Curriculum Vitae – 2024
https://www.donluc.com/luc/

Web: https://www.donluc.com/
Facebook: https://www.facebook.com/neosteam.labs.9/
YouTube: https://www.youtube.com/@thesass2063
Twitter: https://twitter.com/labs_steam
Pinterest: https://www.pinterest.com/NeoSteamLabs/
Instagram: https://www.instagram.com/neosteamlabs/
DFRobot: https://learn.dfrobot.com/user-10186.html
Elecrow: https://www.elecrow.com/share/sharepj/center/no/760816d385ebb1edc0732fd873bfbf13
TikTok: https://www.tiktok.com/@luc.paquin8
Hackster: https://www.hackster.io/luc-paquin
LinkedIn: https://www.linkedin.com/in/jlucpaquin/

Don Luc
Project #16: Sound – Mini MP3 Player – Mk26

——

#DonLucElectronics #DonLuc #MiniMP3Player #IoT #Project #Fritzing #Programming #Electronics #Microcontrollers #Consultant

——

Mini MP3 Player

——

Mini MP3 Player

——

Mini MP3 Player

——

Mini MP3 Player

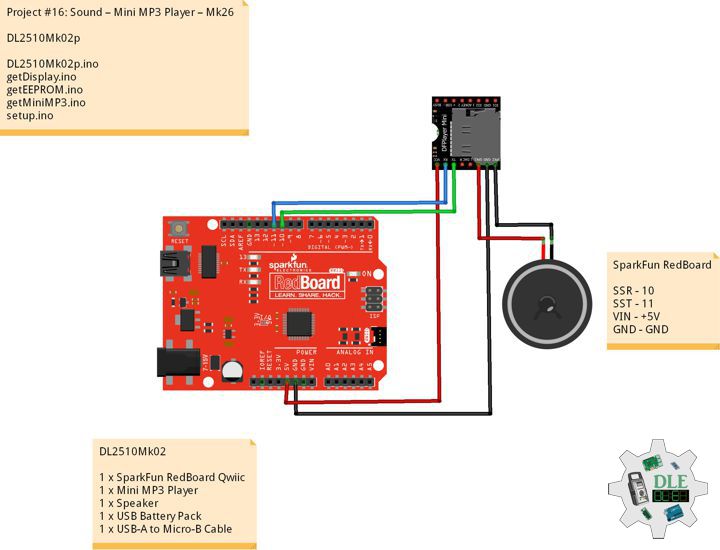
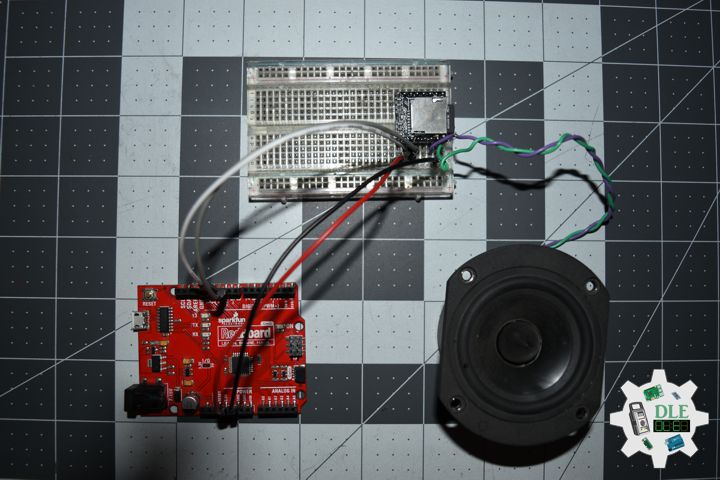
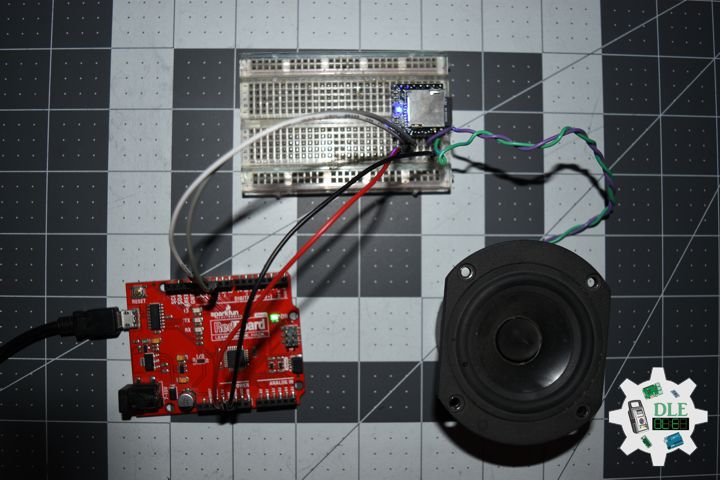
Mini MP3 Player is a compact and inexpensive MP3 module that can be connected directly to the speaker. The module can be used alone with a battery power supply, speaker, and keypad, or through the serial port control, as the Arduino UNO compatible board or any microcontroller with a serial port module. The module itself perfectly integrated hardware decodes MP3, WAV, and WMA’s. The software supports TF card drivers to support FAT16, FAT32 file systems. This can be done by the simple serial command that plays the specified music, as well as how to play music and other functions, easy to use, stable and reliable.

Play next MP3 every 8 second.

1.mp3 – William Shakespeare
2.mp3 – Albert Einstein
3.mp3 – Luc Paquin
4.mp3 – Carl Sagan
5.mp3 – Dalek

DL2510Mk02

1 x SparkFun RedBoard Qwiic
1 x Mini MP3 Player
1 x Speaker
1 x USB Battery Pack
1 x USB-A to Micro-B Cable

DL2510Mk02p

DL2510Mk02p.ino

/****** Don Luc Electronics © ******
Software Version Information
Project #16: Sound – Mini MP3 Player – Mk26
16-26
DL2509Mk02p.ino
DL2509Mk02
1 x SparkFun RedBoard Qwiic
1 x Mini MP3 Player
1 x Speaker
1 x USB Battery Pack
1 x USB-A to Micro-B Cable
*/

// Include the Library Code
// EEPROM Library to Read and Write EEPROM
// with Unique ID for Unit
#include "EEPROM.h"
// Arduino
#include "Arduino.h"
// Software Serial
#include "SoftwareSerial.h"
// DFRobot DFPlayer Mini
#include "DFRobotDFPlayerMini.h"

// Software Serial RX, TX
SoftwareSerial mySoftwareSerial(10, 11);
// DFRobot DFPlayer Mini
DFRobotDFPlayerMini myDFPlayer;

// EEPROM Unique ID Information
String uid = "";

// Software Version Information
String sver = "16-26";

void loop() {
  
  // isMP3
  isMP3();

}

getEEPROM.ino

// EEPROM
// isUID EEPROM Unique ID
void isUID() {
  
  // Is Unit ID
  uid = "";
  for (int x = 0; x < 7; x++)
  {
    uid = uid + char(EEPROM.read(x));
  }

}

getMiniMP3.ino

// Mini MP3
// isSetupMP3
void isSetupMP3(){

  // Mini MP3
  myDFPlayer.begin(mySoftwareSerial);
  
  // Set volume value. From 0 to 30
  myDFPlayer.volume(20);
  
  // Play the first MP3
  myDFPlayer.play(1);
  
}
// isMP3
void isMP3(){
  
  // Timer
  static unsigned long timer = millis();
  
  // isMp3
  if (millis() - timer > 8000) {
    
    // Time
    timer = millis();
    
    // Play next mp3 every 8 second
    myDFPlayer.next();

  }

  myDFPlayer.available();
  
}

setup.ino

// Setup
void setup()
{
 
  // Delay
  delay( 100 );

  // EEPROM Unique ID
  isUID();

  // Delay
  delay( 100 );

  // Software Serial
  mySoftwareSerial.begin(9600);

  // Delay
  delay( 100 );

  // isSetupMP3
  isSetupMP3();
    
  // Delay 1 Second
  delay( 1000 );

}

——

People can contact us: https://www.donluc.com/?page_id=1927

Consultant, R&D, Electronics, IoT, Teacher and Instructor

  • Programming Language
  • Single-Board Microcontrollers (PIC, Arduino, Raspberry Pi, Arm, Silicon Labs, Espressif, Etc…)
  • IoT
  • Wireless (Radio Frequency, Bluetooth, WiFi, Etc…)
  • Robotics
  • Automation
  • Camera and Video Capture Receiver Stationary, Wheel/Tank , Underwater and UAV Vehicle
  • Unmanned Vehicles Terrestrial, Marine and UAV
  • Machine Learning
  • Artificial Intelligence (AI)
  • RTOS
  • Sensors, eHealth Sensors, Biosensor, and Biometric
  • Research & Development (R & D)
  • Consulting

Follow Us

Luc Paquin – Curriculum Vitae – 2024
https://www.donluc.com/luc/

Web: https://www.donluc.com/
Facebook: https://www.facebook.com/neosteam.labs.9/
YouTube: https://www.youtube.com/@thesass2063
Twitter: https://twitter.com/labs_steam
Pinterest: https://www.pinterest.com/NeoSteamLabs/
Instagram: https://www.instagram.com/neosteamlabs/
DFRobot: https://learn.dfrobot.com/user-10186.html
Elecrow: https://www.elecrow.com/share/sharepj/center/no/760816d385ebb1edc0732fd873bfbf13
TikTok: https://www.tiktok.com/@luc.paquin8
Hackster: https://www.hackster.io/luc-paquin
LinkedIn: https://www.linkedin.com/in/jlucpaquin/

Don Luc
Project #15: Environment – Soil Moisture Sensor – Mk20

——

#DonLucElectronics #DonLuc #Arduino #ASM #Project #Patreon #Electronics #Microcontrollers #IoT #Fritzing #Programming #Consultant

——

Soil Moisture Sensor

——

Soil Moisture Sensor

——

Soil Moisture Sensor

——

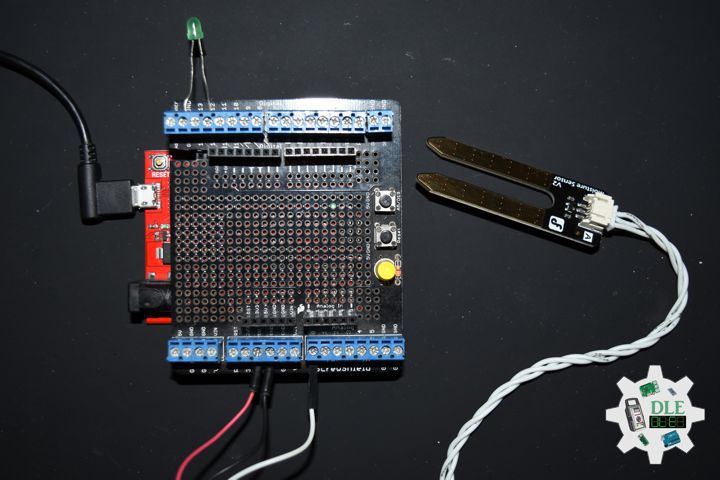
Soil Moisture Sensor

Soil moisture is the critical parameter in agriculture. If there is a shortage or overabundance of water, plants may die. At the same time, this data depends on many external factors, primarily weather conditions and climate changes. That is why it is so vital to understand the most effective methods for analyzing soil moisture content.

This term refers to the entire quantity of water in the ground’s pores or on its surface. The moisture content of soil depends on such factors as weather, type of land, and plants. The parameter is vital in monitoring soil moisture activities, predicting natural disasters, managing water supply, etc. This data may signal a future flood or water deficit ahead of other indicators.

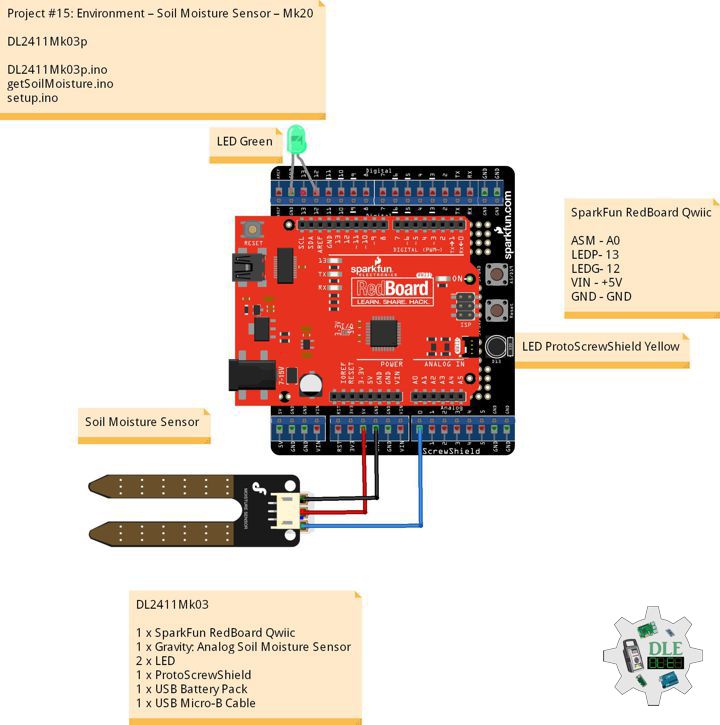
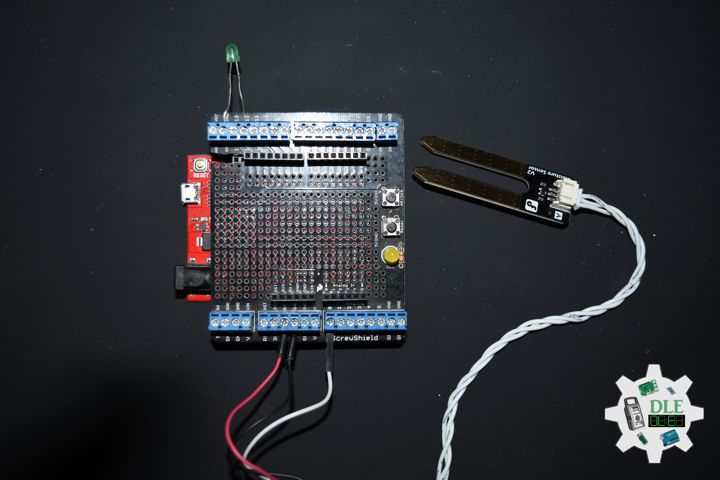
DL2411Mk03

1 x SparkFun RedBoard Qwiic
1 x Gravity: Analog Soil Moisture Sensor
2 x LED
1 x ProtoScrewShield
1 x USB Battery Pack
1 x USB Micro-B Cable

SparkFun RedBoard Qwiic

ASM – A0
LEDP- 13
LEDG- 12
VIN – +5V
GND – GND

DL2411Mk03p

DL2411Mk03p.ino

/****** Don Luc Electronics © ******
Software Version Information
Project #15: Environment – Soil Moisture Sensor – Mk20
15-20
DL2411Mk03p.ino
DL2411Mk03
1 x SparkFun RedBoard Qwiic
1 x Gravity: Analog Soil Moisture Sensor
2 x LED
1 x ProtoScrewShield
1 x USB Battery Pack
1 x USB Micro-B Cable
*/

// Include the Library Code

// Gravity: Analog Soil Moisture Sensor
int iSoilMoisture = A0;
int iSoilMoistureVal = 0;
int zz = 0;
// Change Your Threshold Here
int Threshold = 300;

// LED ProtoScrewShield Yellow
int iLEDProto = 13;

// LED Green
int iLEDGreen = 12;

// Software Version Information
String sver = "15-20";

void loop() {

  // Gravity: Analog Soil Moisture Sensor
  isSoilMoisture();

  // Delay 1 Second
  delay( 1000 );

}

getSoilMoisture.ino

// Gravity: Analog Soil Moisture Sensor
// Soil Moisture
void isSoilMoisture(){

  // Connect Soil Moisture Sensor to Analog 0
  zz = analogRead( iSoilMoisture );

  // iSoilMoistureVal => 0~900 Soil Moisture
  iSoilMoistureVal = map( zz, 0, 715, 0, 900);

  // Serial
  Serial.print("Moisture Sensor Value: ");

  // Threshold
  if (iSoilMoistureVal > Threshold) {

    // 300~900 - Humid Soil
    // LEDProto
    digitalWrite(iLEDProto, LOW);
    // Serial
    Serial.print( "Humid Soil " );
    Serial.println( iSoilMoistureVal );
    // LEDGreen
    digitalWrite(iLEDGreen, HIGH);
    
  }
  else {
    
    // 0-300 Dry Soil
    // LEDGreen
    digitalWrite(iLEDGreen, LOW);
    // Serial
    Serial.print( "Dry Soil " );
    Serial.println( iSoilMoistureVal );
    // LEDProto
    digitalWrite(iLEDProto, HIGH);
    
  }

}

setup.ino

// Setup
void setup()
{
 
  // Delay
  delay(100);

  // Serial
  Serial.begin(57600);

  // Initialize the LED iLEDProto
  pinMode(iLEDProto, OUTPUT);

  // Initialize the LED iLEDGreen
  pinMode(iLEDGreen, OUTPUT);

  // Delay 1 Second
  delay( 1000 );

}

——

People can contact us: https://www.donluc.com/?page_id=1927

Electronics, IoT, Teacher, Instructor, R&D and Consulting

  • Programming Language
  • Single-Board Microcontrollers (PIC, Arduino, Raspberry Pi, Arm, Silicon Labs, Espressif, Etc…)
  • IoT
  • Wireless (Radio Frequency, Bluetooth, WiFi, Etc…)
  • Robotics
  • Automation
  • Camera and Video Capture Receiver Stationary, Wheel/Tank and Underwater Vehicle
  • Unmanned Vehicles Terrestrial and Marine
  • Machine Learning
  • Artificial Intelligence (AI)
  • RTOS
  • Sensors, eHealth Sensors, Biosensor, and Biometric
  • Research & Development (R & D)
  • Consulting

Follow Us

Luc Paquin – Curriculum Vitae – 2024
https://www.donluc.com/luc/

Web: https://www.donluc.com/
Facebook: https://www.facebook.com/neosteam.labs.9/
YouTube: https://www.youtube.com/@thesass2063
Twitter: https://twitter.com/labs_steam
Pinterest: https://www.pinterest.com/NeoSteamLabs/
Instagram: https://www.instagram.com/neosteamlabs/
Patreon: https://patreon.com/DonLucElectronics59
DFRobot: https://learn.dfrobot.com/user-10186.html
Hackster.io: https://www.hackster.io/neosteam-labs
Elecrow: https://www.elecrow.com/share/sharepj/center/no/760816d385ebb1edc0732fd873bfbf13
TikTok: https://www.tiktok.com/@luc.paquin8
Twitch: https://www.twitch.tv/lucpaquin
LinkedIn: https://www.linkedin.com/in/jlucpaquin/

Don Luc
Patreon: Beginner

——

#DonLucElectronics #DonLuc #Arduino #Project #Patreon #Electronics #Microcontrollers #IoT #Fritzing #Programming #Consultant

——

Patreon: Beginner

——

Patreon: Beginner

——

Patreon: Beginner

——

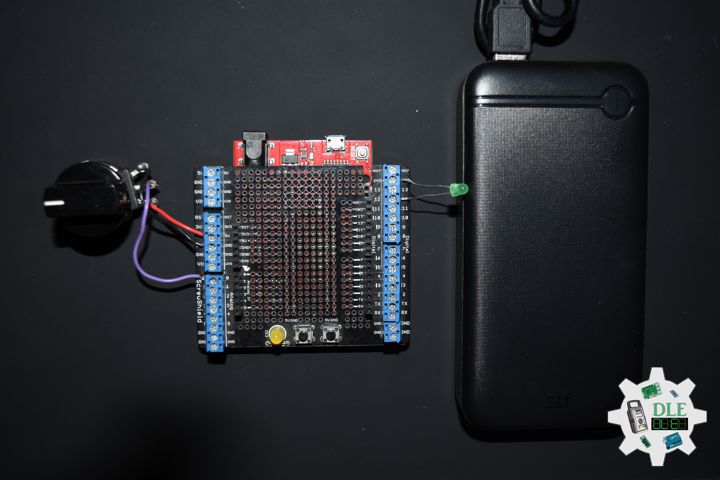
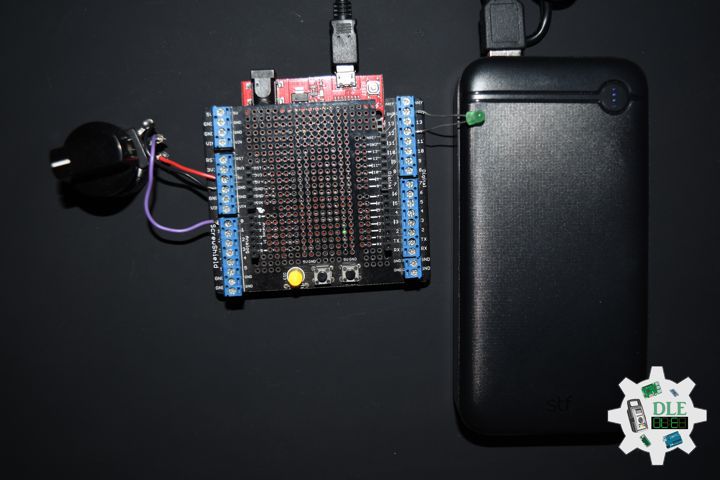
Patreon: Beginner

Beginner: These beginner-friendly microcontrollers is Arduino Uno are easy to use and program with just a computer or laptop, a USB cable, and some open-source software.

What is Arduino?

Arduino board designs use a variety of microprocessors and controllers. The boards are equipped with sets of digital and analog input/output (I/O) pins that may be interfaced to various expansion boards “Shields” or breadboards and other circuits. The boards feature serial communications interfaces, including Universal Serial Bus (USB) on some models, which are also used for loading programs. Arduino boards are able to read inputs, light on a sensor, a finger on a button, or a Twitter message, and turn it into an output, activating a motor, turning on an LED, publishing something online. You can tell your board what to do by sending a set of instructions to the microcontroller on the board. The microcontrollers can be programmed using the C and C++ programming languages, using a standard API which is also known as the Arduino Programming Language, and the Arduino Software (IDE).

Arduino Software (IDE)

A minimal Arduino C/C++ program consists of only two functions:

setup(): This function is called once when a sketch starts after power-up or reset. It is used to initialize variables, input and output pin modes, and other libraries needed in the sketch.
loop(): After setup() function exits, the loop() function is executed repeatedly in the main program. It controls the board until the board is powered off or is reset. It is analogous to the function while.

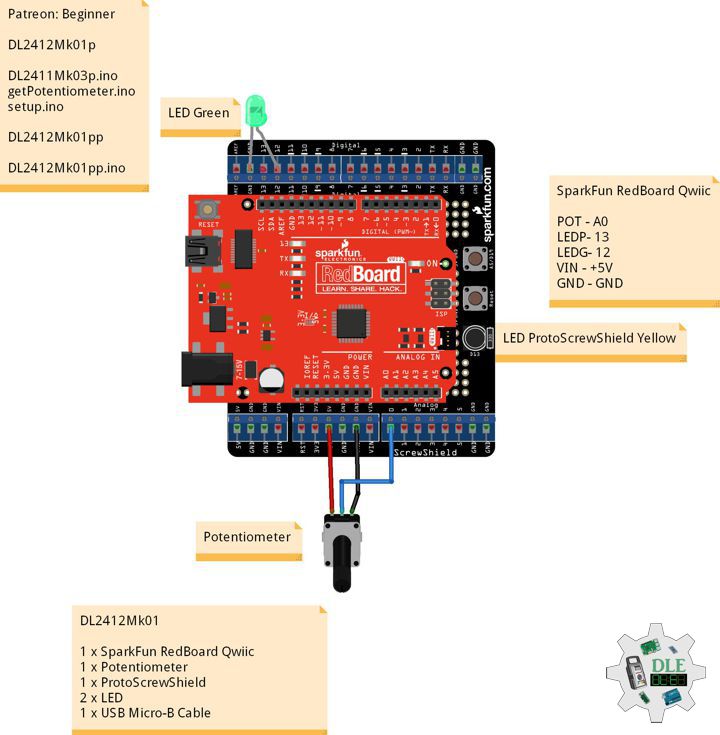
DL2412Mk01

1 x SparkFun RedBoard Qwiic
1 x Potentiometer 10K Ohm
1 x ProtoScrewShield
2 x LED
1 x USB Micro-B Cable

SparkFun RedBoard Qwiic

POT – A0
LEDP – 13
LEDG – 12
VIN – +5V
GND – GND

——

DL2412Mk01ppp

DL2412Mk01ppp.ino

/****** Don Luc Electronics © ******/

int iPot = A0;
int iPotVal = 0;
int Threshold = 500;
int iLEDProto = 13;
int iLEDGreen = 12;
String sver = "Beginner";

void setup()
{

  delay(100);

  Serial.begin(57600);
  pinMode(iLEDProto, OUTPUT);
  pinMode(iLEDGreen, OUTPUT);
  delay( 100 );

}

void loop() {

  iPotVal = analogRead( iPot );
  Serial.print("Potentiometer: ");
  if (iPotVal > Threshold) {

    digitalWrite(iLEDProto, LOW);
    Serial.print( "LED Green " );
    Serial.println( iPotVal );
    digitalWrite(iLEDGreen, HIGH);
    
  }
  else {

    digitalWrite(iLEDGreen, LOW);
    Serial.print( "LED Proto " );
    Serial.println( iPotVal );
    digitalWrite(iLEDProto, HIGH);
    
  }
  delay( 100 );

}

——

DL2412Mk01pp

DL2412Mk01pp.ino

/****** Don Luc Electronics © ******
Software Version Information
Patreon: Beginner
Beginner
DL2412Mk01pp.ino
DL2412Mk01
1 x SparkFun RedBoard Qwiic
1 x Potentiometer
1 x ProtoScrewShield
2 x LED
1 x USB Micro-B Cable
*/

// Include the Library Code

// Potentiometer
int iPot = A0;
int iPotVal = 0;
// Change Your Threshold Here
int Threshold = 500;

// LED ProtoScrewShield Yellow
int iLEDProto = 13;

// LED Green
int iLEDGreen = 12;

// Software Version Information
String sver = "Beginner";

// Setup
void setup()
{
 
  // Delay
  delay(100);

  // Serial
  Serial.begin(57600);

  // Initialize the LED iLEDProto
  pinMode(iLEDProto, OUTPUT);

  // Initialize the LED iLEDGreen
  pinMode(iLEDGreen, OUTPUT);

  // Delay 0.1 Second
  delay( 100 );

}
// Loop
void loop() {

  // Potentiometer
  // Connect Potentiometer to Analog 0
  iPotVal = analogRead( iPot );

  // Serial
  Serial.print("Potentiometer: ");

  // Threshold
  if (iPotVal > Threshold) {

    // LEDProto
    digitalWrite(iLEDProto, LOW);
    // Serial
    Serial.print( "LED Green " );
    Serial.println( iPotVal );
    // LEDGreen
    digitalWrite(iLEDGreen, HIGH);
    
  }
  else {
    
    // LEDGreen
    digitalWrite(iLEDGreen, LOW);
    // Serial
    Serial.print( "LED Proto " );
    Serial.println( iPotVal );
    // LEDProto
    digitalWrite(iLEDProto, HIGH);
    
  }

  // Delay 0.1 Second
  delay( 100 );

}

——

DL2412Mk01p

DL2412Mk01p.ino
loop()

getPotentiometer.ino
Attaining => get
Combining Form => is

setup.ino
setup()

DL2412Mk01p

DL2411Mk03p.ino

/****** Don Luc Electronics © ******
Software Version Information
Patreon: Beginner
Beginner
DL2412Mk01p.ino
DL2412Mk01
1 x SparkFun RedBoard Qwiic
1 x Potentiometer
1 x ProtoScrewShield
2 x LED
1 x USB Micro-B Cable
*/

// Include the Library Code

// Potentiometer
int iPot = A0;
int iPotVal = 0;
// Change Your Threshold Here
int Threshold = 500;

// LED ProtoScrewShield Yellow
int iLEDProto = 13;

// LED Green
int iLEDGreen = 12;

// Software Version Information
String sver = "Beginner";

void loop() {

  // Potentiometer
  isPotentiometer();

  // Delay 0.1 Second
  delay( 100 );

}

getPotentiometer.ino

// Potentiometer
// Potentiometer
void isPotentiometer(){

  // Connect Potentiometer to Analog 0
  iPotVal = analogRead( iPot );

  // Serial
  Serial.print("Potentiometer: ");

  // Threshold
  if (iPotVal > Threshold) {

    // LEDProto
    digitalWrite(iLEDProto, LOW);
    // Serial
    Serial.print( "LED Green " );
    Serial.println( iPotVal );
    // LEDGreen
    digitalWrite(iLEDGreen, HIGH);
    
  }
  else {
    
    // LEDGreen
    digitalWrite(iLEDGreen, LOW);
    // Serial
    Serial.print( "LED Proto " );
    Serial.println( iPotVal );
    // LEDProto
    digitalWrite(iLEDProto, HIGH);
    
  }

}

setup.ino

// Setup
void setup()
{
 
  // Delay
  delay(100);

  // Serial
  Serial.begin(57600);

  // Initialize the LED iLEDProto
  pinMode(iLEDProto, OUTPUT);

  // Initialize the LED iLEDGreen
  pinMode(iLEDGreen, OUTPUT);

  // Delay 0.1 Second
  delay( 100 );

}

——

People can contact us: https://www.donluc.com/?page_id=1927

Electronics, IoT, Teacher, Instructor, R&D and Consulting

  • Programming Language
  • Single-Board Microcontrollers (PIC, Arduino, Raspberry Pi, Arm, Silicon Labs, Espressif, Etc…)
  • IoT
  • Wireless (Radio Frequency, Bluetooth, WiFi, Etc…)
  • Robotics
  • Automation
  • Camera and Video Capture Receiver Stationary, Wheel/Tank and Underwater Vehicle
  • Unmanned Vehicles Terrestrial and Marine
  • Machine Learning
  • Artificial Intelligence (AI)
  • RTOS
  • Sensors, eHealth Sensors, Biosensor, and Biometric
  • Research & Development (R & D)
  • Consulting

Follow Us

Luc Paquin – Curriculum Vitae – 2024
https://www.donluc.com/luc/

Web: https://www.donluc.com/
Facebook: https://www.facebook.com/neosteam.labs.9/
YouTube: https://www.youtube.com/@thesass2063
Twitter: https://twitter.com/labs_steam
Pinterest: https://www.pinterest.com/NeoSteamLabs/
Instagram: https://www.instagram.com/neosteamlabs/
Patreon: https://patreon.com/DonLucElectronics59
DFRobot: https://learn.dfrobot.com/user-10186.html
Hackster.io: https://www.hackster.io/neosteam-labs
Elecrow: https://www.elecrow.com/share/sharepj/center/no/760816d385ebb1edc0732fd873bfbf13
TikTok: https://www.tiktok.com/@luc.paquin8
Twitch: https://www.twitch.tv/lucpaquin
LinkedIn: https://www.linkedin.com/in/jlucpaquin/

Don Luc