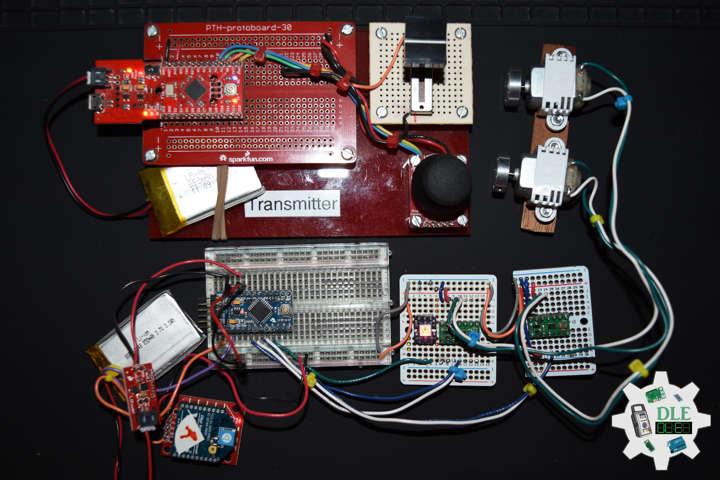
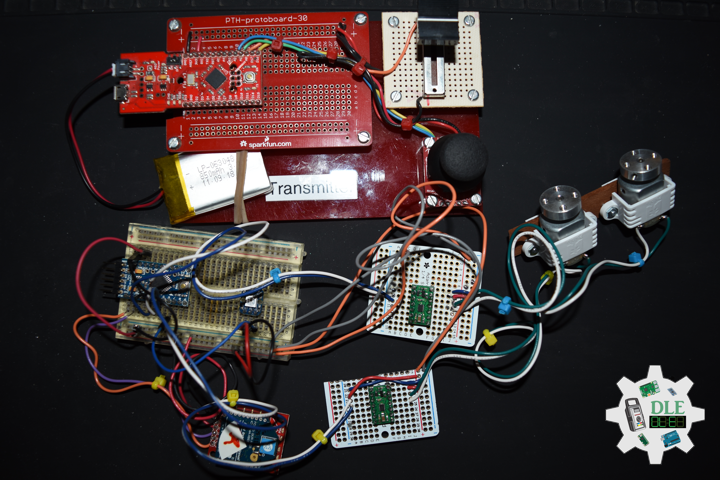
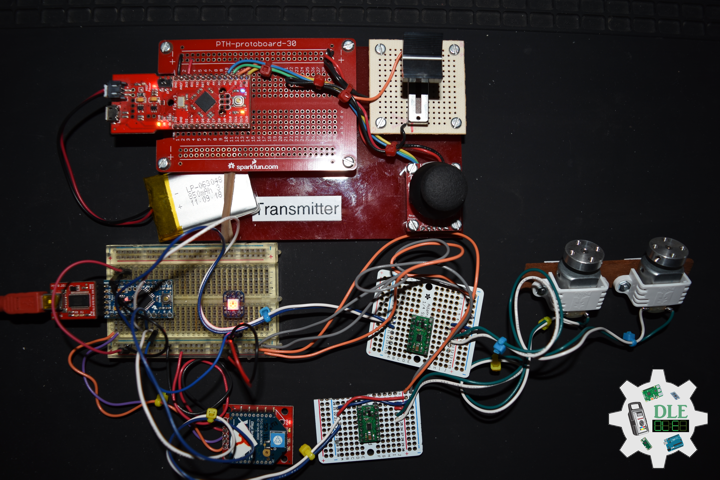
Program
Project #23: E-Textiles – SparkFun Micro OLED – Mk03
——
#DonLucElectronics #DonLuc #ETextiles #Wearable #FLORA #MicroOLED #Arduino #Project #Programming #Electronics #Microcontrollers #Consultant
——
——
——
——
SparkFun Micro OLED Breakout (Qwiic)
The SparkFun Qwiic Micro OLED Breakout is a Qwiic-enabled version of our popular Micro OLED display. The small monochrome, blue-on-black OLED screen presents incredibly clear images for your viewing pleasure. It’s micro, but it still packs a punch the OLED display is crisp, and you can fit a deceivingly large amount of graphics on there. This breakout is perfect for adding graphics to your next project and displaying diagnostic information without resorting to a serial output, all with the ease of use of our own Qwiic Connect System.
This version of the Micro OLED Breakout is exactly the size of its non-Qwiic sibling, featuring a screen that is 64 pixels wide and 48 pixels tall and measuring 0.66 inch across. But it has also been equipped with two Qwiic connectors, making it ideal for I2C operations. We’ve also added two mounting holes and a convenient Qwiic cable holder incorporated into a detachable tab on the board that can be easily removed thanks to a v-scored edge. We’ve even made sure to include an I2C pull-up jumper and ADDR jumper on the back of the board, so if you have your own I2C pull-ups or need to change the I2C address of the board, you have options.
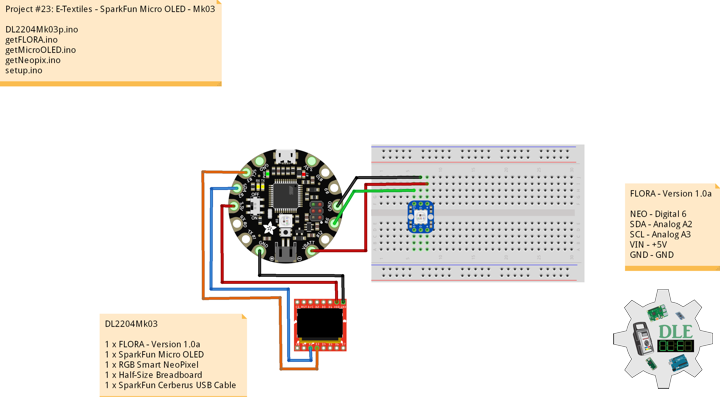
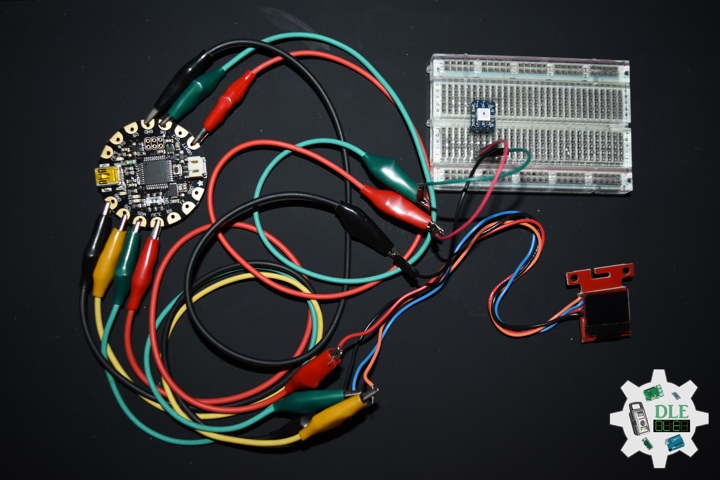
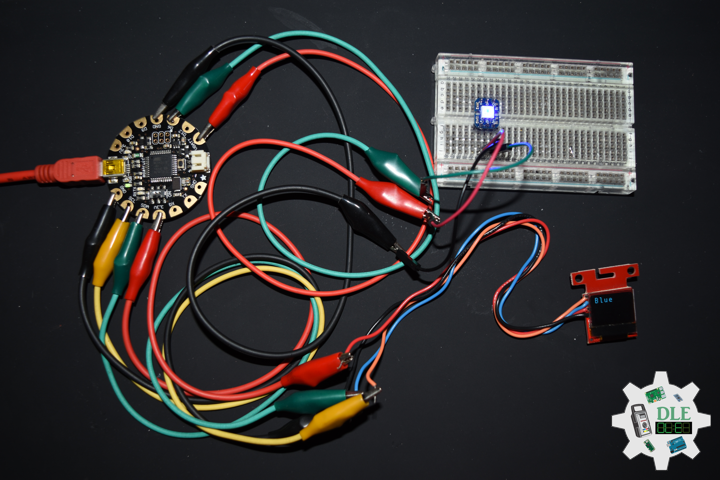
DL2204Mk03
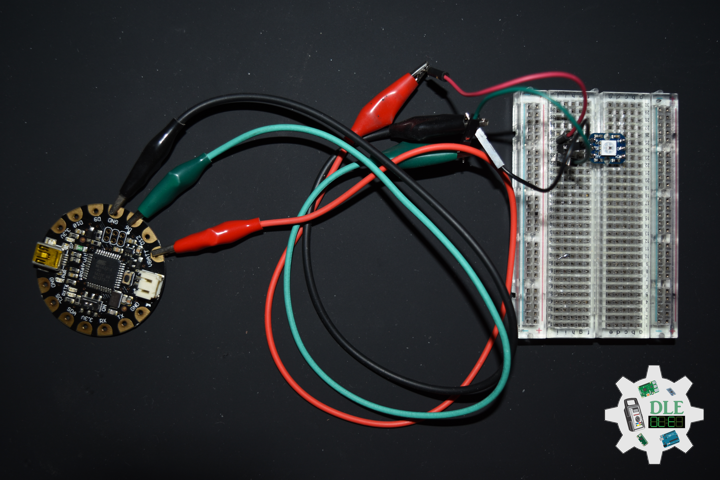
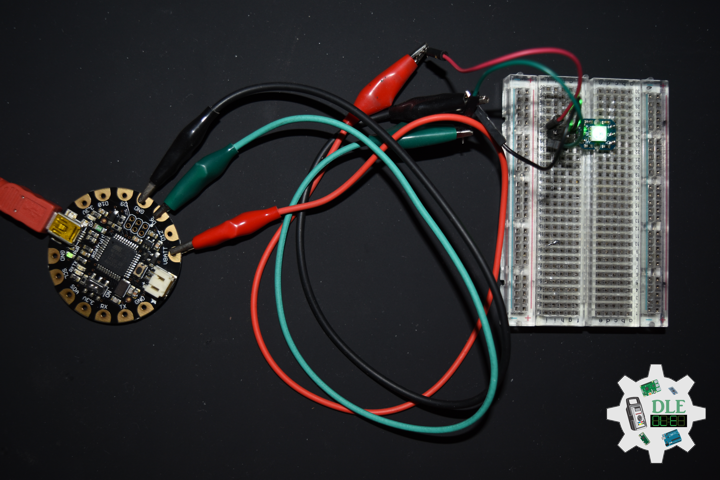
1 x FLORA – Version 1.0a
1 x SparkFun Micro OLED
1 x RGB Smart NeoPixel
1 x Half-Size Breadboard
1 x SparkFun Cerberus USB Cable
FLORA – Version 1.0a
NEO – Digital 6
SDA – Analog A2
SCL – Analog A3
VIN – +5V
GND – GND
——
DL2204Mk03p.ino
/* ***** Don Luc Electronics © *****
Software Version Information
Project #23: E-Textiles - SparkFun Micro OLED - Mk03
23-03
DL2204Mk03p.ino
1 x FLORA - Version 1.0a
1 x SparkFun Micro OLED
1 x RGB Smart NeoPixel
1 x Half-Size Breadboard
1 x SparkFun Cerberus USB Cable
*/

// Include the Library Code
// Wire
#include <Wire.h>
// NeoPixels
#include <Adafruit_NeoPixel.h>
// SparkFun Micro OLED
#include <SFE_MicroOLED.h>

// FLORA
// Color
String sVal;

// NeoPixels
// On digital pin 6
#define PIN 6
// NeoPixels NUMPIXELS = 1
#define NUMPIXELS 1
// Pixels
Adafruit_NeoPixel pixels = Adafruit_NeoPixel(NUMPIXELS, PIN, NEO_GRB + NEO_KHZ800);
// Red
int red = 0;
// Green
int green = 0;
// Blue
int blue = 0;
// Neopix
int iNeo = 0;
// Value
int zz = 0;

// SparkFun Micro OLED
#define PIN_RESET 9
#define DC_JUMPER 1
// I2C declaration
MicroOLED oled(PIN_RESET, DC_JUMPER);

// Software Version Information
String sver = "23-03";

void loop() {

  // FLORA
  isFLORA();

  // Micro OLED
  isMicroOLED();

  // Delay
  delay( 3000 );

}
getFLORA.ino
// FLORA
// isFLORA
void isFLORA() {

  // FLORA = zz => Neopix
  // FLORA = sVal => Color
  if ( zz == 0 ) {

    sVal = "Green";
    isNUMPIXELS();
    zz = 1;

  } else if ( zz == 1 ) {

    sVal = "Blue";
    isNUMPIXELS();
    zz = 2;

  } else if ( zz == 2 ) {

    sVal = "Red";
    isNUMPIXELS();
    zz = 3;

  } else if ( zz == 3 ) {

    sVal = "Yellow";
    isNUMPIXELS();
    zz = 4;

  } else if ( zz == 4 ) {

    sVal = "Magenta";
    isNUMPIXELS();
    zz = 5;

  } else if ( zz == 5 ) {

    sVal = "Cyan";
    isNUMPIXELS();
    zz = 6;

  } else if ( zz == 6 ) {

    sVal = "White";
    isNUMPIXELS();
    zz = 0;

  }

}
getMicroOLED.ino
// SparkFun Micro OLED
// Setup Micro OLED
void setupMicroOLED() {

  // Initialize the OLED
  oled.begin();
  // Clear the display's internal memory
  oled.clear(ALL);
  // Display what's in the buffer (splashscreen)
  oled.display();

  // Delay 1000 ms
  delay(1000);

  // Clear the buffer.
  oled.clear(PAGE);

}
// Micro OLED
void isMicroOLED() {

  // Clear the display
  oled.clear(PAGE);
  // Set cursor to top-left
  oled.setCursor(0, 0);
  // Set font to type 1
  oled.setFontType(1);
  // Print sVal
  oled.print(sVal);
  oled.display();

}
getNeopix.ino
// NeoPixels
// Neopix
void isNeopix()
{

    // Pixels
    pixels.setBrightness( 255 );
    // Pixels color takes RGB values, from 0,0,0 up to 255,255,255
    pixels.setPixelColor( iNeo, pixels.Color(red,green,blue) );
    // This sends the updated pixel color to the hardware
    pixels.show();
    // Delay for a period of time (in milliseconds)
    delay(50);

}
// isNUMPIXELS
void isNUMPIXELS()
{

  // Neopix Value
  switch ( zz ) {
    case 0:
      // NeoPixels Green
      // Red
      red = 0;
      // Green
      green = 255;
      // Blue
      blue = 0;
      // Neopix
      iNeo = 0;
      isNeopix();
      break;
    case 1:
      // NeoPixels Blue
      // Red
      red = 0;
      // Green
      green = 0;
      // Blue
      blue = 255;
      // Neopix
      iNeo = 0;
      isNeopix();
      break;
    case 2:
      // NeoPixels Red
      // Red
      red = 255;
      // Green
      green = 0;
      // Blue
      blue = 0;
      // Neopix
      iNeo = 0;
      isNeopix();
      break;
    case 3:
      // NeoPixels Yellow
      // Red
      red = 255;
      // Green
      green = 255;
      // Blue
      blue = 0;
      // Neopix
      iNeo = 0;
      isNeopix();
      break;
    case 4:
      // NeoPixels Magenta
      // Red
      red = 255;
      // Green
      green = 0;
      // Blue
      blue = 255;
      // Neopix
      iNeo = 0;
      isNeopix();
      break;
    case 5:
      // NeoPixels Cyan
      // Red
      red = 0;
      // Green
      green = 255;
      // Blue
      blue = 255;
      // Neopix
      iNeo = 0;
      isNeopix();
      break;
    case 6:
      // NeoPixels White
      // Red
      red = 255;
      // Green
      green = 255;
      // Blue
      blue = 255;
      // Neopix
      iNeo = 0;
      isNeopix();
      break;
  }

}
// isNUMPIXELSoff
void isNUMPIXELSoff()
{

   // Black Off
   // NeoPixels
   // Red
   red = 0;
   // Green
   green = 0;
   // Blue
   blue = 0;
   isNeopix();

}
setup.ino
// Setup
void setup() {

  // NeoPixels
  // This initializes the NeoPixel library
  pixels.begin();
  // Delay for a period of time (in milliseconds)
  delay(50);
  // isNUMPIXELS Off
  isNUMPIXELSoff();

  // Set up I2C bus
  Wire.begin();

  // Delay for a period of time (in milliseconds)
  delay(50);

  // Setup Micro OLED
  setupMicroOLED();

}
——
People can contact us: https://www.donluc.com/?page_id=1927
Technology Experience
- Single-Board Microcontrollers (PIC, Arduino, Raspberry Pi,Espressif, etc…)
- IoT
- Robotics
- Camera and Video Capture Receiver Stationary, Wheel/Tank and Underwater Vehicle
- Unmanned Vehicles Terrestrial and Marine
- Research & Development (R & D)
- Desktop Applications (Windows, OSX, Linux, Multi-OS, Multi-Tier, etc…)
- Mobile Applications (Android, iOS, Blackberry, Windows Mobile, Windows CE, etc…)
- Web Applications (LAMP, Scripting, Java, ASP, ASP.NET, RoR, Wakanda, etc…)
- Social Media Programming & Integration (Facebook, Twitter, YouTube, Pinterest, etc…)
- Content Management Systems (WordPress, Drupal, Joomla, Moodle, etc…)
- Bulletin Boards (phpBB, SMF, Vanilla, jobberBase, etc…)
- eCommerce (WooCommerce, OSCommerce, ZenCart, PayPal Shopping Cart, etc…)
Instructor and E-Mentor
- IoT
- PIC Microcontrollers
- Arduino
- Raspberry Pi
- Espressif
- Robotics
- DOS, Windows, OSX, Linux, iOS, Android, Multi-OS
- Linux-Apache-PHP-MySQL
Follow Us
J. Luc Paquin – Curriculum Vitae – 2022 English & Español
https://www.jlpconsultants.com/luc/
Web: https://www.donluc.com/
Web: https://www.jlpconsultants.com/
Facebook: https://www.facebook.com/neosteam.labs.9/
YouTube: https://www.youtube.com/channel/UC5eRjrGn1CqkkGfZy0jxEdA
Twitter: https://twitter.com/labs_steam
Pinterest: https://www.pinterest.com/NeoSteamLabs/
Instagram: https://www.instagram.com/neosteamlabs/
Don Luc
Project #23: E-Textiles – FLORA – Mk02
——
#DonLucElectronics #DonLuc #ETextiles #Wearable #FLORA #Arduino #Project #Programming #Electronics #Microcontrollers #Consultant
——
——
——
——
FLORA – Wearable Electronic Platform – Version 1.0a
FLORA is Adafruit’s fully-featured wearable electronics platform. It’s a round, sewable, Arduino-compatible microcontroller designed to empower amazing wearables projects. The FLORA family also has the best stainless steel threads, sensors, GPS modules and chainable LED NeoPixels, perfect accessories for the FLORA main board. It’s built around the Atmega32u4 chip, which has built-in USB support, is wearable Arduino / Arduino-compatible.
The FLORA has built-in USB support. Built in USB means you plug it in to program it, it just shows up, all you need is a Mini-B USB cable, no additional purchases are needed. The FLORA has USB HID support, so it can act like a mouse or keyboard to attach directly to computers.
FLORA has a small but easy to use onboard reset button to reboot the system. The power supply is designed to be flexible and easy to use. Can be used with LiIon/LiPoly, LiFe, alkaline or rechargeable NiMh/NiCad batteries of any size. The FLORA does not have a LiPo charger included by design, this allows safe use with multiple battery types and reduces risk of fire as it is not recommended to charge these batteries on fabric. We suggest one of our micro-lipo chargers if you want to use LiPo batteries with FLORA.
FLORA has onboard power switch connected to 2A power FET for safe and efficient battery on/off control, so you can power quite a bit without burning out your switch. The FLORA has an onboard 3.3v 250mA regulator with a protection diode and USB fuse so that the microcontroller voltage is consistent and can power common 3.3v modules and sensors.
FLORA
- FLORA is fabric friendly, all the components on board are flush to the PCB and won’t snag delicate garments.
- FLORA is extremely beginner-friendly. it is difficult to destroy the FLORA by connecting a battery backwards due to polarized connector and protection diodes.
- The FLORA has 4 indicator LEDs: power good, digital signal LED for bootloader feedback, data rx/tx. Also onboard is an ICSP connector for easy reprograming for advanced users.
- There are 14 sewing tap pads for attachment and electrical connections. Data buses are interleaved with power and ground pads for easy module and sensor attachments without worrying about overlapping traces which are not possible with conductive thread.
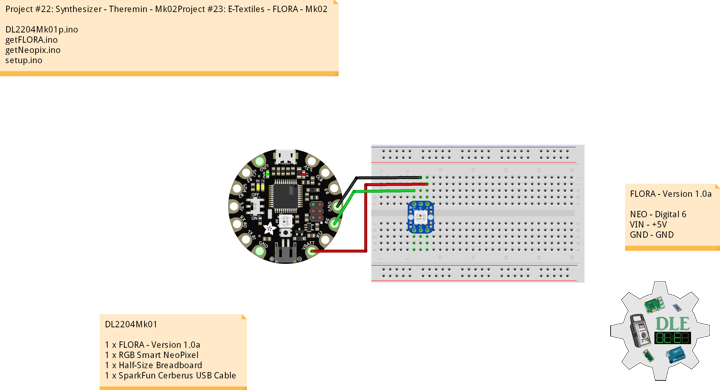
DL2204Mk01
1 x FLORA – Version 1.0a
1 x RGB Smart NeoPixel
1 x Half-Size Breadboard
1 x SparkFun Cerberus USB Cable
FLORA – Version 1.0a
NEO – Digital 6
VIN – +5V
GND – GND
DL2204Mk01p.ino
/* ***** Don Luc Electronics © *****
Software Version Information
Project #23: E-Textiles - FLORA - Wearable Electronic Platform - Mk02
23-02
DL2204Mk02p.ino
1 x FLORA - Version 1.0a
1 x RGB Smart NeoPixel
1 x Half-Size Breadboard
1 x SparkFun Cerberus USB Cable
*/

// Include the Library Code
// NeoPixels
#include <Adafruit_NeoPixel.h>

// NeoPixels
// On digital pin 6
#define PIN 6
// NeoPixels NUMPIXELS = 1
#define NUMPIXELS 1
// Pixels
Adafruit_NeoPixel pixels = Adafruit_NeoPixel(NUMPIXELS, PIN, NEO_GRB + NEO_KHZ800);
// Red
int red = 0;
// Green
int green = 0;
// Blue
int blue = 0;
// Neopix
int iNeo = 0;
// Value
int zz = 0;

// Software Version Information
String sver = "23-02";

void loop() {

  // FLORA
  isFLORA();
  delay( 2000 );

}
getFLORA.ino
// FLORA
// isFLORA
void isFLORA() {

  // FLORA = zz => Neopix
  if ( zz == 0 ) {

    isNUMPIXELS();
    zz = 1;

  } else if ( zz == 1 ) {

    isNUMPIXELS();
    zz = 2;

  } else if ( zz == 2 ) {

    isNUMPIXELS();
    zz = 3;

  } else if ( zz == 3 ) {

    isNUMPIXELS();
    zz = 4;

  } else if ( zz == 4 ) {

    isNUMPIXELS();
    zz = 5;

  } else if ( zz == 5 ) {

    isNUMPIXELS();
    zz = 6;

  } else if ( zz == 6 ) {

    isNUMPIXELS();
    zz = 0;

  }

}
getNeopix.ino
// NeoPixels
// Neopix
void isNeopix()
{

    // Pixels
    pixels.setBrightness( 255 );
    // Pixels color takes RGB values, from 0,0,0 up to 255,255,255
    pixels.setPixelColor( iNeo, pixels.Color(red,green,blue) );
    // This sends the updated pixel color to the hardware
    pixels.show();
    // Delay for a period of time (in milliseconds)
    delay(50);

}
// isNUMPIXELS
void isNUMPIXELS()
{

  // Neopix Value
  switch ( zz ) {
    case 0:
      // NeoPixels Green
      // Red
      red = 0;
      // Green
      green = 255;
      // Blue
      blue = 0;
      // Neopix
      iNeo = 0;
      isNeopix();
      break;
    case 1:
      // NeoPixels Blue
      // Red
      red = 0;
      // Green
      green = 0;
      // Blue
      blue = 255;
      // Neopix
      iNeo = 0;
      isNeopix();
      break;
    case 2:
      // NeoPixels Red
      // Red
      red = 255;
      // Green
      green = 0;
      // Blue
      blue = 0;
      // Neopix
      iNeo = 0;
      isNeopix();
      break;
    case 3:
      // NeoPixels Yellow
      // Red
      red = 255;
      // Green
      green = 255;
      // Blue
      blue = 0;
      // Neopix
      iNeo = 0;
      isNeopix();
      break;
    case 4:
      // NeoPixels Magenta
      // Red
      red = 255;
      // Green
      green = 0;
      // Blue
      blue = 255;
      // Neopix
      iNeo = 0;
      isNeopix();
      break;
    case 5:
      // NeoPixels Cyan
      // Red
      red = 0;
      // Green
      green = 255;
      // Blue
      blue = 255;
      // Neopix
      iNeo = 0;
      isNeopix();
      break;
    case 6:
      // NeoPixels White
      // Red
      red = 255;
      // Green
      green = 255;
      // Blue
      blue = 255;
      // Neopix
      iNeo = 0;
      isNeopix();
      break;
  }

}
// isNUMPIXELSoff
void isNUMPIXELSoff()
{

   // Black Off
   // NeoPixels
   // Red
   red = 0;
   // Green
   green = 0;
   // Blue
   blue = 0;
   isNeopix();

}
setup.ino
// Setup
void setup() {

  // NeoPixels
  // This initializes the NeoPixel library
  pixels.begin();
  // Delay for a period of time (in milliseconds)
  delay(50);
  // isNUMPIXELS Off
  isNUMPIXELSoff();

}
——
People can contact us: https://www.donluc.com/?page_id=1927
Technology Experience
- Single-Board Microcontrollers (PIC, Arduino, Raspberry Pi,Espressif, etc…)
- IoT
- Robotics
- Camera and Video Capture Receiver Stationary, Wheel/Tank and Underwater Vehicle
- Unmanned Vehicles Terrestrial and Marine
- Research & Development (R & D)
- Desktop Applications (Windows, OSX, Linux, Multi-OS, Multi-Tier, etc…)
- Mobile Applications (Android, iOS, Blackberry, Windows Mobile, Windows CE, etc…)
- Web Applications (LAMP, Scripting, Java, ASP, ASP.NET, RoR, Wakanda, etc…)
- Social Media Programming & Integration (Facebook, Twitter, YouTube, Pinterest, etc…)
- Content Management Systems (WordPress, Drupal, Joomla, Moodle, etc…)
- Bulletin Boards (phpBB, SMF, Vanilla, jobberBase, etc…)
- eCommerce (WooCommerce, OSCommerce, ZenCart, PayPal Shopping Cart, etc…)
Instructor and E-Mentor
- IoT
- PIC Microcontrollers
- Arduino
- Raspberry Pi
- Espressif
- Robotics
- DOS, Windows, OSX, Linux, iOS, Android, Multi-OS
- Linux-Apache-PHP-MySQL
Follow Us
J. Luc Paquin – Curriculum Vitae – 2022 English & Español
https://www.jlpconsultants.com/luc/
Web: https://www.donluc.com/
Web: https://www.jlpconsultants.com/
Facebook: https://www.facebook.com/neosteam.labs.9/
YouTube: https://www.youtube.com/channel/UC5eRjrGn1CqkkGfZy0jxEdA
Twitter: https://twitter.com/labs_steam
Pinterest: https://www.pinterest.com/NeoSteamLabs/
Instagram: https://www.instagram.com/neosteamlabs/
Don Luc
Project #22: Synthesizer – Theremin – Mk02
——
#DonLucElectronics #DonLuc #Synthesizer #Theremin #Arduino #ArduinoProMini #Project #Fritzing #Programming #Electronics #Microcontrollers #Consultant
——
——
——
——
Theremin
The theremin was invented in 1920 by a Russian physicist named Lev Termen. Today, this marvelous instrument is once again in the musical spotlight. Besides looking like no other instrument, the theremin is unique in that it is played without being touched.
Two antennas protrude from the theremin, one controlling pitch, and the other controlling volume. As a hand approaches the vertical antenna, the pitch gets higher. Approaching the horizontal antenna makes the volume softer. Because there is no physical contact with the instrument, playing the theremin in a precise melodic way requires practiced skill and keen attention to pitch. The electric signals from the theremin are amplified and sent to a loudspeaker.
In the late 1920’s, RCA produced approximately 500 theremins, manufactured by General Electric and Westinghouse. Today, it is estimated that only half of these still exist. The spooky sound of the theremin was used in several movie soundtracks during the 1950’s and 1960’s. Electronic music pioneer Robert Moog built theremins long before he built synthesizers. In the 1960’s, he produced such models as the wedge-shaped Vanguard theremin and the shoebox shaped Moog Melodia theremin. It provided background mood music for such sci-fi classics. During the 60’s and 70’s, bands such as Lothar and the Hand People, the Bonzo Doo Dah Dog Band, and Led Zeppelin brought the theremin into the public eye for a short time.
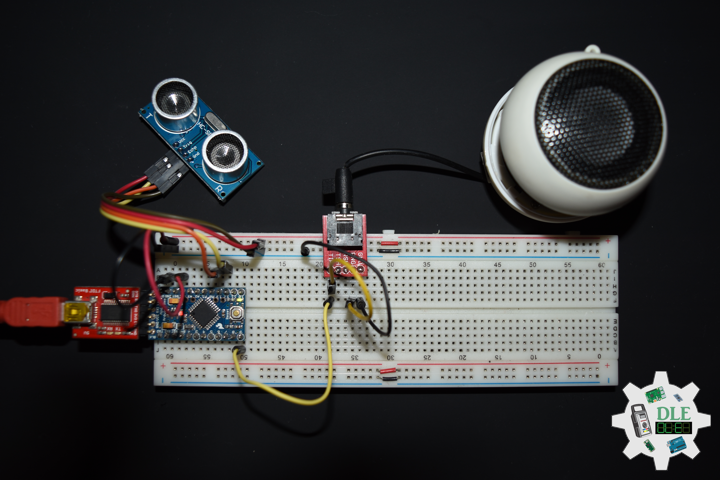
Theremin + Arduino Pro Mini + Ultrasonic Sensor + Mozzi
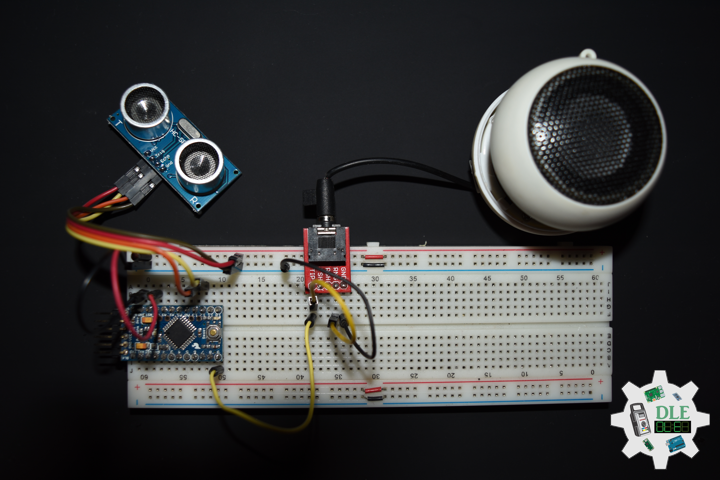
Arduino Pro Mini does not come with connectors populated so that you can solder in any connector or wire with any orientation you need. This is the ultrasonic distance sensor. This economical sensor provides 2cm to 400cm of non-contact measurement functionality. The ultrasonic range detectors replace the antenna of the traditional Theremin. Control the frequency (pitch) of the output. Operation of the sensor is straightforward. The Arduino sends a digital pulse to the TRIG pin of the sensor causing it to emit a burst of high frequency audio. If an echo is detected the sensor toggles the ECHO pin which is monitored by the Arduino. By measuring the time delay between the outgoing pulse and returning echo we can calculate the distance. As sound takes 29 microseconds to travel one cm, and must travel out and back, we can divide the time to the echo by 5.8 to get the distance in mm. The project uses the Mozzi audio library to generate a sine table for oscillator which is sent to the output.
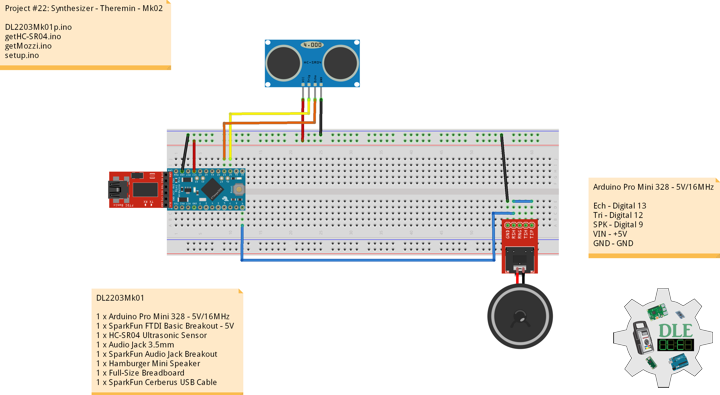
DL2203Mk01
1 x Arduino Pro Mini 328 – 5V/16MHz
1 x SparkFun FTDI Basic Breakout – 5V
1 x HC-SR04 Ultrasonic Sensor
1 x Audio Jack 3.5mm
1 x SparkFun Audio Jack Breakout
1 x Hamburger Mini Speaker
1 x Full-Size Breadboard
1 x SparkFun Cerberus USB Cable
Arduino Pro Mini 328 – 5V/16MHz – Receiver
Ech – Digital 13
Tri – Digital 12
SPK – Digital 9
VIN – +5V
GND – GND
DL2203Mk01p.ino
/* ***** Don Luc Electronics © *****
Software Version Information
Project #22: Synthesizer - Theremin - Mk02
22-02
DL2203Mk01p.ino
1 x Arduino Pro Mini 328 - 5V/16MHz
1 x SparkFun FTDI Basic Breakout - 5V
1 x HC-SR04 Ultrasonic Sensor
1 x Audio Jack 3.5mm
1 x SparkFun Audio Jack Breakout
1 x Hamburger Mini Speaker
1 x Full-Size Breadboard
1 x SparkFun Cerberus USB Cable
*/

// Include the Library Code
// Mozzi
#include <MozziGuts.h>
// Oscillator template
#include <Oscil.h>
// Sine table for oscillator
#include <tables/sin2048_int8.h>
// Rolling Average
#include <RollingAverage.h>
// Control Delay
#include <ControlDelay.h>

// Control Rate
#define CONTROL_RATE 64
// Echo Cells
unsigned int echo_cells_1 = 32;
unsigned int echo_cells_2 = 60;
unsigned int echo_cells_3 = 127;
// Contro lDelay = 2 seconds
ControlDelay <128, int> kDelay;
// Oscils to compare bumpy to averaged control input
Oscil <SIN2048_NUM_CELLS, AUDIO_RATE> aSin0(SIN2048_DATA);
Oscil <SIN2048_NUM_CELLS, AUDIO_RATE> aSin1(SIN2048_DATA);
Oscil <SIN2048_NUM_CELLS, AUDIO_RATE> aSin2(SIN2048_DATA);
Oscil <SIN2048_NUM_CELLS, AUDIO_RATE> aSin3(SIN2048_DATA);
// RollingAverage <number_type, how_many_to_average> myThing
// How many to average has to be power of 2
RollingAverage <int, 32> kAverage;
int averaged;

// Trigger pin 12 to pitch distance sensor
const int iTrigPitch = 12;
// Echo Receive pin 13 to pitch distance sensor
const int iEchoPitch = 13;
// Stores the distance measured by the distance sensor
float distance = 0;

// Mini Speaker
int SPK = 9;

// Set the input for the volume
// Volume level from updateControl() to updateAudio()
byte vol;

// Software Version Information
String sver = "22-02";

void loop() {

  // Audio Hook
  audioHook();

}
getHC-SR04.ino
// HC-SR04 Ultrasonic Sensor
// Setup HC-SR04
void setupHCSR04() {

  // The trigger iTrig will output pulses of electricity
  pinMode(iTrigPitch, OUTPUT);
  // The echo iEcho will measure the duration of pulses coming back from the distance sensor
  pinMode(iEchoPitch, INPUT);

}
// Distance
float isDistance() {

  // Variable to store the time it takes for a ping to bounce off an object
  float echoTime;
  // Variable to store the distance calculated from the echo time
  float calculatedDistance;

  // Send out an ultrasonic pulse that's 10ms long
  digitalWrite(iTrigPitch, HIGH);
  delayMicroseconds(10);
  digitalWrite(iTrigPitch, LOW);

  // Use the pulseIn command to see how long it takes for the
  // pulse to bounce back to the sensor
  echoTime = pulseIn(iEchoPitch, HIGH);

  // Calculate the distance of the object that reflected the pulse
  // (half the bounce time multiplied by the speed of sound)
  // cm = 58.0
  calculatedDistance = echoTime / 58.0;

  // Send back the distance that was calculated
  return calculatedDistance;

}
getMozzi.ino
// Mozzi
// Update Control
void updateControl(){

  // Volume
  vol = 255;
  // Variable to store the distance measured by the sensor
  distance = isDistance();
  int bumpy_input = distance;
  // Averaged
  averaged = kAverage.next(bumpy_input);
  aSin0.setFreq(averaged);
  aSin1.setFreq(kDelay.next(averaged));
  aSin2.setFreq(kDelay.read(echo_cells_2));
  aSin3.setFreq(kDelay.read(echo_cells_3));

}
// Update Audio
int updateAudio()
{

  // Update Audio
  return 3*((int)aSin0.next()+aSin1.next()+(aSin2.next()>>1)
    +(aSin3.next()>>2)) >>3;

}
setup.ino
// Setup
void setup() {

  // Setup HC-SR04
  setupHCSR04();

  // Echo Cells 1
  kDelay.set(echo_cells_1);

  // Mozzi Start
  startMozzi();

}
——
People can contact us: https://www.donluc.com/?page_id=1927
Technology Experience
- Single-Board Microcontrollers (PIC, Arduino, Raspberry Pi,Espressif, etc…)
- IoT
- Robotics
- Camera and Video Capture Receiver Stationary, Wheel/Tank and Underwater Vehicle
- Unmanned Vehicles Terrestrial and Marine
- Research & Development (R & D)
- Desktop Applications (Windows, OSX, Linux, Multi-OS, Multi-Tier, etc…)
- Mobile Applications (Android, iOS, Blackberry, Windows Mobile, Windows CE, etc…)
- Web Applications (LAMP, Scripting, Java, ASP, ASP.NET, RoR, Wakanda, etc…)
- Social Media Programming & Integration (Facebook, Twitter, YouTube, Pinterest, etc…)
- Content Management Systems (WordPress, Drupal, Joomla, Moodle, etc…)
- Bulletin Boards (phpBB, SMF, Vanilla, jobberBase, etc…)
- eCommerce (WooCommerce, OSCommerce, ZenCart, PayPal Shopping Cart, etc…)
Instructor and E-Mentor
- IoT
- PIC Microcontrollers
- Arduino
- Raspberry Pi
- Espressif
- Robotics
- DOS, Windows, OSX, Linux, iOS, Android, Multi-OS
- Linux-Apache-PHP-MySQL
Follow Us
J. Luc Paquin – Curriculum Vitae – 2022 English & Español
https://www.jlpconsultants.com/luc/
Web: https://www.donluc.com/
Web: https://www.jlpconsultants.com/
Facebook: https://www.facebook.com/neosteam.labs.9/
YouTube: https://www.youtube.com/channel/UC5eRjrGn1CqkkGfZy0jxEdA
Twitter: https://twitter.com/labs_steam
Pinterest: https://www.pinterest.com/NeoSteamLabs/
Instagram: https://www.instagram.com/neosteamlabs/
Don Luc
Project #22: Synthesizer – The AcceleroSynth 2012 – Mk01
——
#DonLucElectronics #DonLuc #Synthesizer #Programming #Electronics #Microcontrollers #Consultant
——
——
Synthesizer, Music Synthesizer Or Electronic Sound Synthesizer
Synthesizer machine that electronically generates and modifies sounds, frequently with the use of a digital computer. Synthesizers are used for the composition of electronic music and in live performance. Synthesizers are typically played with keyboards or controlled by sequencers, software or other instruments. A electronic musical instrument that generates audio signals. Synthesizers typically create sounds by generating waveforms, through methods including subtractive synthesis, additive synthesis and frequency modulation synthesis. These sounds may be altered by components such as filters, which cut or boost frequencies, envelopes, which control articulation, or how notes begin and end, and low-frequency oscillators, which modulate parameters such as pitch, volume, or filter characteristics affecting timbre.
The AcceleroSynth – 2012
We are finally ready for our first electronics project, The AcceleroSynth. It is an microcontroller-based (Arduino) music synth that is controller by a 3 axis analog accelerometer. It will be both a hardware and a software synth. This is the announcement for the project and in the coming days I will post the BOM (Bill of Material), schematics and Arduino code with the first assembly video. The project will first be assembled on a protoboard, then a soldered version will be built either on a perfboard or on an Arduino ProtoShield. If there is enough demand either a PCB or an Arduino Shield will be built for the project and sold here. More on that later. The first installment on the building of the project should be up on a few days.
People can contact us: https://www.donluc.com/?page_id=1927
Technology Experience
- Single-Board Microcontrollers (PIC, Arduino, Raspberry Pi,Espressif, etc…)
- IoT
- Robotics
- Camera and Video Capture Receiver Stationary, Wheel/Tank and Underwater Vehicle
- Unmanned Vehicles Terrestrial and Marine
- Research & Development (R & D)
- Desktop Applications (Windows, OSX, Linux, Multi-OS, Multi-Tier, etc…)
- Mobile Applications (Android, iOS, Blackberry, Windows Mobile, Windows CE, etc…)
- Web Applications (LAMP, Scripting, Java, ASP, ASP.NET, RoR, Wakanda, etc…)
- Social Media Programming & Integration (Facebook, Twitter, YouTube, Pinterest, etc…)
- Content Management Systems (WordPress, Drupal, Joomla, Moodle, etc…)
- Bulletin Boards (phpBB, SMF, Vanilla, jobberBase, etc…)
- eCommerce (WooCommerce, OSCommerce, ZenCart, PayPal Shopping Cart, etc…)
Instructor and E-Mentor
- IoT
- PIC Microcontrollers
- Arduino
- Raspberry Pi
- Espressif
- Robotics
- DOS, Windows, OSX, Linux, iOS, Android, Multi-OS
- Linux-Apache-PHP-MySQL
Follow Us
J. Luc Paquin – Curriculum Vitae – 2022 English & Español
https://www.jlpconsultants.com/luc/
Web: https://www.donluc.com/
Web: https://www.jlpconsultants.com/
Facebook: https://www.facebook.com/neosteam.labs.9/
YouTube: https://www.youtube.com/channel/UC5eRjrGn1CqkkGfZy0jxEdA
Twitter: https://twitter.com/labs_steam
Pinterest: https://www.pinterest.com/NeoSteamLabs/
Instagram: https://www.instagram.com/neosteamlabs/
Don Luc
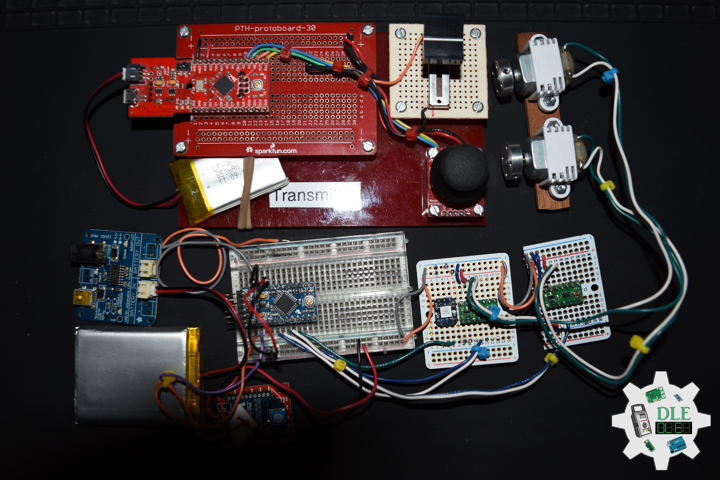
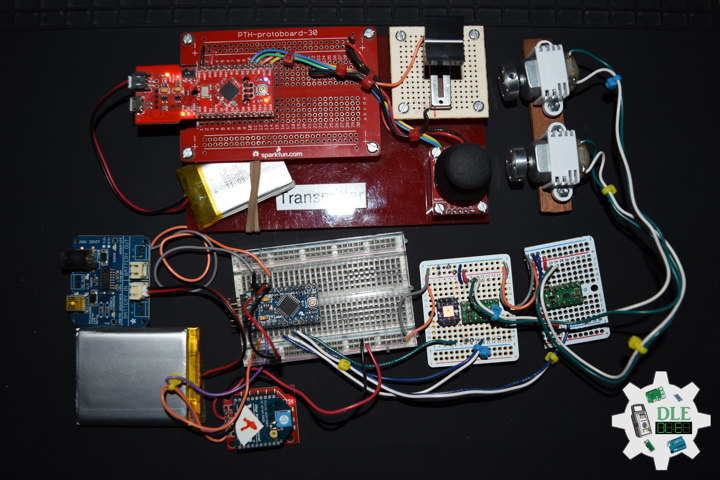
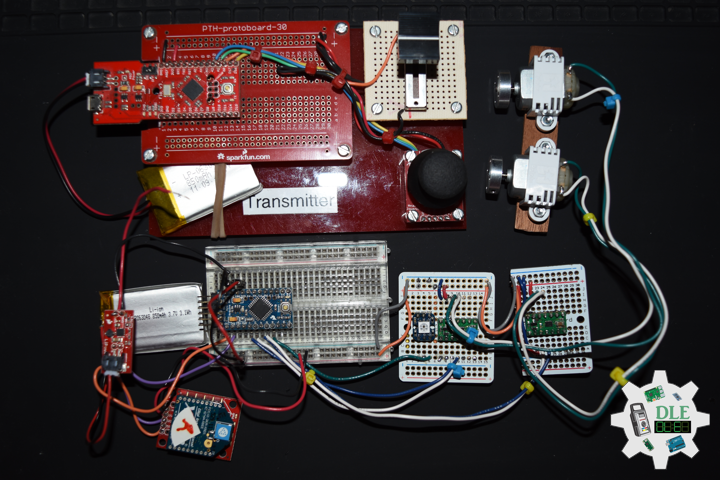
Project #12: Robotics – Pololu Wheel – Mk23
——
#DonLucElectronics #DonLuc #Robotics #Arduino #Fio #ArduinoProMini #XBee #DCMotor #MotorDriver #Project #Fritzing #Programming #Electronics #Microcontrollers #Consultant
——
——
——
——
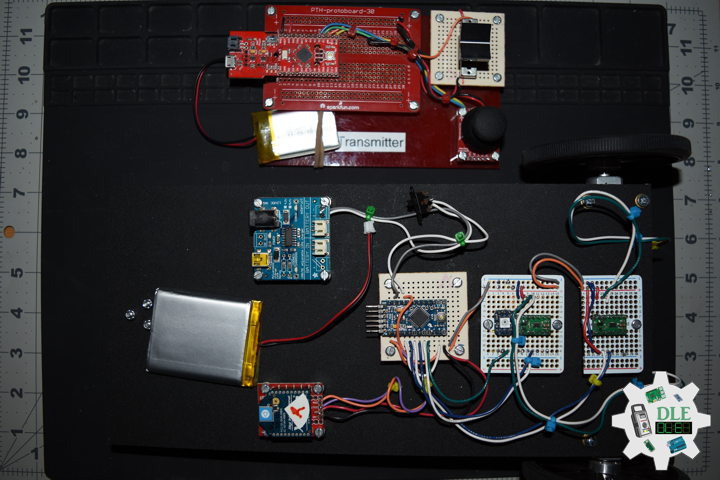
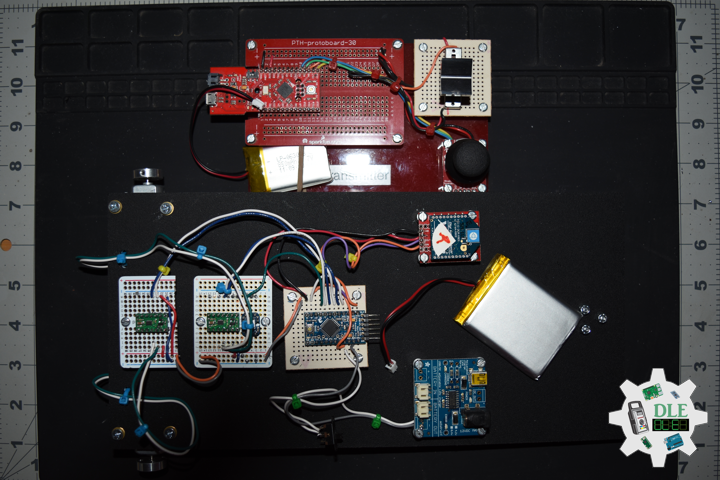
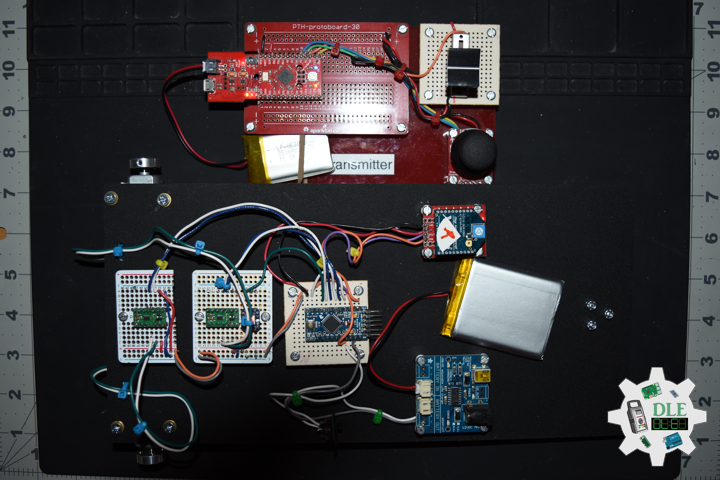
Pololu Wheel 90 mm × 10 mm – Black
These black plastic wheels have silicone tires and measure 90 mm (3.54 inches) in diameter, and they press-fit onto the 3mm D shafts on many of our motors, including our micro metal gearmotors and our mini plastic gearmotors. Additionally, this wheel is compatible with several of our universal mounting hubs, which can serve as adapters for motors with different shafts. Six mounting holes for #4 or M3 screws make it possible to use the wheel with any of our universal mounting hubs for those screw sizes, enabling these wheels to be used with our larger metal gearmotors and stepper motors. The included silicone tires, which feature horizontal treads for improved traction.
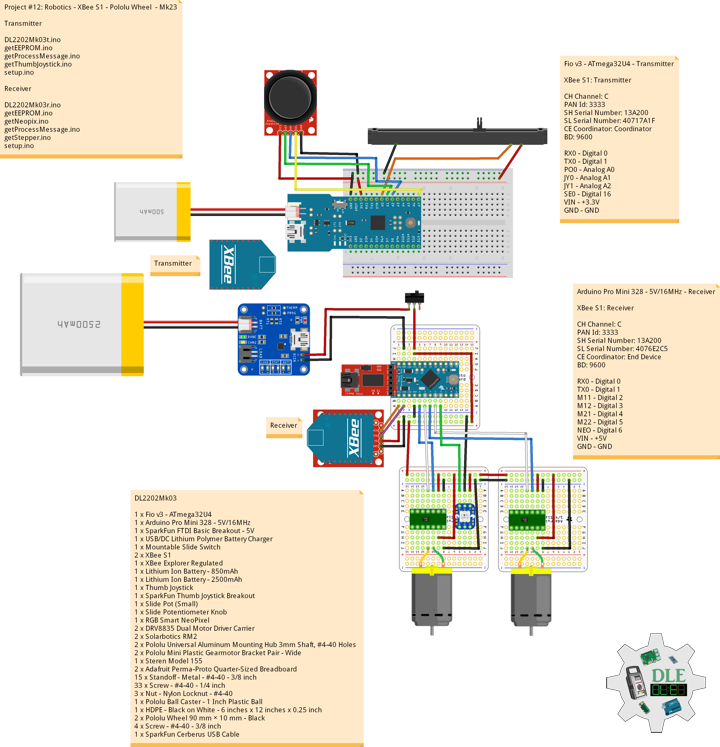
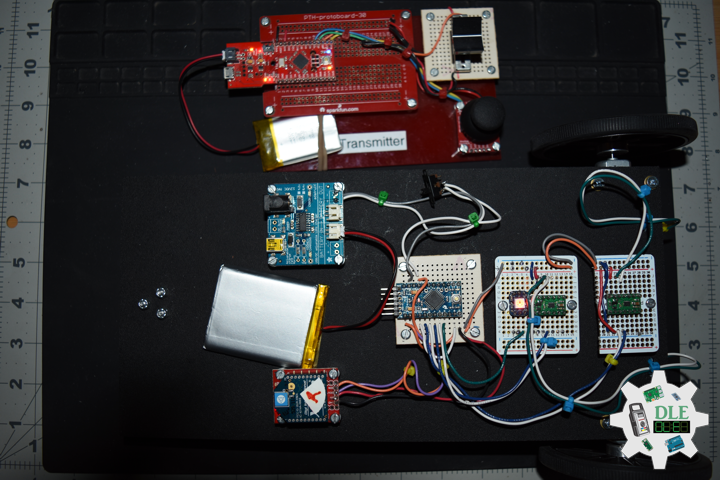
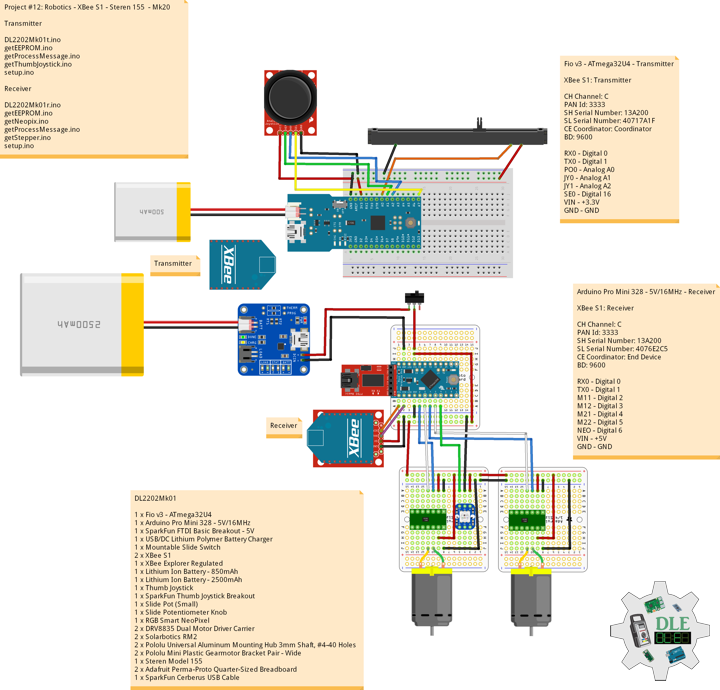
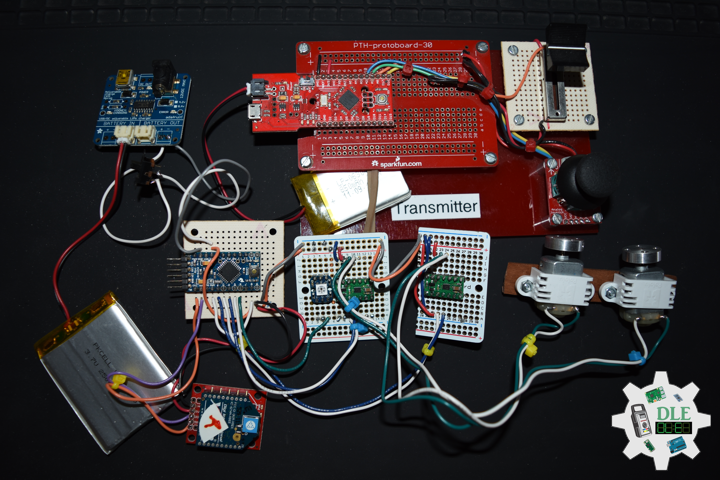
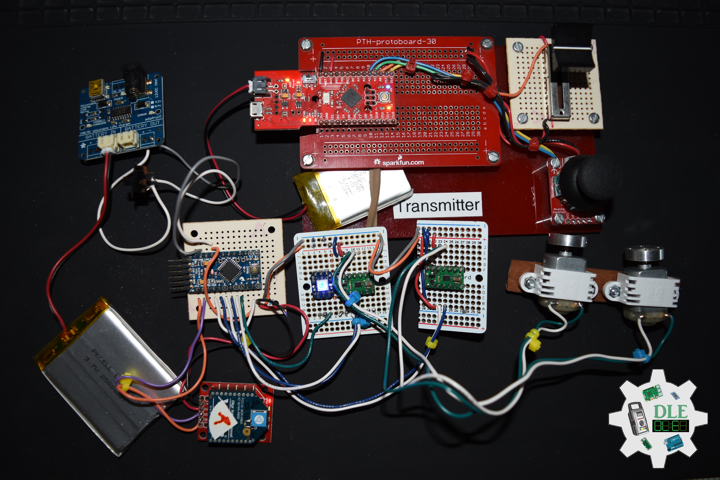
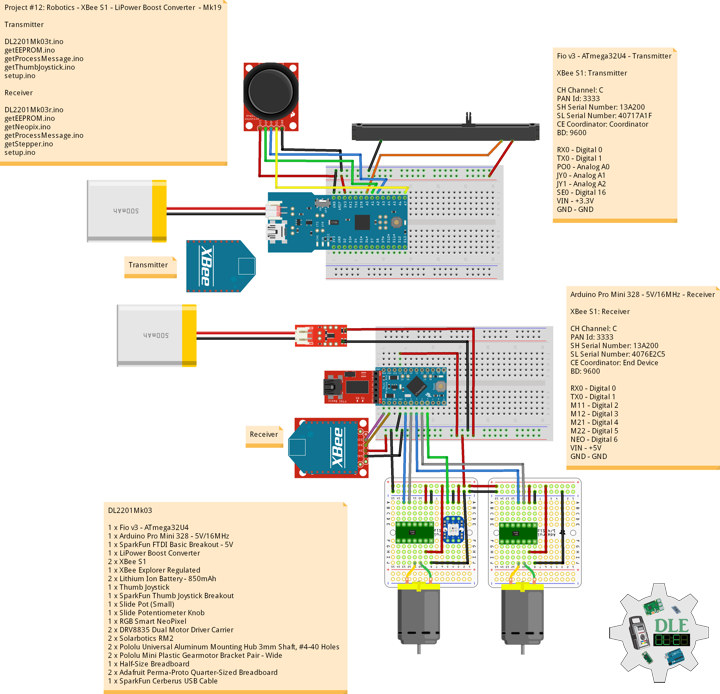
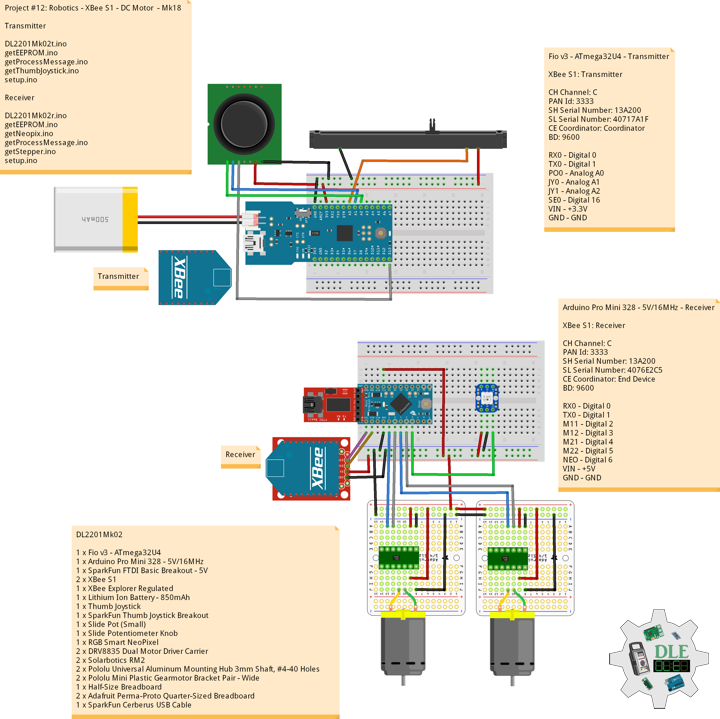
DL2202Mk03
1 x Fio v3 – ATmega32U4
1 x Arduino Pro Mini 328 – 5V/16MHz
1 x SparkFun FTDI Basic Breakout – 5V
1 x USB/DC Lithium Polymer Battery Charger
1 x Mountable Slide Switch
2 x XBee S1
1 x XBee Explorer Regulated
1 x Lithium Ion Battery – 850mAh
1 x Lithium Ion Battery – 2500mAh
1 x Thumb Joystick
1 x SparkFun Thumb Joystick Breakout
1 x Slide Pot (Small)
1 x Slide Potentiometer Knob
1 x RGB Smart NeoPixel
2 x DRV8835 Dual Motor Driver Carrier
2 x Solarbotics RM2
2 x Pololu Universal Aluminum Mounting Hub 3mm Shaft, #4-40 Holes
2 x Pololu Mini Plastic Gearmotor Bracket Pair – Wide
1 x Steren Model 155
2 x Adafruit Perma-Proto Quarter-Sized Breadboard
15 x Standoff – Metal – #4-40 – 3/8 inch
33 x Screw – #4-40 – 1/4 inch
3 x Nut – Nylon Locknut – #4-40
1 x Pololu Ball Caster – 1 Inch Plastic Ball
1 x HDPE – Black on White – 6 inches x 12 inches x 0.25 inch
2 x Pololu Wheel 90 mm × 10 mm – Black
4 x Screw – #4-40 – 3/8 inch
1 x SparkFun Cerberus USB Cable
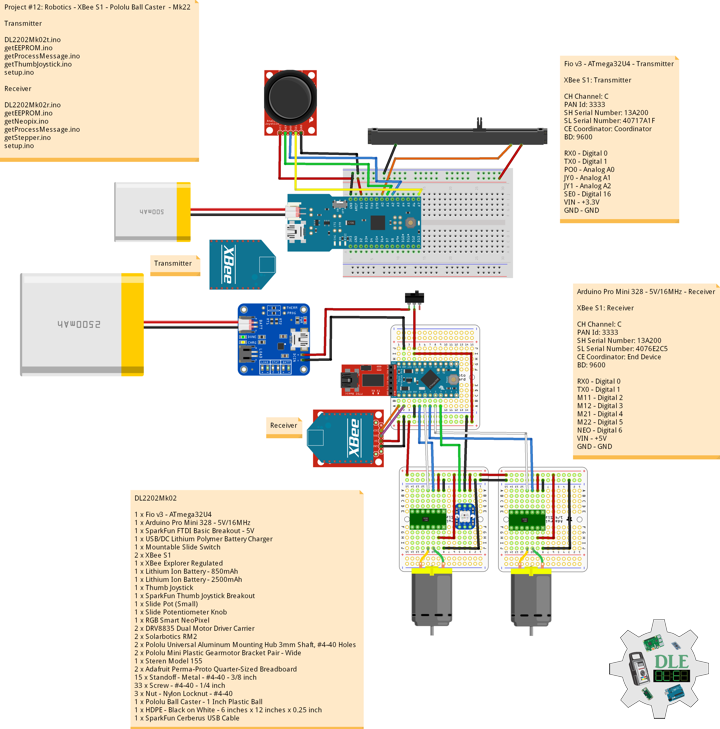
Fio v3 – ATmega32U4 – Transmitter
XBee S1: Transmitter
CH Channel: C
PAN Id: 3333
SH Serial Number: 13A200
SL Serial Number: 40717A1F
CE Coordinator: Coordinator
BD: 9600
RX0 – Digital 0
TX0 – Digital 1
PO0 – Analog A0
JY0 – Analog A1
JY1 – Analog A2
SE0 – Digital 16
VIN – +3.3V
GND – GND
DL2202Mk03t.ino
/* ***** Don Luc Electronics © *****
Software Version Information
Project #12: Robotics - Pololu Wheel - Mk23
02-03
Transmitter
DL2202Mk03t.ino
1 x Fio v3 - ATmega32U4
1 x XBee S1
1 x Lithium Ion Battery - 850mAh
1 x Thumb Joystick
1 x SparkFun Thumb Joystick Breakout
1 x Slide Pot (Small)
1 x Slide Potentiometer Knob
1 x SparkFun Cerberus USB Cable
*/

// Include the Library Code
// EEPROM library to read and write EEPROM with unique ID for unit
#include <EEPROM.h>

// Communication
unsigned long dTime = 200;

// Slide Pot (Small)
// Select the input pin for the slide pot
// Power
const int iSP1 = A0;
// Power to store the value
int iPower = 0;

// Connections to joystick
// Vertical
const int VERT = A1;
// Horizontal
const int HORIZ = A2;
// Pushbutton
const int SEL = 16;
// Initialize variables for analog and digital values
int vertical;
int horizontal;
int select;

// Software Version Information
// Version
String sver = "12-23t";
// Unit ID Information
// UID
String uid = "";

void loop()
{

  // Thumb Joystick
  isThumbJoystick();

  // Process Message
  isProcessMessage();

  delay( dTime );

}
getEEPROM.ino
// EEPROM
// is UID
void isUID()
{

  // Is Unit ID
  // UID
  uid = "";
  for (int x = 0; x < 5; x++)
  {
    uid = uid + char(EEPROM.read(x));
  }

}
getProcessMessage.ino
// Process Message
// isProcessMessage
void isProcessMessage() {

   // Loop through serial buffer
   // Print = "<" + vertical + "|" + horizontal + "|" + select + "|" + iValue + "|" + sver + "|" + uid + "*"

   Serial1.print( '<'  );
   Serial1.print( vertical );
   Serial1.print( '|' );
   Serial1.print( horizontal );
   Serial1.print( '|' );
   Serial1.print( select );
   Serial1.print( '|' );
   Serial1.print( iPower );
   Serial1.print( '|' );
   Serial1.print( sver );
   Serial1.print( '|' );
   Serial1.print( uid );
   Serial1.println( '*' );

}
getThumbJoystick.ino
// Thumb Joystick
void isThumbJoystick() {

  // Read all values from the joystick
  // Joystick was sitting around 520 for the vertical and horizontal values
  // Will be 0-1023
  vertical = analogRead(VERT);
  // Will be 0-1023
  horizontal = analogRead(HORIZ);
  // Will be HIGH (1) if not pressed, and LOW (0) if pressed
  select = digitalRead(SEL);
  // Read the value
  // Power be 0-1023
  iPower = analogRead( iSP1 );

}
setup.ino
// Setup
void setup()
{

  // EEPROM Unit ID
  isUID();

  // Pause
  delay(5);

  // Make the SEL line an input
  pinMode(SEL, INPUT_PULLUP);

  // Open Serial1 port at 9600 baud
  Serial1.begin( 9600 );

  // Pause
  delay(5);

}
——
Arduino Pro Mini 328 – 5V/16MHz – Receiver
XBee S1: Receiver
CH Channel: C
PAN Id: 3333
SH Serial Number: 13A200
SL Serial Number: 4076E2C5
CE Coordinator: End Device
BD: 9600
RX0 – Digital 0
TX0 – Digital 1
M11 – Digital 2
M12 – Digital 3
M21 – Digital 4
M22 – Digital 5
NEO – Digital 6
VIN – +5V
GND – GND
DL2202Mk03r.ino
/* ***** Don Luc Electronics © *****
Software Version Information
Project #12: Robotics - Pololu Wheel - Mk23
02-03
Receiver
DL2202Mk03r.ino
1 x Arduino Pro Mini 328 - 5V/16MHz
1 x SparkFun FTDI Basic Breakout - 5V
1 x XBee S1
1 x XBee Explorer Regulated
1 x USB/DC Lithium Polymer Battery Charger
1 x Mountable Slide Switch
1 x Lithium Ion Battery - 2500mAh
1 x RGB Smart NeoPixel
2 x DRV8835 Dual Motor Driver Carrier
2 x Solarbotics RM2
2 x Pololu Universal Aluminum Mounting Hub 3mm Shaft, #4-40 Holes
2 x Pololu Mini Plastic Gearmotor Bracket Pair - Wide
1 x Steren Model 155
2 x Adafruit Perma-Proto Quarter-Sized Breadboard
15 x Standoff - Metal - #4-40 - 3/8 inch
33 x Screw - #4-40 - 1/4 inch
3 x Nut - Nylon Locknut - #4-40
1 x Pololu Ball Caster - 1 Inch Plastic Ball
1 x HDPE - Black on White - 6 inches x 12 inches x 0.25 inch
2 x Pololu Wheel 90 mm × 10 mm - Black
4 x Screw - #4-40 - 3/8 inch
1 x SparkFun Cerberus USB Cable
*/

// Include the library code:
// EEPROM library to read and write EEPROM with unique ID for unit
#include <EEPROM.h>
// NeoPixels
#include <Adafruit_NeoPixel.h>

// Solarbotics RM2 -> 1
#define MOTOR1_IN1 2
#define MOTOR1_IN2 3
// Solarbotics RM2 -> 2
#define MOTOR2_IN1 4
#define MOTOR2_IN2 5

// Power be 0-1023
int iPower = 0;
String POW = "";
// Joystick was sitting around 520 for the vertical and horizontal values
// Will be 0-1023
// Vertical
int vertical;
String VER = "";
// Horizontal
// Will be 0-1023
int horizontal;
String HOR = "";
// Select
// Will be HIGH (1) if not pressed, and LOW (0) if pressed
int select1 = 0;
String SEL = "";
int firstClosingBracket = 0;
// Map Vertical and Horizontal
int mapVer = 0;
int mapHor = 0;
int iVer = 1;
int iHor = 0;

// NeoPixels
// On digital pin 6
#define PIN 6
// NeoPixels NUMPIXELS = 1
#define NUMPIXELS 1
// Pixels
Adafruit_NeoPixel pixels = Adafruit_NeoPixel(NUMPIXELS, PIN, NEO_GRB + NEO_KHZ800);
// Red
int red = 0;
// Green
int green = 0;
// Blue
int blue = 0;
// Neopix
int iNeo = 0;
// Value
int zz = 0;

// Process Message
// Start
bool bStart = false;
// End
bool bEnd   = false;
// Variable to store the incoming byte
int incb = 0;
// Message
String msg = "";
// Index
byte in = 0;
int x = 0;

// Software Version Information
String sver = "12-23r";
// Unit ID information
String uid = "";

void loop() {

  // Check for serial messages
  isProcessMessage();

}
getEEPROM.ino
// EEPROM
// isUID
void isUID()
{

  // Is Unit ID
  uid = "";
  for (int x = 0; x < 5; x++)
  {
    uid = uid + char(EEPROM.read(x));
  }

}
getNeopix.ino
// NeoPixels
// Neopix
void isNeopix()
{

    // Pixels
    pixels.setBrightness( 130 );
    // Pixels color takes RGB values, from 0,0,0 up to 255,255,255
    pixels.setPixelColor( iNeo, pixels.Color(red,green,blue) );
    // This sends the updated pixel color to the hardware
    pixels.show();
    // Delay for a period of time (in milliseconds)
    delay(50);

}
// isNUMPIXELS
void isNUMPIXELS()
{

  // Neopix Value
  switch ( zz ) {
    case 0:
      // NeoPixels Green
      // Red
      red = 0;
      // Green
      green = 255;
      // Blue
      blue = 0;
      // Neopix
      iNeo = 0;
      isNeopix();
      break;
    case 1:
      // NeoPixels Blue
      // Red
      red = 0;
      // Green
      green = 0;
      // Blue
      blue = 255;
      // Neopix
      iNeo = 0;
      isNeopix();
      break;
    case 2:
      // NeoPixels Red
      // Red
      red = 255;
      // Green
      green = 0;
      // Blue
      blue = 0;
      // Neopix
      iNeo = 0;
      isNeopix();
      break;
    case 3:
      // NeoPixels Yellow
      // Red
      red = 255;
      // Green
      green = 255;
      // Blue
      blue = 0;
      // Neopix
      iNeo = 0;
      isNeopix();
      break;
    case 4:
      // NeoPixels Magenta
      // Red
      red = 255;
      // Green
      green = 0;
      // Blue
      blue = 255;
      // Neopix
      iNeo = 0;
      isNeopix();
      break;
    case 5:
      // NeoPixels Cyan
      // Red
      red = 0;
      // Green
      green = 255;
      // Blue
      blue = 255;
      // Neopix
      iNeo = 0;
      isNeopix();
      break;
    case 6:
      // NeoPixels White
      // Red
      red = 255;
      // Green
      green = 255;
      // Blue
      blue = 255;
      // Neopix
      iNeo = 0;
      isNeopix();
      break;
  }

}
// isNUMPIXELSoff
void isNUMPIXELSoff()
{

   // Black Off
   // NeoPixels
   // Red
   red = 0;
   // Green
   green = 0;
   // Blue
   blue = 0;
   isNeopix();

}
getProcessMessage.ino
// ProcessMessage
// isProcessMessage
void isProcessMessage() {

  // Loop through serial buffer one byte at a time until you reach * which will be end of message
  while ( Serial.available() > 0 )
  {

      // Read the incoming byte:
      incb = Serial.read();

      // Start the message when the '<' symbol is received
      if(incb == '<')
      {

        // Start
        bStart = true;
        in = 0;
        msg = "";

      }
      // End the message when the '*' symbol is received
      else if(incb == '*')
      {

        // End
        bEnd = true;
        x = msg.length();
        msg.remove( x , 1);
        // Done reading

        break;
      }
      // Read the message
      else
      {

        // Message
        msg = msg + char(incb);
        in++;

      }

   }

   // Start - End
   if( bStart && bEnd)
   {

      // isRM2Motor => Message
      isRM2Motor();

      // Start - End
      in = 0;
      msg = "";
      bStart = false;
      bEnd = false;
      vertical;
      horizontal;
      iPower;

   }

}
getRM2Motor.ino
// RM2 Motor
// Setup RM2 Motor
void isSetupRM2Motor() {

  // Solarbotics RM2 -> 1
  pinMode(MOTOR1_IN1, OUTPUT);
  pinMode(MOTOR1_IN2, OUTPUT);
  // Solarbotics RM2 -> 2
  pinMode(MOTOR2_IN1, OUTPUT);
  pinMode(MOTOR2_IN2, OUTPUT);

}
// isRM2Motor
void isRM2Motor() {

  // msg = vertical + "|" + horizontal + "|" + select + "|" + iValue + "|" + sver + "|" + uid
  firstClosingBracket = 0;
  // Vertical
  firstClosingBracket = msg.indexOf('|');
  VER = msg;
  VER.remove(firstClosingBracket);
  vertical = VER.toInt();
  // Horizontal
  firstClosingBracket = firstClosingBracket + 1;
  msg.remove(0, firstClosingBracket );
  firstClosingBracket = msg.indexOf('|');
  HOR = msg;
  HOR.remove(firstClosingBracket);
  horizontal = HOR.toInt();
  // Select
  firstClosingBracket = firstClosingBracket + 1;
  msg.remove(0, firstClosingBracket );
  firstClosingBracket = msg.indexOf('|');
  SEL = msg;
  SEL.remove(firstClosingBracket);
  select1 = SEL.toInt();
  // Power
  firstClosingBracket = firstClosingBracket + 1;
  msg.remove(0, firstClosingBracket );
  firstClosingBracket = msg.indexOf('|');
  POW = msg;
  POW.remove(firstClosingBracket);
  iPower = POW.toInt();

  // Set the direction
  // Joystick was sitting around 520 for the vertical and horizontal values
  // Will be 0-1023
  mapVer = map(vertical, 0, 1023, -512, 512);
  mapHor = map(horizontal, 0, 1023, -512, 512);
  // Power
  iPower = map(iPower, 0, 1023, 80, 200);

  // Vertical and Horizontal
  if ( mapVer == -512 ) {

      // Backward
      // NeoPixels Blue
      zz = 1;
      isNUMPIXELS();
      iVer = 1;

  } else if ( mapVer == 512 ) {

      // Forward
      // NeoPixels Green
      zz = 0;
      isNUMPIXELS();
      iVer = 2;

  } else if ( mapHor == -512 ) {

      // Left
      // NeoPixels Yellow
      zz = 3;
      isNUMPIXELS();
      iVer = 3;

  } else if ( mapHor == 512 ) {

      // Right
      // NeoPixels Magenta
      zz = 4;
      isNUMPIXELS();
      iVer = 4;

  } else {

    // Stop
    // NeoPixels Red
    zz = 2;
    isNUMPIXELS();
    iVer = 5;

  }

  // XBee Car
  switch ( iVer ) {
    case 1:

      // Solarbotics RM2 -> 1 Forward
      digitalWrite(MOTOR1_IN1, LOW);
      analogWrite(MOTOR1_IN2, iPower);
      delay(10);

      // Solarbotics RM2 -> 2 Forward
      digitalWrite(MOTOR2_IN2, LOW);
      analogWrite(MOTOR2_IN1, iPower);
      delay(10);

      break;
    case 2:

      // Solarbotics RM2 -> 1 Backward
      digitalWrite(MOTOR1_IN2, LOW);
      analogWrite(MOTOR1_IN1, iPower);
      delay(10);

      // Solarbotics RM2 -> 2 Backward
      digitalWrite(MOTOR2_IN1, LOW);
      analogWrite(MOTOR2_IN2, iPower);
      delay(10);

      break;
    case 3:

      // Right
      // Solarbotics RM2 -> 1 Forward
      digitalWrite(MOTOR1_IN1, LOW);
      analogWrite(MOTOR1_IN2, iPower);
      delay(10);

      // Solarbotics RM2 -> 2 Forward
      digitalWrite(MOTOR2_IN1, LOW);
      analogWrite(MOTOR2_IN2, iPower);
      delay(10);

      break;
    case 4:

      // Left
      // Solarbotics RM2 -> 1 Backward
      digitalWrite(MOTOR1_IN2, LOW);
      analogWrite(MOTOR1_IN1, iPower);
      delay(10);

      // Solarbotics RM2 -> 2 Backward
      digitalWrite(MOTOR2_IN2, LOW);
      analogWrite(MOTOR2_IN1, iPower);
      delay(10);

      break;
    case 5:

      // Stop
      // NeoPixels Red
      //zz = 2;
      //isNUMPIXELS();
      // Solarbotics RM2 -> 1
      digitalWrite(MOTOR1_IN1, LOW);
      analogWrite(MOTOR1_IN2, 0);
      delay(10);

      // Solarbotics RM2 -> 2
      digitalWrite(MOTOR2_IN1, LOW);
      analogWrite(MOTOR2_IN2, 0);
      delay(10);

      break;
 }

}
setup.ino
// Setup
void setup() {

  // Open the serial port at 9600 bps:
  Serial.begin( 9600 );

  // Pause
  delay(5);

  // EEPROM Unit ID
  isUID();

  // Pause
  delay(5);

  // Setup Solarbotics RM2 Motor
  isSetupRM2Motor();

  // Pause
  delay(5);

  // NeoPixels
  // This initializes the NeoPixel library
  pixels.begin();
  // Delay for a period of time (in milliseconds)
  delay(50);
  // isNUMPIXELS Off
  isNUMPIXELSoff();

}
——
People can contact us: https://www.donluc.com/?page_id=1927
Technology Experience
- Single-Board Microcontrollers (PIC, Arduino, Raspberry Pi,Espressif, etc…)
- IoT
- Robotics
- Camera and Video Capture Receiver Stationary, Wheel/Tank and Underwater Vehicle
- Unmanned Vehicles Terrestrial and Marine
- Research & Development (R & D)
- Desktop Applications (Windows, OSX, Linux, Multi-OS, Multi-Tier, etc…)
- Mobile Applications (Android, iOS, Blackberry, Windows Mobile, Windows CE, etc…)
- Web Applications (LAMP, Scripting, Java, ASP, ASP.NET, RoR, Wakanda, etc…)
- Social Media Programming & Integration (Facebook, Twitter, YouTube, Pinterest, etc…)
- Content Management Systems (WordPress, Drupal, Joomla, Moodle, etc…)
- Bulletin Boards (phpBB, SMF, Vanilla, jobberBase, etc…)
- eCommerce (WooCommerce, OSCommerce, ZenCart, PayPal Shopping Cart, etc…)
Instructor and E-Mentor
- IoT
- PIC Microcontrollers
- Arduino
- Raspberry Pi
- Espressif
- Robotics
- DOS, Windows, OSX, Linux, iOS, Android, Multi-OS
- Linux-Apache-PHP-MySQL
Follow Us
J. Luc Paquin – Curriculum Vitae – 2022 English & Español
https://www.jlpconsultants.com/luc/
Web: https://www.donluc.com/
Web: https://www.jlpconsultants.com/
Facebook: https://www.facebook.com/neosteam.labs.9/
YouTube: https://www.youtube.com/channel/UC5eRjrGn1CqkkGfZy0jxEdA
Twitter: https://twitter.com/labs_steam
Pinterest: https://www.pinterest.com/NeoSteamLabs/
Instagram: https://www.instagram.com/neosteamlabs/
Don Luc
Project #12: Robotics – Pololu Ball Caster – Mk22
——
#DonLucElectronics #DonLuc #Robotics #Arduino #Fio #ArduinoProMini #XBee #DCMotor #MotorDriver #Project #Fritzing #Programming #Electronics #Microcontrollers #Consultant
——
——
——
——
Pololu Ball Caster with 1 Inch Plastic Ball and Ball Bearings
This ball caster uses a 1 inch diameter plastic ball and has an overall height of 1.1 inches (29 mm). The two-part housing snaps together to securely enclose the ball and three ball bearings that minimize friction between the ball and the ABS housing.
This ball caster kit includes a two-part black ABS housing, a 1 inch diameter POM plastic ball, three 3 mm × 7 mm × 3 mm ball bearings, and three dowel pins used to hold the ball bearings. When assembled, the ball caster is capable of rolling in any direction with low friction, making it suitable for use as a third contact point for wheeled, differential-drive robots weighing up to around ten pounds.
The base piece of the housing has holes for three mounting screws and slots for ball bearings. The second part of the housing snaps into the base piece to secure the ball and ball bearings. The assembled ball caster has an overall height of 1.1 inches (29 mm).
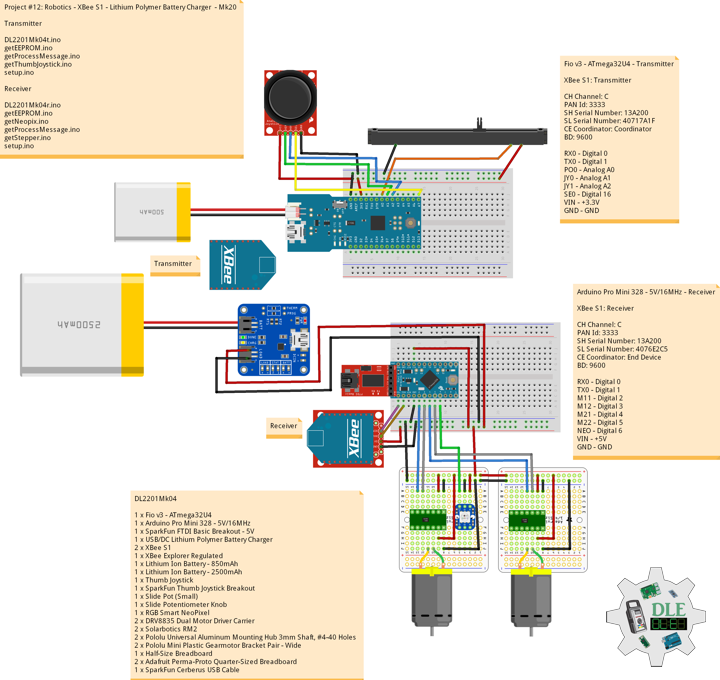
DL2202Mk02
1 x Fio v3 – ATmega32U4
1 x Arduino Pro Mini 328 – 5V/16MHz
1 x SparkFun FTDI Basic Breakout – 5V
1 x USB/DC Lithium Polymer Battery Charger
1 x Mountable Slide Switch
2 x XBee S1
1 x XBee Explorer Regulated
1 x Lithium Ion Battery – 850mAh
1 x Lithium Ion Battery – 2500mAh
1 x Thumb Joystick
1 x SparkFun Thumb Joystick Breakout
1 x Slide Pot (Small)
1 x Slide Potentiometer Knob
1 x RGB Smart NeoPixel
2 x DRV8835 Dual Motor Driver Carrier
2 x Solarbotics RM2
2 x Pololu Universal Aluminum Mounting Hub 3mm Shaft, #4-40 Holes
2 x Pololu Mini Plastic Gearmotor Bracket Pair – Wide
1 x Steren Model 155
2 x Adafruit Perma-Proto Quarter-Sized Breadboard
15 x Standoff – Metal – #4-40 – 3/8 inch
33 x Screw – #4-40 – 1/4 inch
3 x Nut – Nylon Locknut – #4-40
1 x Pololu Ball Caster – 1 Inch Plastic Ball
1 x HDPE – Black on White – 6 inches x 12 inches x 0.25 inch
1 x SparkFun Cerberus USB Cable
Fio v3 – ATmega32U4 – Transmitter
XBee S1: Transmitter
CH Channel: C
PAN Id: 3333
SH Serial Number: 13A200
SL Serial Number: 40717A1F
CE Coordinator: Coordinator
BD: 9600
RX0 – Digital 0
TX0 – Digital 1
PO0 – Analog A0
JY0 – Analog A1
JY1 – Analog A2
SE0 – Digital 16
VIN – +3.3V
GND – GND
——
DL2202Mk02t.ino
/* ***** Don Luc Electronics © *****
Software Version Information
Project #12: Robotics - Pololu Ball Caster - Mk22
02-02
Transmitter
DL2202Mk02t.ino
1 x Fio v3 - ATmega32U4
1 x XBee S1
1 x Lithium Ion Battery - 850mAh
1 x Thumb Joystick
1 x SparkFun Thumb Joystick Breakout
1 x Slide Pot (Small)
1 x Slide Potentiometer Knob
1 x SparkFun Cerberus USB Cable
*/

// Include the Library Code
// EEPROM library to read and write EEPROM with unique ID for unit
#include <EEPROM.h>

// Communication
unsigned long dTime = 200;

// Slide Pot (Small)
// Select the input pin for the slide pot
// Power
const int iSP1 = A0;
// Power to store the value
int iPower = 0;

// Connections to joystick
// Vertical
const int VERT = A1;
// Horizontal
const int HORIZ = A2;
// Pushbutton
const int SEL = 16;
// Initialize variables for analog and digital values
int vertical;
int horizontal;
int select;

// Software Version Information
// Version
String sver = "12-22t";
// Unit ID Information
// UID
String uid = "";

void loop()
{

  // Thumb Joystick
  isThumbJoystick();

  // Process Message
  isProcessMessage();

  delay( dTime );

}
getEEPROM.ino
// EEPROM
// is UID
void isUID()
{

  // Is Unit ID
  // UID
  uid = "";
  for (int x = 0; x < 5; x++)
  {
    uid = uid + char(EEPROM.read(x));
  }

}
getProcessMessage.ino
// Process Message
// isProcessMessage
void isProcessMessage() {

   // Loop through serial buffer
   // Print = "<" + vertical + "|" + horizontal + "|" + select + "|" + iValue + "|" + sver + "|" + uid + "*"

   Serial1.print( '<'  );
   Serial1.print( vertical );
   Serial1.print( '|' );
   Serial1.print( horizontal );
   Serial1.print( '|' );
   Serial1.print( select );
   Serial1.print( '|' );
   Serial1.print( iPower );
   Serial1.print( '|' );
   Serial1.print( sver );
   Serial1.print( '|' );
   Serial1.print( uid );
   Serial1.println( '*' );

}
getThumbJoystick.ino
// Thumb Joystick
void isThumbJoystick() {

  // Read all values from the joystick
  // Joystick was sitting around 520 for the vertical and horizontal values
  // Will be 0-1023
  vertical = analogRead(VERT);
  // Will be 0-1023
  horizontal = analogRead(HORIZ);
  // Will be HIGH (1) if not pressed, and LOW (0) if pressed
  select = digitalRead(SEL);
  // Read the value
  // Power be 0-1023
  iPower = analogRead( iSP1 );

}
setup.ino
// Setup
void setup()
{

  // EEPROM Unit ID
  isUID();

  // Pause
  delay(5);

  // Make the SEL line an input
  pinMode(SEL, INPUT_PULLUP);

  // Open Serial1 port at 9600 baud
  Serial1.begin( 9600 );

  // Pause
  delay(5);

}
——
Arduino Pro Mini 328 – 5V/16MHz – Receiver
XBee S1: Receiver
CH Channel: C
PAN Id: 3333
SH Serial Number: 13A200
SL Serial Number: 4076E2C5
CE Coordinator: End Device
BD: 9600
RX0 – Digital 0
TX0 – Digital 1
M11 – Digital 2
M12 – Digital 3
M21 – Digital 4
M22 – Digital 5
NEO – Digital 6
VIN – +5V
GND – GND
DL2202Mk02r.ino
/* ***** Don Luc Electronics © *****
Software Version Information
Project #12: Robotics - Pololu Ball Caster - Mk22
02-02
Receiver
DL2202Mk02r.ino
1 x Arduino Pro Mini 328 - 5V/16MHz
1 x SparkFun FTDI Basic Breakout - 5V
1 x XBee S1
1 x XBee Explorer Regulated
1 x USB/DC Lithium Polymer Battery Charger
1 x Mountable Slide Switch
1 x Lithium Ion Battery - 2500mAh
1 x RGB Smart NeoPixel
2 x DRV8835 Dual Motor Driver Carrier
2 x Solarbotics RM2
2 x Pololu Universal Aluminum Mounting Hub 3mm Shaft, #4-40 Holes
2 x Pololu Mini Plastic Gearmotor Bracket Pair - Wide
1 x Steren Model 155
2 x Adafruit Perma-Proto Quarter-Sized Breadboard
15 x Standoff - Metal - #4-40 - 3/8 inch
33 x Screw - #4-40 - 1/4 inch
3 x Nut - Nylon Locknut - #4-40
1 x Pololu Ball Caster - 1 Inch Plastic Ball
1 x HDPE - Black on White - 6 inches x 12 inches x 0.25 inch
1 x SparkFun Cerberus USB Cable
*/

// Include the library code:
// EEPROM library to read and write EEPROM with unique ID for unit
#include <EEPROM.h>
// NeoPixels
#include <Adafruit_NeoPixel.h>

// Solarbotics RM2 -> 1
#define MOTOR1_IN1 2
#define MOTOR1_IN2 3
// Solarbotics RM2 -> 2
#define MOTOR2_IN1 4
#define MOTOR2_IN2 5

// Power be 0-1023
int iPower = 0;
String POW = "";
// Joystick was sitting around 520 for the vertical and horizontal values
// Will be 0-1023
// Vertical
int vertical;
String VER = "";
// Horizontal
// Will be 0-1023
int horizontal;
String HOR = "";
// Select
// Will be HIGH (1) if not pressed, and LOW (0) if pressed
int select1 = 0;
String SEL = "";
int firstClosingBracket = 0;
// Map Vertical and Horizontal
int mapVer = 0;
int mapHor = 0;
int iVer = 1;
int iHor = 0;

// NeoPixels
// On digital pin 6
#define PIN 6
// NeoPixels NUMPIXELS = 1
#define NUMPIXELS 1
// Pixels
Adafruit_NeoPixel pixels = Adafruit_NeoPixel(NUMPIXELS, PIN, NEO_GRB + NEO_KHZ800);
// Red
int red = 0;
// Green
int green = 0;
// Blue
int blue = 0;
// Neopix
int iNeo = 0;
// Value
int zz = 0;

// Process Message
// Start
bool bStart = false;
// End
bool bEnd   = false;
// Variable to store the incoming byte
int incb = 0;
// Message
String msg = "";
// Index
byte in = 0;
int x = 0;

// Software Version Information
String sver = "12-22r";
// Unit ID information
String uid = "";

void loop() {

  // Check for serial messages
  isProcessMessage();

}
getEEPROM.ino
// EEPROM
// isUID
void isUID()
{

  // Is Unit ID
  uid = "";
  for (int x = 0; x < 5; x++)
  {
    uid = uid + char(EEPROM.read(x));
  }

}
getNeopix.ino
// NeoPixels
// Neopix
void isNeopix()
{

    // Pixels
    pixels.setBrightness( 130 );
    // Pixels color takes RGB values, from 0,0,0 up to 255,255,255
    pixels.setPixelColor( iNeo, pixels.Color(red,green,blue) );
    // This sends the updated pixel color to the hardware
    pixels.show();
    // Delay for a period of time (in milliseconds)
    delay(50);

}
// isNUMPIXELS
void isNUMPIXELS()
{

  // Neopix Value
  switch ( zz ) {
    case 0:
      // NeoPixels Green
      // Red
      red = 0;
      // Green
      green = 255;
      // Blue
      blue = 0;
      // Neopix
      iNeo = 0;
      isNeopix();
      break;
    case 1:
      // NeoPixels Blue
      // Red
      red = 0;
      // Green
      green = 0;
      // Blue
      blue = 255;
      // Neopix
      iNeo = 0;
      isNeopix();
      break;
    case 2:
      // NeoPixels Red
      // Red
      red = 255;
      // Green
      green = 0;
      // Blue
      blue = 0;
      // Neopix
      iNeo = 0;
      isNeopix();
      break;
    case 3:
      // NeoPixels Yellow
      // Red
      red = 255;
      // Green
      green = 255;
      // Blue
      blue = 0;
      // Neopix
      iNeo = 0;
      isNeopix();
      break;
    case 4:
      // NeoPixels Magenta
      // Red
      red = 255;
      // Green
      green = 0;
      // Blue
      blue = 255;
      // Neopix
      iNeo = 0;
      isNeopix();
      break;
    case 5:
      // NeoPixels Cyan
      // Red
      red = 0;
      // Green
      green = 255;
      // Blue
      blue = 255;
      // Neopix
      iNeo = 0;
      isNeopix();
      break;
    case 6:
      // NeoPixels White
      // Red
      red = 255;
      // Green
      green = 255;
      // Blue
      blue = 255;
      // Neopix
      iNeo = 0;
      isNeopix();
      break;
  }

}
// isNUMPIXELSoff
void isNUMPIXELSoff()
{

   // Black Off
   // NeoPixels
   // Red
   red = 0;
   // Green
   green = 0;
   // Blue
   blue = 0;
   isNeopix();

}
getProcessMessage.ino
// ProcessMessage
// isProcessMessage
void isProcessMessage() {

  // Loop through serial buffer one byte at a time until you reach * which will be end of message
  while ( Serial.available() > 0 )
  {

      // Read the incoming byte:
      incb = Serial.read();

      // Start the message when the '<' symbol is received
      if(incb == '<')
      {

        // Start
        bStart = true;
        in = 0;
        msg = "";

      }
      // End the message when the '*' symbol is received
      else if(incb == '*')
      {

        // End
        bEnd = true;
        x = msg.length();
        msg.remove( x , 1);
        // Done reading

        break;
      }
      // Read the message
      else
      {

        // Message
        msg = msg + char(incb);
        in++;

      }

   }

   // Start - End
   if( bStart && bEnd)
   {

      // isRM2Motor => Message
      isRM2Motor();

      // Start - End
      in = 0;
      msg = "";
      bStart = false;
      bEnd = false;
      vertical;
      horizontal;
      iPower;

   }

}
getRM2Motor.ino
// RM2 Motor
// Setup RM2 Motor
void isSetupRM2Motor() {

  // Solarbotics RM2 -> 1
  pinMode(MOTOR1_IN1, OUTPUT);
  pinMode(MOTOR1_IN2, OUTPUT);
  // Solarbotics RM2 -> 2
  pinMode(MOTOR2_IN1, OUTPUT);
  pinMode(MOTOR2_IN2, OUTPUT);

}
// isRM2Motor
void isRM2Motor() {

  // msg = vertical + "|" + horizontal + "|" + select + "|" + iValue + "|" + sver + "|" + uid
  firstClosingBracket = 0;
  // Vertical
  firstClosingBracket = msg.indexOf('|');
  VER = msg;
  VER.remove(firstClosingBracket);
  vertical = VER.toInt();
  // Horizontal
  firstClosingBracket = firstClosingBracket + 1;
  msg.remove(0, firstClosingBracket );
  firstClosingBracket = msg.indexOf('|');
  HOR = msg;
  HOR.remove(firstClosingBracket);
  horizontal = HOR.toInt();
  // Select
  firstClosingBracket = firstClosingBracket + 1;
  msg.remove(0, firstClosingBracket );
  firstClosingBracket = msg.indexOf('|');
  SEL = msg;
  SEL.remove(firstClosingBracket);
  select1 = SEL.toInt();
  // Power
  firstClosingBracket = firstClosingBracket + 1;
  msg.remove(0, firstClosingBracket );
  firstClosingBracket = msg.indexOf('|');
  POW = msg;
  POW.remove(firstClosingBracket);
  iPower = POW.toInt();

  // Set the direction
  // Joystick was sitting around 520 for the vertical and horizontal values
  // Will be 0-1023
  mapVer = map(vertical, 0, 1023, -512, 512);
  mapHor = map(horizontal, 0, 1023, -512, 512);
  // Power
  iPower = map(iPower, 0, 1023, 30, 200);

  // Vertical and Horizontal
  if ( mapVer == -512 ) {

      // Down
      // NeoPixels Blue
      zz = 1;
      isNUMPIXELS();
      iVer = 1;

  } else if ( mapVer == 512 ) {

      // Up
      // NeoPixels Green
      zz = 0;
      isNUMPIXELS();
      iVer = 2;

  } else if ( mapHor == -512 ) {

      // Left
      // NeoPixels Yellow
      zz = 3;
      isNUMPIXELS();
      iVer = 3;

  } else if ( mapHor == 512 ) {

      // Right
      // NeoPixels Magenta
      zz = 4;
      isNUMPIXELS();
      iVer = 4;

  } else {

    // Stop
    // NeoPixels Red
    zz = 2;
    isNUMPIXELS();
    iVer = 5;

  }

  // XBee Car
  switch ( iVer ) {
    case 1:

      // Solarbotics RM2 -> 1 Forward
      digitalWrite(MOTOR1_IN1, LOW);
      analogWrite(MOTOR1_IN2, iPower);
      delay(10);

      // Solarbotics RM2 -> 2 Forward
      digitalWrite(MOTOR2_IN1, LOW);
      analogWrite(MOTOR2_IN2, iPower);
      delay(10);

      break;
    case 2:

      // Solarbotics RM2 -> 1 Backward
      digitalWrite(MOTOR1_IN2, LOW);
      analogWrite(MOTOR1_IN1, iPower);
      delay(10);

      // Solarbotics RM2 -> 2 Backward
      digitalWrite(MOTOR2_IN2, LOW);
      analogWrite(MOTOR2_IN1, iPower);
      delay(10);

      break;
    case 3:

      // Right
      // Solarbotics RM2 -> 1 Forward
      digitalWrite(MOTOR1_IN1, LOW);
      analogWrite(MOTOR1_IN2, iPower);
      delay(10);

      // Solarbotics RM2 -> 2 Backward
      digitalWrite(MOTOR2_IN2, LOW);
      analogWrite(MOTOR2_IN1, iPower);
      delay(10);

      break;
    case 4:

      // Left
      // Solarbotics RM2 -> 1 Backward
      digitalWrite(MOTOR1_IN2, LOW);
      analogWrite(MOTOR1_IN1, iPower);
      delay(10);

      // Solarbotics RM2 -> 2 Forward
      digitalWrite(MOTOR2_IN1, LOW);
      analogWrite(MOTOR2_IN2, iPower);
      delay(10);

      break;
    case 5:

      // Stop
      // NeoPixels Red
      //zz = 2;
      //isNUMPIXELS();
      // Solarbotics RM2 -> 1
      digitalWrite(MOTOR1_IN1, LOW);
      analogWrite(MOTOR1_IN2, 0);
      delay(10);

      // Solarbotics RM2 -> 2
      digitalWrite(MOTOR2_IN1, LOW);
      analogWrite(MOTOR2_IN2, 0);
      delay(10);

      break;
 }

}
setup.ino
// Setup
void setup() {

  // Open the serial port at 9600 bps:
  Serial.begin( 9600 );

  // Pause
  delay(5);

  // EEPROM Unit ID
  isUID();

  // Pause
  delay(5);

  // Setup Solarbotics RM2 Motor
  isSetupRM2Motor();

  // Pause
  delay(5);

  // NeoPixels
  // This initializes the NeoPixel library
  pixels.begin();
  // Delay for a period of time (in milliseconds)
  delay(50);
  // isNUMPIXELS Off
  isNUMPIXELSoff();

}
——
People can contact us: https://www.donluc.com/?page_id=1927
Technology Experience
- Single-Board Microcontrollers (PIC, Arduino, Raspberry Pi,Espressif, etc…)
- IoT
- Robotics
- Camera and Video Capture Receiver Stationary, Wheel/Tank and Underwater Vehicle
- Unmanned Vehicles Terrestrial and Marine
- Research & Development (R & D)
- Desktop Applications (Windows, OSX, Linux, Multi-OS, Multi-Tier, etc…)
- Mobile Applications (Android, iOS, Blackberry, Windows Mobile, Windows CE, etc…)
- Web Applications (LAMP, Scripting, Java, ASP, ASP.NET, RoR, Wakanda, etc…)
- Social Media Programming & Integration (Facebook, Twitter, YouTube, Pinterest, etc…)
- Content Management Systems (WordPress, Drupal, Joomla, Moodle, etc…)
- Bulletin Boards (phpBB, SMF, Vanilla, jobberBase, etc…)
- eCommerce (WooCommerce, OSCommerce, ZenCart, PayPal Shopping Cart, etc…)
Instructor and E-Mentor
- IoT
- PIC Microcontrollers
- Arduino
- Raspberry Pi
- Espressif
- Robotics
- DOS, Windows, OSX, Linux, iOS, Android, Multi-OS
- Linux-Apache-PHP-MySQL
Follow Us
J. Luc Paquin – Curriculum Vitae – 2022 English & Español
https://www.jlpconsultants.com/luc/
Web: https://www.donluc.com/
Web: https://www.jlpconsultants.com/
Facebook: https://www.facebook.com/neosteam.labs.9/
YouTube: https://www.youtube.com/channel/UC5eRjrGn1CqkkGfZy0jxEdA
Twitter: https://twitter.com/labs_steam
Pinterest: https://www.pinterest.com/NeoSteamLabs/
Instagram: https://www.instagram.com/neosteamlabs/
Don Luc
Project #12: Robotics – Steren 155 – Mk21
——
#DonLucElectronics #DonLuc #Robotics #Arduino #Fio #ArduinoProMini #XBee #DCMotor #MotorDriver #Project #Fritzing #Programming #Electronics #Microcontrollers #Consultant
——
——
——
——
Perforated Phenolic Plate
So you finish your electronics projects, such as printed circuits. We know that designing a prototype or electronic project can be a complicated task if you do not have the necessary items to carry it out, so with us you it a phenolic plates of a face, two sided or perforated, ferric chloride, auto-adherable tracks, leaves thermal transfer or permanent ink markers so that your circuits are perfect.
Steren Model 155
Bakelite phenolic plate with copper, 4.5 cm x 4.5 cm, engraved and perforated with 164 orifices for components and 4 for fixing the plate. Ideal for projects or prototypes.
DL2202Mk01
1 x Fio v3 – ATmega32U4
1 x Arduino Pro Mini 328 – 5V/16MHz
1 x SparkFun FTDI Basic Breakout – 5V
1 x USB/DC Lithium Polymer Battery Charger
1 x Mountable Slide Switch
2 x XBee S1
1 x XBee Explorer Regulated
1 x Lithium Ion Battery – 850mAh
1 x Lithium Ion Battery – 2500mAh
1 x Thumb Joystick
1 x SparkFun Thumb Joystick Breakout
1 x Slide Pot (Small)
1 x Slide Potentiometer Knob
1 x RGB Smart NeoPixel
2 x DRV8835 Dual Motor Driver Carrier
2 x Solarbotics RM2
2 x Pololu Universal Aluminum Mounting Hub 3mm Shaft, #4-40 Holes
2 x Pololu Mini Plastic Gearmotor Bracket Pair – Wide
1 x Steren Model 155
2 x Adafruit Perma-Proto Quarter-Sized Breadboard
1 x SparkFun Cerberus USB Cable
Fio v3 – ATmega32U4 – Transmitter
XBee S1: Transmitter
CH Channel: C
PAN Id: 3333
SH Serial Number: 13A200
SL Serial Number: 40717A1F
CE Coordinator: Coordinator
BD: 9600
RX0 – Digital 0
TX0 – Digital 1
PO0 – Analog A0
JY0 – Analog A1
JY1 – Analog A2
SE0 – Digital 16
VIN – +3.3V
GND – GND
DL2202Mk01t.ino
/* ***** Don Luc Electronics © *****
Software Version Information
Project #12: Robotics - Steren 155 - Mk21
02-01
Transmitter
DL2202Mk01t.ino
1 x Fio v3 - ATmega32U4
1 x XBee S1
1 x Lithium Ion Battery - 850mAh
1 x Thumb Joystick
1 x SparkFun Thumb Joystick Breakout
1 x Slide Pot (Small)
1 x Slide Potentiometer Knob
1 x SparkFun Cerberus USB Cable
*/

// Include the Library Code
// EEPROM library to read and write EEPROM with unique ID for unit
#include <EEPROM.h>

// Communication
unsigned long dTime = 200;

// Slide Pot (Small)
// Select the input pin for the slide pot
// Power
const int iSP1 = A0;
// Power to store the value
int iPower = 0;

// Connections to joystick
// Vertical
const int VERT = A1;
// Horizontal
const int HORIZ = A2;
// Pushbutton
const int SEL = 16;
// Initialize variables for analog and digital values
int vertical;
int horizontal;
int select;

// Software Version Information
// Version
String sver = "12-21t";
// Unit ID Information
// UID
String uid = "";

void loop()
{

  // Thumb Joystick
  isThumbJoystick();

  // Process Message
  isProcessMessage();

  delay( dTime );

}
getEEPROM.ino
// EEPROM
// is UID
void isUID()
{

  // Is Unit ID
  // UID
  uid = "";
  for (int x = 0; x < 5; x++)
  {
    uid = uid + char(EEPROM.read(x));
  }

}
getProcessMessage.ino
// Process Message
// isProcessMessage
void isProcessMessage() {

   // Loop through serial buffer
   // Print = "<" + vertical + "|" + horizontal + "|" + select + "|" + iValue + "|" + sver + "|" + uid + "*"

   Serial1.print( '<'  );
   Serial1.print( vertical );
   Serial1.print( '|' );
   Serial1.print( horizontal );
   Serial1.print( '|' );
   Serial1.print( select );
   Serial1.print( '|' );
   Serial1.print( iPower );
   Serial1.print( '|' );
   Serial1.print( sver );
   Serial1.print( '|' );
   Serial1.print( uid );
   Serial1.println( '*' );

}
getThumbJoystick.ino
// Thumb Joystick
void isThumbJoystick() {

  // Read all values from the joystick
  // Joystick was sitting around 520 for the vertical and horizontal values
  // Will be 0-1023
  vertical = analogRead(VERT);
  // Will be 0-1023
  horizontal = analogRead(HORIZ);
  // Will be HIGH (1) if not pressed, and LOW (0) if pressed
  select = digitalRead(SEL);
  // Read the value
  // Power be 0-1023
  iPower = analogRead( iSP1 );

}
setup.ino
// Setup
void setup()
{

  // EEPROM Unit ID
  isUID();

  // Pause
  delay(5);

  // Make the SEL line an input
  pinMode(SEL, INPUT_PULLUP);

  // Open Serial1 port at 9600 baud
  Serial1.begin( 9600 );

  // Pause
  delay(5);

}
——
Arduino Pro Mini 328 – 5V/16MHz – Receiver
XBee S1: Receiver
CH Channel: C
PAN Id: 3333
SH Serial Number: 13A200
SL Serial Number: 4076E2C5
CE Coordinator: End Device
BD: 9600
RX0 – Digital 0
TX0 – Digital 1
M11 – Digital 2
M12 – Digital 3
M21 – Digital 4
M22 – Digital 5
NEO – Digital 6
VIN – +5V
GND – GND
DL2202Mk01r.ino
/* ***** Don Luc Electronics © *****
Software Version Information
Project #12: Robotics - Steren 155 - Mk21
02-01
Receiver
DL2202Mk01r.ino
1 x Arduino Pro Mini 328 - 5V/16MHz
1 x SparkFun FTDI Basic Breakout - 5V
1 x XBee S1
1 x XBee Explorer Regulated
1 x USB/DC Lithium Polymer Battery Charger
1 x Mountable Slide Switch
1 x Lithium Ion Battery - 2500mAh
1 x RGB Smart NeoPixel
2 x DRV8835 Dual Motor Driver Carrier
2 x Solarbotics RM2
2 x Pololu Universal Aluminum Mounting Hub 3mm Shaft, #4-40 Holes
2 x Pololu Mini Plastic Gearmotor Bracket Pair - Wide
1 x Steren Model 155
2 x Adafruit Perma-Proto Quarter-Sized Breadboard
1 x SparkFun Cerberus USB Cable
*/

// Include the library code:
// EEPROM library to read and write EEPROM with unique ID for unit
#include <EEPROM.h>
// NeoPixels
#include <Adafruit_NeoPixel.h>

// Solarbotics RM2 -> 1
#define MOTOR1_IN1 2
#define MOTOR1_IN2 3
// Solarbotics RM2 -> 2
#define MOTOR2_IN1 4
#define MOTOR2_IN2 5

// Power be 0-1023
int iPower = 0;
String POW = "";
// Joystick was sitting around 520 for the vertical and horizontal values
// Will be 0-1023
// Vertical
int vertical;
String VER = "";
// Horizontal
// Will be 0-1023
int horizontal;
String HOR = "";
// Select
// Will be HIGH (1) if not pressed, and LOW (0) if pressed
int select1 = 0;
String SEL = "";
int firstClosingBracket = 0;
// Map Vertical and Horizontal
int mapVer = 0;
int mapHor = 0;
int iVer = 1;
int iHor = 0;

// NeoPixels
// On digital pin 6
#define PIN 6
// NeoPixels NUMPIXELS = 1
#define NUMPIXELS 1
// Pixels
Adafruit_NeoPixel pixels = Adafruit_NeoPixel(NUMPIXELS, PIN, NEO_GRB + NEO_KHZ800);
// Red
int red = 0;
// Green
int green = 0;
// Blue
int blue = 0;
// Neopix
int iNeo = 0;
// Value
int zz = 0;

// Process Message
// Start
bool bStart = false;
// End
bool bEnd   = false;
// Variable to store the incoming byte
int incb = 0;
// Message
String msg = "";
// Index
byte in = 0;
int x = 0;

// Software Version Information
String sver = "12-21r";
// Unit ID information
String uid = "";

void loop() {

  // Check for serial messages
  isProcessMessage();

}
getEEPROM.ino
// EEPROM
// isUID
void isUID()
{

  // Is Unit ID
  uid = "";
  for (int x = 0; x < 5; x++)
  {
    uid = uid + char(EEPROM.read(x));
  }

}
getNeopix.ino
// NeoPixels
// Neopix
void isNeopix()
{

    // Pixels
    pixels.setBrightness( 130 );
    // Pixels color takes RGB values, from 0,0,0 up to 255,255,255
    pixels.setPixelColor( iNeo, pixels.Color(red,green,blue) );
    // This sends the updated pixel color to the hardware
    pixels.show();
    // Delay for a period of time (in milliseconds)
    delay(50);

}
// isNUMPIXELS
void isNUMPIXELS()
{

  // Neopix Value
  switch ( zz ) {
    case 0:
      // NeoPixels Green
      // Red
      red = 0;
      // Green
      green = 255;
      // Blue
      blue = 0;
      // Neopix
      iNeo = 0;
      isNeopix();
      break;
    case 1:
      // NeoPixels Blue
      // Red
      red = 0;
      // Green
      green = 0;
      // Blue
      blue = 255;
      // Neopix
      iNeo = 0;
      isNeopix();
      break;
    case 2:
      // NeoPixels Red
      // Red
      red = 255;
      // Green
      green = 0;
      // Blue
      blue = 0;
      // Neopix
      iNeo = 0;
      isNeopix();
      break;
    case 3:
      // NeoPixels Yellow
      // Red
      red = 255;
      // Green
      green = 255;
      // Blue
      blue = 0;
      // Neopix
      iNeo = 0;
      isNeopix();
      break;
    case 4:
      // NeoPixels Magenta
      // Red
      red = 255;
      // Green
      green = 0;
      // Blue
      blue = 255;
      // Neopix
      iNeo = 0;
      isNeopix();
      break;
    case 5:
      // NeoPixels Cyan
      // Red
      red = 0;
      // Green
      green = 255;
      // Blue
      blue = 255;
      // Neopix
      iNeo = 0;
      isNeopix();
      break;
    case 6:
      // NeoPixels White
      // Red
      red = 255;
      // Green
      green = 255;
      // Blue
      blue = 255;
      // Neopix
      iNeo = 0;
      isNeopix();
      break;
  }

}
// isNUMPIXELSoff
void isNUMPIXELSoff()
{

   // Black Off
   // NeoPixels
   // Red
   red = 0;
   // Green
   green = 0;
   // Blue
   blue = 0;
   isNeopix();

}
getProcessMessage.ino
// ProcessMessage
// isProcessMessage
void isProcessMessage() {

  // Loop through serial buffer one byte at a time until you reach * which will be end of message
  while ( Serial.available() > 0 )
  {

      // Read the incoming byte:
      incb = Serial.read();

      // Start the message when the '<' symbol is received
      if(incb == '<')
      {

        // Start
        bStart = true;
        in = 0;
        msg = "";

      }
      // End the message when the '*' symbol is received
      else if(incb == '*')
      {

        // End
        bEnd = true;
        x = msg.length();
        msg.remove( x , 1);
        // Done reading

        break;
      }
      // Read the message
      else
      {

        // Message
        msg = msg + char(incb);
        in++;

      }

   }

   // Start - End
   if( bStart && bEnd)
   {

      // isRM2Motor => Message
      isRM2Motor();

      // Start - End
      in = 0;
      msg = "";
      bStart = false;
      bEnd = false;
      vertical;
      horizontal;
      iPower;

   }

}
getRM2Motor.ino
// RM2 Motor
// Setup RM2 Motor
void isSetupRM2Motor() {

  // Solarbotics RM2 -> 1
  pinMode(MOTOR1_IN1, OUTPUT);
  pinMode(MOTOR1_IN2, OUTPUT);
  // Solarbotics RM2 -> 2
  pinMode(MOTOR2_IN1, OUTPUT);
  pinMode(MOTOR2_IN2, OUTPUT);

}
// isRM2Motor
void isRM2Motor() {

  // msg = vertical + "|" + horizontal + "|" + select + "|" + iValue + "|" + sver + "|" + uid
  firstClosingBracket = 0;
  // Vertical
  firstClosingBracket = msg.indexOf('|');
  VER = msg;
  VER.remove(firstClosingBracket);
  vertical = VER.toInt();
  // Horizontal
  firstClosingBracket = firstClosingBracket + 1;
  msg.remove(0, firstClosingBracket );
  firstClosingBracket = msg.indexOf('|');
  HOR = msg;
  HOR.remove(firstClosingBracket);
  horizontal = HOR.toInt();
  // Select
  firstClosingBracket = firstClosingBracket + 1;
  msg.remove(0, firstClosingBracket );
  firstClosingBracket = msg.indexOf('|');
  SEL = msg;
  SEL.remove(firstClosingBracket);
  select1 = SEL.toInt();
  // Power
  firstClosingBracket = firstClosingBracket + 1;
  msg.remove(0, firstClosingBracket );
  firstClosingBracket = msg.indexOf('|');
  POW = msg;
  POW.remove(firstClosingBracket);
  iPower = POW.toInt();

  // Set the direction
  // Joystick was sitting around 520 for the vertical and horizontal values
  // Will be 0-1023
  mapVer = map(vertical, 0, 1023, -512, 512);
  mapHor = map(horizontal, 0, 1023, -512, 512);
  // Power
  iPower = map(iPower, 0, 1023, 30, 200);

  // Vertical and Horizontal
  if ( mapVer == -512 ) {

      // Down
      // NeoPixels Blue
      zz = 1;
      isNUMPIXELS();
      iVer = 1;

  } else if ( mapVer == 512 ) {

      // Up
      // NeoPixels Green
      zz = 0;
      isNUMPIXELS();
      iVer = 2;

  } else if ( mapHor == -512 ) {

      // Left
      // NeoPixels Yellow
      zz = 3;
      isNUMPIXELS();
      iVer = 3;

  } else if ( mapHor == 512 ) {

      // Right
      // NeoPixels Magenta
      zz = 4;
      isNUMPIXELS();
      iVer = 4;

  } else {

    // Stop
    // NeoPixels Red
    zz = 2;
    isNUMPIXELS();
    iVer = 5;

  }

  // XBee Car
  switch ( iVer ) {
    case 1:

      // Solarbotics RM2 -> 1 Forward
      digitalWrite(MOTOR1_IN1, LOW);
      analogWrite(MOTOR1_IN2, iPower);
      delay(10);

      // Solarbotics RM2 -> 2 Forward
      digitalWrite(MOTOR2_IN1, LOW);
      analogWrite(MOTOR2_IN2, iPower);
      delay(10);

      break;
    case 2:

      // Solarbotics RM2 -> 1 Backward
      digitalWrite(MOTOR1_IN2, LOW);
      analogWrite(MOTOR1_IN1, iPower);
      delay(10);

      // Solarbotics RM2 -> 2 Backward
      digitalWrite(MOTOR2_IN2, LOW);
      analogWrite(MOTOR2_IN1, iPower);
      delay(10);

      break;
    case 3:

      // Right
      // Solarbotics RM2 -> 1 Forward
      digitalWrite(MOTOR1_IN1, LOW);
      analogWrite(MOTOR1_IN2, iPower);
      delay(10);

      // Solarbotics RM2 -> 2 Backward
      digitalWrite(MOTOR2_IN2, LOW);
      analogWrite(MOTOR2_IN1, iPower);
      delay(10);

      break;
    case 4:

      // Left
      // Solarbotics RM2 -> 1 Backward
      digitalWrite(MOTOR1_IN2, LOW);
      analogWrite(MOTOR1_IN1, iPower);
      delay(10);

      // Solarbotics RM2 -> 2 Forward
      digitalWrite(MOTOR2_IN1, LOW);
      analogWrite(MOTOR2_IN2, iPower);
      delay(10);

      break;
    case 5:

      // Stop
      // NeoPixels Red
      //zz = 2;
      //isNUMPIXELS();
      // Solarbotics RM2 -> 1
      digitalWrite(MOTOR1_IN1, LOW);
      analogWrite(MOTOR1_IN2, 0);
      delay(10);

      // Solarbotics RM2 -> 2
      digitalWrite(MOTOR2_IN1, LOW);
      analogWrite(MOTOR2_IN2, 0);
      delay(10);

      break;
 }

}
setup.ino
// Setup
void setup() {

  // Open the serial port at 9600 bps:
  Serial.begin( 9600 );

  // Pause
  delay(5);

  // EEPROM Unit ID
  isUID();

  // Pause
  delay(5);

  // Setup Solarbotics RM2 Motor
  isSetupRM2Motor();

  // Pause
  delay(5);

  // NeoPixels
  // This initializes the NeoPixel library
  pixels.begin();
  // Delay for a period of time (in milliseconds)
  delay(50);
  // isNUMPIXELS Off
  isNUMPIXELSoff();

}
——
People can contact us: https://www.donluc.com/?page_id=1927
Technology Experience
- Single-Board Microcontrollers (PIC, Arduino, Raspberry Pi,Espressif, etc…)
- IoT
- Robotics
- Camera and Video Capture Receiver Stationary, Wheel/Tank and Underwater Vehicle
- Unmanned Vehicles Terrestrial and Marine
- Research & Development (R & D)
- Desktop Applications (Windows, OSX, Linux, Multi-OS, Multi-Tier, etc…)
- Mobile Applications (Android, iOS, Blackberry, Windows Mobile, Windows CE, etc…)
- Web Applications (LAMP, Scripting, Java, ASP, ASP.NET, RoR, Wakanda, etc…)
- Social Media Programming & Integration (Facebook, Twitter, YouTube, Pinterest, etc…)
- Content Management Systems (WordPress, Drupal, Joomla, Moodle, etc…)
- Bulletin Boards (phpBB, SMF, Vanilla, jobberBase, etc…)
- eCommerce (WooCommerce, OSCommerce, ZenCart, PayPal Shopping Cart, etc…)
Instructor and E-Mentor
- IoT
- PIC Microcontrollers
- Arduino
- Raspberry Pi
- Espressif
- Robotics
- DOS, Windows, OSX, Linux, iOS, Android, Multi-OS
- Linux-Apache-PHP-MySQL
Follow Us
J. Luc Paquin – Curriculum Vitae – 2022 English & Español
https://www.jlpconsultants.com/luc/
Web: https://www.donluc.com/
Web: https://www.jlpconsultants.com/
Facebook: https://www.facebook.com/neosteam.labs.9/
YouTube: https://www.youtube.com/channel/UC5eRjrGn1CqkkGfZy0jxEdA
Twitter: https://twitter.com/labs_steam
Pinterest: https://www.pinterest.com/NeoSteamLabs/
Instagram: https://www.instagram.com/neosteamlabs/
Don Luc
Project #12: Robotics – Lithium Polymer Battery Charger – Mk20
——
#DonLucElectronics #DonLuc #Robotics #Arduino #Fio #ArduinoProMini #XBee #DCMotor #MotorDriver #Project #Fritzing #Programming #Electronics #Microcontrollers #Consultant
——
——
——
——
USB/DC Lithium Polymer Battery Charger 5-12V – 3.7/4.2v Cells
Charge your single-cell lithium ion/polymer battery any which way you like with this board. Other nice things about this charger include multiple LEDs for power & charging status, including a charging LED which will blink when the battery is full. If the charger gets too hot from high-speed charging, it will slow down the charge rate automatically. You can easily adjust the charge rate up to 1.2A or down to 100mA. For use with Adafruit Lipoly/LiIon batteries only. Other batteries may have different voltage, chemistry, polarity or pinout.
- Use USB or DC power – 5 to 12V input
- Charges one single-cell 3.7/4.2v batteries with constant current/constant voltage
- Three indicator LEDs – green for Power, orange for charging and red for error
- Charging LED will blink when the battery is full
- 2 JST connections so you can keep the battery plugged in and powering your project
- Terminal block connections galore just solder in 3.5mm terminal blocks
- Default charge rate is about 500mA, but you can easily change this by soldering in a through-hole resistor on. The chip can do 100-1200 mA charging
- Safety timer will stop charging after about 14 hours
- The chip supports a standard 10K thermistor, which we have stuffed as a standard resistor. You can solder in a thermistor easily
DL2201Mk04
1 x Fio v3 – ATmega32U4
1 x Arduino Pro Mini 328 – 5V/16MHz
1 x SparkFun FTDI Basic Breakout – 5V
1 x USB/DC Lithium Polymer Battery Charger
2 x XBee S1
1 x XBee Explorer Regulated
1 x Lithium Ion Battery – 850mAh
1 x Lithium Ion Battery – 2500mAh
1 x Thumb Joystick
1 x SparkFun Thumb Joystick Breakout
1 x Slide Pot (Small)
1 x Slide Potentiometer Knob
1 x RGB Smart NeoPixel
2 x DRV8835 Dual Motor Driver Carrier
2 x Solarbotics RM2
2 x Pololu Universal Aluminum Mounting Hub 3mm Shaft, #4-40 Holes
2 x Pololu Mini Plastic Gearmotor Bracket Pair – Wide
1 x Half-Size Breadboard
2 x Adafruit Perma-Proto Quarter-Sized Breadboard
1 x SparkFun Cerberus USB Cable
Fio v3 – ATmega32U4 – Transmitter
XBee S1: Transmitter
CH Channel: C
PAN Id: 3333
SH Serial Number: 13A200
SL Serial Number: 40717A1F
CE Coordinator: Coordinator
BD: 9600
RX0 – Digital 0
TX0 – Digital 1
PO0 – Analog A0
JY0 – Analog A1
JY1 – Analog A2
SE0 – Digital 16
VIN – +3.3V
GND – GND
——
DL2201Mk04t.ino
/* ***** Don Luc Electronics © *****
Software Version Information
Project #12: Robotics - Lithium Polymer Battery Charger - Mk20
01-04
Transmitter
DL2201Mk04t.ino
1 x Fio v3 - ATmega32U4
1 x XBee S1
1 x Lithium Ion Battery - 850mAh
1 x Thumb Joystick
1 x SparkFun Thumb Joystick Breakout
1 x Slide Pot (Small)
1 x Slide Potentiometer Knob
1 x SparkFun Cerberus USB Cable
*/

// Include the Library Code
// EEPROM library to read and write EEPROM with unique ID for unit
#include <EEPROM.h>

// Communication
unsigned long dTime = 200;

// Slide Pot (Small)
// Select the input pin for the slide pot
// Power
const int iSP1 = A0;
// Power to store the value
int iPower = 0;

// Connections to joystick
// Vertical
const int VERT = A1;
// Horizontal
const int HORIZ = A2;
// Pushbutton
const int SEL = 16;
// Initialize variables for analog and digital values
int vertical;
int horizontal;
int select;

// Software Version Information
// Version
String sver = "12-20t";
// Unit ID Information
// UID
String uid = "";

void loop()
{

  // Thumb Joystick
  isThumbJoystick();

  // Process Message
  isProcessMessage();

  delay( dTime );

}
getEEPROM.ino
// EEPROM
// is UID
void isUID()
{

  // Is Unit ID
  // UID
  uid = "";
  for (int x = 0; x < 5; x++)
  {
    uid = uid + char(EEPROM.read(x));
  }

}
getProcessMessage.ino
// Process Message
// isProcessMessage
void isProcessMessage() {

   // Loop through serial buffer
   // Print = "<" + vertical + "|" + horizontal + "|" + select + "|" + iValue + "|" + sver + "|" + uid + "*"

   Serial1.print( '<'  );
   Serial1.print( vertical );
   Serial1.print( '|' );
   Serial1.print( horizontal );
   Serial1.print( '|' );
   Serial1.print( select );
   Serial1.print( '|' );
   Serial1.print( iPower );
   Serial1.print( '|' );
   Serial1.print( sver );
   Serial1.print( '|' );
   Serial1.print( uid );
   Serial1.println( '*' );

}
getThumbJoystick.ino
// Thumb Joystick
void isThumbJoystick() {

  // Read all values from the joystick
  // Joystick was sitting around 520 for the vertical and horizontal values
  // Will be 0-1023
  vertical = analogRead(VERT);
  // Will be 0-1023
  horizontal = analogRead(HORIZ);
  // Will be HIGH (1) if not pressed, and LOW (0) if pressed
  select = digitalRead(SEL);
  // Read the value
  // Power be 0-1023
  iPower = analogRead( iSP1 );

}
setup.ino
// Setup
void setup()
{

  // EEPROM Unit ID
  isUID();

  // Pause
  delay(5);

  // Make the SEL line an input
  pinMode(SEL, INPUT_PULLUP);

  // Open Serial1 port at 9600 baud
  Serial1.begin( 9600 );

  // Pause
  delay(5);

}
——
Arduino Pro Mini 328 – 5V/16MHz – Receiver
XBee S1: Receiver
CH Channel: C
PAN Id: 3333
SH Serial Number: 13A200
SL Serial Number: 4076E2C5
CE Coordinator: End Device
BD: 9600
RX0 – Digital 0
TX0 – Digital 1
M11 – Digital 2
M12 – Digital 3
M21 – Digital 4
M22 – Digital 5
NEO – Digital 6
VIN – +5V
GND – GND
——
DL2201Mk04r.ino
/* ***** Don Luc Electronics © *****
Software Version Information
Project #12: Robotics - Lithium Polymer Battery Charger - Mk20
01-04
Receiver
DL2201Mk04r.ino
1 x Arduino Pro Mini 328 - 5V/16MHz
1 x SparkFun FTDI Basic Breakout - 5V
1 x XBee S1
1 x XBee Explorer Regulated
1 x USB/DC Lithium Polymer Battery Charger
1 x Lithium Ion Battery - 2500mAh
1 x RGB Smart NeoPixel
2 x DRV8835 Dual Motor Driver Carrier
2 x Solarbotics RM2
2 x Pololu Universal Aluminum Mounting Hub 3mm Shaft, #4-40 Holes
2 x Pololu Mini Plastic Gearmotor Bracket Pair - Wide
1 x Half-Size Breadboard
2 x Adafruit Perma-Proto Quarter-Sized Breadboard
1 x SparkFun Cerberus USB Cable
*/

// Include the library code:
// EEPROM library to read and write EEPROM with unique ID for unit
#include <EEPROM.h>
// NeoPixels
#include <Adafruit_NeoPixel.h>

// Solarbotics RM2 -> 1
#define MOTOR1_IN1 2
#define MOTOR1_IN2 3
// Solarbotics RM2 -> 2
#define MOTOR2_IN1 4
#define MOTOR2_IN2 5

// Power be 0-1023
int iPower = 0;
String POW = "";
// Joystick was sitting around 520 for the vertical and horizontal values
// Will be 0-1023
// Vertical
int vertical;
String VER = "";
// Horizontal
// Will be 0-1023
int horizontal;
String HOR = "";
// Select
// Will be HIGH (1) if not pressed, and LOW (0) if pressed
int select1 = 0;
String SEL = "";
int firstClosingBracket = 0;
// Map Vertical and Horizontal
int mapVer = 0;
int mapHor = 0;
int iVer = 1;
int iHor = 0;

// NeoPixels
// On digital pin 6
#define PIN 6
// NeoPixels NUMPIXELS = 1
#define NUMPIXELS 1
// Pixels
Adafruit_NeoPixel pixels = Adafruit_NeoPixel(NUMPIXELS, PIN, NEO_GRB + NEO_KHZ800);
// Red
int red = 0;
// Green
int green = 0;
// Blue
int blue = 0;
// Neopix
int iNeo = 0;
// Value
int zz = 0;

// Process Message
// Start
bool bStart = false;
// End
bool bEnd   = false;
// Variable to store the incoming byte
int incb = 0;
// Message
String msg = "";
// Index
byte in = 0;
int x = 0;

// Software Version Information
String sver = "12-20r";
// Unit ID information
String uid = "";

void loop() {

  // Check for serial messages
  isProcessMessage();

}
getEEPROM.ino
// EEPROM
// isUID
void isUID()
{

  // Is Unit ID
  uid = "";
  for (int x = 0; x < 5; x++)
  {
    uid = uid + char(EEPROM.read(x));
  }

}
getNeopix.ino
// NeoPixels
// Neopix
void isNeopix()
{

    // Pixels
    pixels.setBrightness( 130 );
    // Pixels color takes RGB values, from 0,0,0 up to 255,255,255
    pixels.setPixelColor( iNeo, pixels.Color(red,green,blue) );
    // This sends the updated pixel color to the hardware
    pixels.show();
    // Delay for a period of time (in milliseconds)
    delay(50);

}
// isNUMPIXELS
void isNUMPIXELS()
{

  // Neopix Value
  switch ( zz ) {
    case 0:
      // NeoPixels Green
      // Red
      red = 0;
      // Green
      green = 255;
      // Blue
      blue = 0;
      // Neopix
      iNeo = 0;
      isNeopix();
      break;
    case 1:
      // NeoPixels Blue
      // Red
      red = 0;
      // Green
      green = 0;
      // Blue
      blue = 255;
      // Neopix
      iNeo = 0;
      isNeopix();
      break;
    case 2:
      // NeoPixels Red
      // Red
      red = 255;
      // Green
      green = 0;
      // Blue
      blue = 0;
      // Neopix
      iNeo = 0;
      isNeopix();
      break;
    case 3:
      // NeoPixels Yellow
      // Red
      red = 255;
      // Green
      green = 255;
      // Blue
      blue = 0;
      // Neopix
      iNeo = 0;
      isNeopix();
      break;
    case 4:
      // NeoPixels Magenta
      // Red
      red = 255;
      // Green
      green = 0;
      // Blue
      blue = 255;
      // Neopix
      iNeo = 0;
      isNeopix();
      break;
    case 5:
      // NeoPixels Cyan
      // Red
      red = 0;
      // Green
      green = 255;
      // Blue
      blue = 255;
      // Neopix
      iNeo = 0;
      isNeopix();
      break;
    case 6:
      // NeoPixels White
      // Red
      red = 255;
      // Green
      green = 255;
      // Blue
      blue = 255;
      // Neopix
      iNeo = 0;
      isNeopix();
      break;
  }

}
// isNUMPIXELSoff
void isNUMPIXELSoff()
{

   // Black Off
   // NeoPixels
   // Red
   red = 0;
   // Green
   green = 0;
   // Blue
   blue = 0;
   isNeopix();

}
getProcessMessage.ino
// ProcessMessage
// isProcessMessage
void isProcessMessage() {

  // Loop through serial buffer one byte at a time until you reach * which will be end of message
  while ( Serial.available() > 0 )
  {

      // Read the incoming byte:
      incb = Serial.read();

      // Start the message when the '<' symbol is received
      if(incb == '<')
      {

        // Start
        bStart = true;
        in = 0;
        msg = "";

      }
      // End the message when the '*' symbol is received
      else if(incb == '*')
      {

        // End
        bEnd = true;
        x = msg.length();
        msg.remove( x , 1);
        // Done reading

        break;
      }
      // Read the message
      else
      {

        // Message
        msg = msg + char(incb);
        in++;

      }

   }

   // Start - End
   if( bStart && bEnd)
   {

      // isRM2Motor => Message
      isRM2Motor();

      // Start - End
      in = 0;
      msg = "";
      bStart = false;
      bEnd = false;
      vertical;
      horizontal;
      iPower;

   }

}
getRM2Motor.ino
// RM2 Motor
// Setup RM2 Motor
void isSetupRM2Motor() {

  // Solarbotics RM2 -> 1
  pinMode(MOTOR1_IN1, OUTPUT);
  pinMode(MOTOR1_IN2, OUTPUT);
  // Solarbotics RM2 -> 2
  pinMode(MOTOR2_IN1, OUTPUT);
  pinMode(MOTOR2_IN2, OUTPUT);

}
// isRM2Motor
void isRM2Motor() {

  // msg = vertical + "|" + horizontal + "|" + select + "|" + iValue + "|" + sver + "|" + uid
  firstClosingBracket = 0;
  // Vertical
  firstClosingBracket = msg.indexOf('|');
  VER = msg;
  VER.remove(firstClosingBracket);
  vertical = VER.toInt();
  // Horizontal
  firstClosingBracket = firstClosingBracket + 1;
  msg.remove(0, firstClosingBracket );
  firstClosingBracket = msg.indexOf('|');
  HOR = msg;
  HOR.remove(firstClosingBracket);
  horizontal = HOR.toInt();
  // Select
  firstClosingBracket = firstClosingBracket + 1;
  msg.remove(0, firstClosingBracket );
  firstClosingBracket = msg.indexOf('|');
  SEL = msg;
  SEL.remove(firstClosingBracket);
  select1 = SEL.toInt();
  // Power
  firstClosingBracket = firstClosingBracket + 1;
  msg.remove(0, firstClosingBracket );
  firstClosingBracket = msg.indexOf('|');
  POW = msg;
  POW.remove(firstClosingBracket);
  iPower = POW.toInt();

  // Set the direction
  // Joystick was sitting around 520 for the vertical and horizontal values
  // Will be 0-1023
  mapVer = map(vertical, 0, 1023, -512, 512);
  mapHor = map(horizontal, 0, 1023, -512, 512);
  // Power
  iPower = map(iPower, 0, 1023, 30, 200);

  // Vertical and Horizontal
  if ( mapVer == -512 ) {

      // Down
      // NeoPixels Blue
      zz = 1;
      isNUMPIXELS();
      iVer = 1;

  } else if ( mapVer == 512 ) {

      // Up
      // NeoPixels Green
      zz = 0;
      isNUMPIXELS();
      iVer = 2;

  } else if ( mapHor == -512 ) {

      // Left
      // NeoPixels Yellow
      zz = 3;
      isNUMPIXELS();
      iVer = 3;

  } else if ( mapHor == 512 ) {

      // Right
      // NeoPixels Magenta
      zz = 4;
      isNUMPIXELS();
      iVer = 4;

  } else {

    // Stop
    // NeoPixels Red
    zz = 2;
    isNUMPIXELS();
    iVer = 5;

  }

  // XBee Car
  switch ( iVer ) {
    case 1:

      // Solarbotics RM2 -> 1 Forward
      digitalWrite(MOTOR1_IN1, LOW);
      analogWrite(MOTOR1_IN2, iPower);
      delay(10);

      // Solarbotics RM2 -> 2 Forward
      digitalWrite(MOTOR2_IN1, LOW);
      analogWrite(MOTOR2_IN2, iPower);
      delay(10);

      break;
    case 2:

      // Solarbotics RM2 -> 1 Backward
      digitalWrite(MOTOR1_IN2, LOW);
      analogWrite(MOTOR1_IN1, iPower);
      delay(10);

      // Solarbotics RM2 -> 2 Backward
      digitalWrite(MOTOR2_IN2, LOW);
      analogWrite(MOTOR2_IN1, iPower);
      delay(10);

      break;
    case 3:

      // Right
      // Solarbotics RM2 -> 1 Forward
      digitalWrite(MOTOR1_IN1, LOW);
      analogWrite(MOTOR1_IN2, iPower);
      delay(10);

      // Solarbotics RM2 -> 2 Backward
      digitalWrite(MOTOR2_IN2, LOW);
      analogWrite(MOTOR2_IN1, iPower);
      delay(10);

      break;
    case 4:

      // Left
      // Solarbotics RM2 -> 1 Backward
      digitalWrite(MOTOR1_IN2, LOW);
      analogWrite(MOTOR1_IN1, iPower);
      delay(10);

      // Solarbotics RM2 -> 2 Forward
      digitalWrite(MOTOR2_IN1, LOW);
      analogWrite(MOTOR2_IN2, iPower);
      delay(10);

      break;
    case 5:

      // Stop
      // NeoPixels Red
      //zz = 2;
      //isNUMPIXELS();
      // Solarbotics RM2 -> 1
      digitalWrite(MOTOR1_IN1, LOW);
      analogWrite(MOTOR1_IN2, 0);
      delay(10);

      // Solarbotics RM2 -> 2
      digitalWrite(MOTOR2_IN1, LOW);
      analogWrite(MOTOR2_IN2, 0);
      delay(10);

      break;
 }

}
setup.ino
// Setup
void setup() {

  // Open the serial port at 9600 bps:
  Serial.begin( 9600 );

  // Pause
  delay(5);

  // EEPROM Unit ID
  isUID();

  // Pause
  delay(5);

  // Setup Solarbotics RM2 Motor
  isSetupRM2Motor();

  // Pause
  delay(5);

  // NeoPixels
  // This initializes the NeoPixel library
  pixels.begin();
  // Delay for a period of time (in milliseconds)
  delay(50);
  // isNUMPIXELS Off
  isNUMPIXELSoff();

}
——
People can contact us: https://www.donluc.com/?page_id=1927
Technology Experience
- Single-Board Microcontrollers (PIC, Arduino, Raspberry Pi,Espressif, etc…)
- IoT
- Robotics
- Camera and Video Capture Receiver Stationary, Wheel/Tank and Underwater Vehicle
- Unmanned Vehicles Terrestrial and Marine
- Research & Development (R & D)
- Desktop Applications (Windows, OSX, Linux, Multi-OS, Multi-Tier, etc…)
- Mobile Applications (Android, iOS, Blackberry, Windows Mobile, Windows CE, etc…)
- Web Applications (LAMP, Scripting, Java, ASP, ASP.NET, RoR, Wakanda, etc…)
- Social Media Programming & Integration (Facebook, Twitter, YouTube, Pinterest, etc…)
- Content Management Systems (WordPress, Drupal, Joomla, Moodle, etc…)
- Bulletin Boards (phpBB, SMF, Vanilla, jobberBase, etc…)
- eCommerce (WooCommerce, OSCommerce, ZenCart, PayPal Shopping Cart, etc…)
Instructor and E-Mentor
- IoT
- PIC Microcontrollers
- Arduino
- Raspberry Pi
- Espressif
- Robotics
- DOS, Windows, OSX, Linux, iOS, Android, Multi-OS
- Linux-Apache-PHP-MySQL
Follow Us
J. Luc Paquin – Curriculum Vitae – 2022 English & Español
https://www.jlpconsultants.com/luc/
Web: https://www.donluc.com/
Web: https://www.jlpconsultants.com/
Facebook: https://www.facebook.com/neosteam.labs.9/
YouTube: https://www.youtube.com/channel/UC5eRjrGn1CqkkGfZy0jxEdA
Twitter: https://twitter.com/labs_steam
Pinterest: https://www.pinterest.com/NeoSteamLabs/
Instagram: https://www.instagram.com/neosteamlabs/
Don Luc
Project #12: Robotics – LiPower Boost Converter – Mk19
——
#DonLucElectronics #DonLuc #Robotics #Arduino #Fio #ArduinoProMini #XBee #DCMotor #MotorDriver #Project #Fritzing #Programming #Electronics #Microcontrollers #Consultant
——
——
——
——
LiPower Boost Converter
The LiPower board is based on the incredibly versatile TPS61200 boost converter. The board is configured to be used with a LiPo battery, has solder jumper selectable 5V and 3.3V output, and an under voltage protection of 2.6V. However, the board can also be used as a general purpose buck and boost regulator with an input voltage as low as 0.3V. With such a low input voltage and quiescent current, the board also works well in energy harvesting applications that use low input voltages.
XBee Explorer Regulated
The XBee Explorer Regulated takes care of the 3.3V regulation, signal conditioning, and basic activity indicators. It translates the 5V serial signals to 3.3V so that you can connect a 5V system to any XBee module. The board was conveniently designed to mate directly with Arduino Pro boards for wireless bootloading and USB based configuration. This unit works with all XBee modules including the Series 1 and Series 2.5, standard and Pro versions. Plug an XBee into this breakout and you will have direct access to the serial and programming pins on the XBee unit and will be able to power the XBee with 5V.
DL2201Mk03
1 x Fio v3 – ATmega32U4
1 x Arduino Pro Mini 328 – 5V/16MHz
1 x SparkFun FTDI Basic Breakout – 5V
1 x LiPower Boost Converter
2 x XBee S1
1 x XBee Explorer Regulated
2 x Lithium Ion Battery – 850mAh
1 x Thumb Joystick
1 x SparkFun Thumb Joystick Breakout
1 x Slide Pot (Small)
1 x Slide Potentiometer Knob
1 x RGB Smart NeoPixel
2 x DRV8835 Dual Motor Driver Carrier
2 x Solarbotics RM2
2 x Pololu Universal Aluminum Mounting Hub 3mm Shaft, #4-40 Holes
2 x Pololu Mini Plastic Gearmotor Bracket Pair – Wide
1 x Half-Size Breadboard
2 x Adafruit Perma-Proto Quarter-Sized Breadboard
1 x SparkFun Cerberus USB Cable
Fio v3 – ATmega32U4 – Transmitter
XBee S1: Transmitter
CH Channel: C
PAN Id: 3333
SH Serial Number: 13A200
SL Serial Number: 40717A1F
CE Coordinator: Coordinator
BD: 9600
RX0 – Digital 0
TX0 – Digital 1
PO0 – Analog A0
JY0 – Analog A1
JY1 – Analog A2
SE0 – Digital 16
VIN – +3.3V
GND – GND
——
DL2201Mk03t.ino
/* ***** Don Luc Electronics © *****
Software Version Information
Project #12: Robotics - LiPower Boost Converter - Mk19
01-03
DL2201Mk03t.ino
1 x Fio v3 - ATmega32U4
1 x XBee S1
1 x Lithium Ion Battery - 850mAh
1 x Thumb Joystick
1 x SparkFun Thumb Joystick Breakout
1 x Slide Pot (Small)
1 x Slide Potentiometer Knob
1 x SparkFun Cerberus USB Cable
*/

// Include the Library Code
// EEPROM library to read and write EEPROM with unique ID for unit
#include <EEPROM.h>

// Communication
unsigned long dTime = 200;

// Slide Pot (Small)
// Select the input pin for the slide pot
// Power
const int iSP1 = A0;
// Power to store the value
int iPower = 0;

// Connections to joystick
// Vertical
const int VERT = A1;
// Horizontal
const int HORIZ = A2;
// Pushbutton
const int SEL = 16;
// Initialize variables for analog and digital values
int vertical;
int horizontal;
int select;

// Software Version Information
// Version
String sver = "12-19t";
// Unit ID Information
// UID
String uid = "";

void loop()
{

  // Thumb Joystick
  isThumbJoystick();

  // Process Message
  isProcessMessage();

  delay( dTime );

}
getEEPROM.ino
// EEPROM
// is UID
void isUID()
{

  // Is Unit ID
  // UID
  uid = "";
  for (int x = 0; x < 5; x++)
  {
    uid = uid + char(EEPROM.read(x));
  }

}
getProcessMessage.ino
// Process Message
// isProcessMessage
void isProcessMessage() {

   // Loop through serial buffer
   // Print = "<" + vertical + "|" + horizontal + "|" + select + "|" + iValue + "|" + sver + "|" + uid + "*"

   Serial1.print( '<'  );
   Serial1.print( vertical );
   Serial1.print( '|' );
   Serial1.print( horizontal );
   Serial1.print( '|' );
   Serial1.print( select );
   Serial1.print( '|' );
   Serial1.print( iPower );
   Serial1.print( '|' );
   Serial1.print( sver );
   Serial1.print( '|' );
   Serial1.print( uid );
   Serial1.println( '*' );

}
getThumbJoystick.ino
// Thumb Joystick
void isThumbJoystick() {

  // Read all values from the joystick
  // Joystick was sitting around 520 for the vertical and horizontal values
  // Will be 0-1023
  vertical = analogRead(VERT);
  // Will be 0-1023
  horizontal = analogRead(HORIZ);
  // Will be HIGH (1) if not pressed, and LOW (0) if pressed
  select = digitalRead(SEL);
  // Read the value
  // Power be 0-1023
  iPower = analogRead( iSP1 );

}
setup.ino
// Setup
void setup()
{

  // EEPROM Unit ID
  isUID();

  // Pause
  delay(5);

  // Make the SEL line an input
  pinMode(SEL, INPUT_PULLUP);

  // Open Serial1 port at 9600 baud
  Serial1.begin( 9600 );

  // Pause
  delay(5);

}
——
Arduino Pro Mini 328 – 5V/16MHz – Receiver
XBee S1: Receiver
CH Channel: C
PAN Id: 3333
SH Serial Number: 13A200
SL Serial Number: 4076E2C5
CE Coordinator: End Device
BD: 9600
RX0 – Digital 0
TX0 – Digital 1
M11 – Digital 2
M12 – Digital 3
M21 – Digital 4
M22 – Digital 5
NEO – Digital 6
VIN – +5V
GND – GND
——
DL2201Mk03r.ino
/* ***** Don Luc Electronics © *****
Software Version Information
Project #12: Robotics - LiPower Boost Converter - Mk19
01-03
DL2201Mk03r.ino
1 x Arduino Pro Mini 328 - 5V/16MHz
1 x SparkFun FTDI Basic Breakout - 5V
1 x XBee S1
1 x XBee Explorer Regulated
1 x LiPower Boost Converter
1 x Lithium Ion Battery - 850mAh
1 x RGB Smart NeoPixel
2 x DRV8835 Dual Motor Driver Carrier
2 x Solarbotics RM2
2 x Pololu Universal Aluminum Mounting Hub 3mm Shaft, #4-40 Holes
2 x Pololu Mini Plastic Gearmotor Bracket Pair - Wide
1 x Half-Size Breadboard
2 x Adafruit Perma-Proto Quarter-Sized Breadboard
1 x SparkFun Cerberus USB Cable
*/

// Include the library code:
// EEPROM library to read and write EEPROM with unique ID for unit
#include <EEPROM.h>
// NeoPixels
#include <Adafruit_NeoPixel.h>

// Solarbotics RM2 -> 1
#define MOTOR1_IN1 2
#define MOTOR1_IN2 3
// Solarbotics RM2 -> 2
#define MOTOR2_IN1 4
#define MOTOR2_IN2 5

// Power be 0-1023
int iPower = 0;
String POW = "";
// Joystick was sitting around 520 for the vertical and horizontal values
// Will be 0-1023
// Vertical
int vertical;
String VER = "";
// Horizontal
// Will be 0-1023
int horizontal;
String HOR = "";
// Select
// Will be HIGH (1) if not pressed, and LOW (0) if pressed
int select1 = 0;
String SEL = "";
int firstClosingBracket = 0;
// Map Vertical and Horizontal
int mapVer = 0;
int mapHor = 0;
int iVer = 1;
int iHor = 0;

// NeoPixels
// On digital pin 6
#define PIN 6
// NeoPixels NUMPIXELS = 1
#define NUMPIXELS 1
// Pixels
Adafruit_NeoPixel pixels = Adafruit_NeoPixel(NUMPIXELS, PIN, NEO_GRB + NEO_KHZ800);
// Red
int red = 0;
// Green
int green = 0;
// Blue
int blue = 0;
// Neopix
int iNeo = 0;
// Value
int zz = 0;

// Process Message
// Start
bool bStart = false;
// End
bool bEnd   = false;
// Variable to store the incoming byte
int incb = 0;
// Message
String msg = "";
// Index
byte in = 0;
int x = 0;

// Software Version Information
String sver = "12-19r";
// Unit ID information
String uid = "";

void loop() {

  // Check for serial messages
  isProcessMessage();

}
getEEPROM.ino
// EEPROM
// isUID
void isUID()
{

  // Is Unit ID
  uid = "";
  for (int x = 0; x < 5; x++)
  {
    uid = uid + char(EEPROM.read(x));
  }

}
getNeopix.ino
// NeoPixels
// Neopix
void isNeopix()
{

    // Pixels
    pixels.setBrightness( 130 );
    // Pixels color takes RGB values, from 0,0,0 up to 255,255,255
    pixels.setPixelColor( iNeo, pixels.Color(red,green,blue) );
    // This sends the updated pixel color to the hardware
    pixels.show();
    // Delay for a period of time (in milliseconds)
    delay(50);

}
// isNUMPIXELS
void isNUMPIXELS()
{

  // Neopix Value
  switch ( zz ) {
    case 0:
      // NeoPixels Green
      // Red
      red = 0;
      // Green
      green = 255;
      // Blue
      blue = 0;
      // Neopix
      iNeo = 0;
      isNeopix();
      break;
    case 1:
      // NeoPixels Blue
      // Red
      red = 0;
      // Green
      green = 0;
      // Blue
      blue = 255;
      // Neopix
      iNeo = 0;
      isNeopix();
      break;
    case 2:
      // NeoPixels Red
      // Red
      red = 255;
      // Green
      green = 0;
      // Blue
      blue = 0;
      // Neopix
      iNeo = 0;
      isNeopix();
      break;
    case 3:
      // NeoPixels Yellow
      // Red
      red = 255;
      // Green
      green = 255;
      // Blue
      blue = 0;
      // Neopix
      iNeo = 0;
      isNeopix();
      break;
    case 4:
      // NeoPixels Magenta
      // Red
      red = 255;
      // Green
      green = 0;
      // Blue
      blue = 255;
      // Neopix
      iNeo = 0;
      isNeopix();
      break;
    case 5:
      // NeoPixels Cyan
      // Red
      red = 0;
      // Green
      green = 255;
      // Blue
      blue = 255;
      // Neopix
      iNeo = 0;
      isNeopix();
      break;
    case 6:
      // NeoPixels White
      // Red
      red = 255;
      // Green
      green = 255;
      // Blue
      blue = 255;
      // Neopix
      iNeo = 0;
      isNeopix();
      break;
  }

}
// isNUMPIXELSoff
void isNUMPIXELSoff()
{

   // Black Off
   // NeoPixels
   // Red
   red = 0;
   // Green
   green = 0;
   // Blue
   blue = 0;
   isNeopix();

}
getProcessMessage.ino
// ProcessMessage
// isProcessMessage
void isProcessMessage() {

  // Loop through serial buffer one byte at a time until you reach * which will be end of message
  while ( Serial.available() > 0 )
  {

      // Read the incoming byte:
      incb = Serial.read();

      // Start the message when the '<' symbol is received
      if(incb == '<')
      {

        // Start
        bStart = true;
        in = 0;
        msg = "";

      }
      // End the message when the '*' symbol is received
      else if(incb == '*')
      {

        // End
        bEnd = true;
        x = msg.length();
        msg.remove( x , 1);
        // Done reading

        break;
      }
      // Read the message
      else
      {

        // Message
        msg = msg + char(incb);
        in++;

      }

   }

   // Start - End
   if( bStart && bEnd)
   {

      // isRM2Motor => Message
      isRM2Motor();

      // Start - End
      in = 0;
      msg = "";
      bStart = false;
      bEnd = false;
      vertical;
      horizontal;
      iPower;

   }

}
getRM2Motor.ino
// RM2 Motor
// Setup RM2 Motor
void isSetupRM2Motor() {

  // Solarbotics RM2 -> 1
  pinMode(MOTOR1_IN1, OUTPUT);
  pinMode(MOTOR1_IN2, OUTPUT);
  // Solarbotics RM2 -> 2
  pinMode(MOTOR2_IN1, OUTPUT);
  pinMode(MOTOR2_IN2, OUTPUT);

}
// isRM2Motor
void isRM2Motor() {

  // msg = vertical + "|" + horizontal + "|" + select + "|" + iValue + "|" + sver + "|" + uid
  firstClosingBracket = 0;
  // Vertical
  firstClosingBracket = msg.indexOf('|');
  VER = msg;
  VER.remove(firstClosingBracket);
  vertical = VER.toInt();
  // Horizontal
  firstClosingBracket = firstClosingBracket + 1;
  msg.remove(0, firstClosingBracket );
  firstClosingBracket = msg.indexOf('|');
  HOR = msg;
  HOR.remove(firstClosingBracket);
  horizontal = HOR.toInt();
  // Select
  firstClosingBracket = firstClosingBracket + 1;
  msg.remove(0, firstClosingBracket );
  firstClosingBracket = msg.indexOf('|');
  SEL = msg;
  SEL.remove(firstClosingBracket);
  select1 = SEL.toInt();
  // Power
  firstClosingBracket = firstClosingBracket + 1;
  msg.remove(0, firstClosingBracket );
  firstClosingBracket = msg.indexOf('|');
  POW = msg;
  POW.remove(firstClosingBracket);
  iPower = POW.toInt();

  // Set the direction
  // Joystick was sitting around 520 for the vertical and horizontal values
  // Will be 0-1023
  mapVer = map(vertical, 0, 1023, -512, 512);
  mapHor = map(horizontal, 0, 1023, -512, 512);
  // Power
  iPower = map(iPower, 0, 1023, 30, 200);

  // Vertical and Horizontal
  if ( mapVer == -512 ) {

      // Down
      // NeoPixels Blue
      zz = 1;
      isNUMPIXELS();
      iVer = 1;

  } else if ( mapVer == 512 ) {

      // Up
      // NeoPixels Green
      zz = 0;
      isNUMPIXELS();
      iVer = 2;

  } else if ( mapHor == -512 ) {

      // Left
      // NeoPixels Yellow
      zz = 3;
      isNUMPIXELS();
      iVer = 3;

  } else if ( mapHor == 512 ) {

      // Right
      // NeoPixels Magenta
      zz = 4;
      isNUMPIXELS();
      iVer = 4;

  } else {

    // Stop
    // NeoPixels Red
    zz = 2;
    isNUMPIXELS();
    iVer = 5;

  }

  // XBee Car
  switch ( iVer ) {
    case 1:

      // Solarbotics RM2 -> 1 Forward
      digitalWrite(MOTOR1_IN1, LOW);
      analogWrite(MOTOR1_IN2, iPower);
      delay(10);

      // Solarbotics RM2 -> 2 Forward
      digitalWrite(MOTOR2_IN1, LOW);
      analogWrite(MOTOR2_IN2, iPower);
      delay(10);

      break;
    case 2:

      // Solarbotics RM2 -> 1 Backward
      digitalWrite(MOTOR1_IN2, LOW);
      analogWrite(MOTOR1_IN1, iPower);
      delay(10);

      // Solarbotics RM2 -> 2 Backward
      digitalWrite(MOTOR2_IN2, LOW);
      analogWrite(MOTOR2_IN1, iPower);
      delay(10);

      break;
    case 3:

      // Right
      // Solarbotics RM2 -> 1 Forward
      digitalWrite(MOTOR1_IN1, LOW);
      analogWrite(MOTOR1_IN2, iPower);
      delay(10);

      // Solarbotics RM2 -> 2 Backward
      digitalWrite(MOTOR2_IN2, LOW);
      analogWrite(MOTOR2_IN1, iPower);
      delay(10);

      break;
    case 4:

      // Left
      // Solarbotics RM2 -> 1 Backward
      digitalWrite(MOTOR1_IN2, LOW);
      analogWrite(MOTOR1_IN1, iPower);
      delay(10);

      // Solarbotics RM2 -> 2 Forward
      digitalWrite(MOTOR2_IN1, LOW);
      analogWrite(MOTOR2_IN2, iPower);
      delay(10);

      break;
    case 5:

      // Stop
      // NeoPixels Red
      //zz = 2;
      //isNUMPIXELS();
      // Solarbotics RM2 -> 1
      digitalWrite(MOTOR1_IN1, LOW);
      analogWrite(MOTOR1_IN2, 0);
      delay(10);

      // Solarbotics RM2 -> 2
      digitalWrite(MOTOR2_IN1, LOW);
      analogWrite(MOTOR2_IN2, 0);
      delay(10);

      break;
 }

}
setup.ino
// Setup
void setup() {

  // Open the serial port at 9600 bps:
  Serial.begin( 9600 );

  // Pause
  delay(5);

  // EEPROM Unit ID
  isUID();

  // Pause
  delay(5);

  // Setup Solarbotics RM2 Motor
  isSetupRM2Motor();

  // Pause
  delay(5);

  // NeoPixels
  // This initializes the NeoPixel library
  pixels.begin();
  // Delay for a period of time (in milliseconds)
  delay(50);
  // isNUMPIXELS Off
  isNUMPIXELSoff();

}
——
People can contact us: https://www.donluc.com/?page_id=1927
Technology Experience
- Single-Board Microcontrollers (PIC, Arduino, Raspberry Pi,Espressif, etc…)
- IoT
- Robotics
- Camera and Video Capture Receiver Stationary, Wheel/Tank and Underwater Vehicle
- Unmanned Vehicles Terrestrial and Marine
- Research & Development (R & D)
- Desktop Applications (Windows, OSX, Linux, Multi-OS, Multi-Tier, etc…)
- Mobile Applications (Android, iOS, Blackberry, Windows Mobile, Windows CE, etc…)
- Web Applications (LAMP, Scripting, Java, ASP, ASP.NET, RoR, Wakanda, etc…)
- Social Media Programming & Integration (Facebook, Twitter, YouTube, Pinterest, etc…)
- Content Management Systems (WordPress, Drupal, Joomla, Moodle, etc…)
- Bulletin Boards (phpBB, SMF, Vanilla, jobberBase, etc…)
- eCommerce (WooCommerce, OSCommerce, ZenCart, PayPal Shopping Cart, etc…)
Instructor and E-Mentor
- IoT
- PIC Microcontrollers
- Arduino
- Raspberry Pi
- Espressif
- Robotics
- DOS, Windows, OSX, Linux, iOS, Android, Multi-OS
- Linux-Apache-PHP-MySQL
Follow Us
J. Luc Paquin – Curriculum Vitae – 2021 English & Español
https://www.jlpconsultants.com/luc/
Web: https://www.donluc.com/
Web: https://www.jlpconsultants.com/
Facebook: https://www.facebook.com/neosteam.labs.9/
YouTube: https://www.youtube.com/channel/UC5eRjrGn1CqkkGfZy0jxEdA
Twitter: https://twitter.com/labs_steam
Pinterest: https://www.pinterest.com/NeoSteamLabs/
Instagram: https://www.instagram.com/neosteamlabs/
Don Luc
Project #12: Robotics – DC Motor – Mk18
——
#DonLucElectronics #DonLuc #Robotics #Arduino #Fio #ArduinoProMini #XBee #DCMotor #MotorDriver #Project #Fritzing #Programming #Electronics #Microcontrollers #Consultant
——
——
——
——
DC Motor
A DC motor is any of a class of rotary electrical motors that converts direct current electrical energy into mechanical energy. The most common types rely on the forces produced by magnetic fields. Nearly all types of DC motors have some internal mechanism, either electromechanical or electronic, to periodically change the direction of current in part of the motor.
DC motors were the first form of motor widely used, as they could be powered from existing direct-current lighting power distribution systems. A DC motor’s speed can be controlled over a wide range, using either a variable supply voltage or by changing the strength of current in its field windings. Small DC motors are used in tools, toys, and appliances. The universal motor can operate on direct current but is a lightweight brushed motor used for portable power tools and appliances. Larger DC motors are currently used in propulsion of electric vehicles, elevator and hoists, and in drives for steel rolling mills. The advent of power electronics has made replacement of DC motors with AC motors possible in many applications.
DL2201Mk02
1 x Fio v3 – ATmega32U4
1 x Arduino Pro Mini 328 – 5V/16MHz
1 x SparkFun FTDI Basic Breakout – 5V
2 x XBee S1
1 x XBee Explorer Regulated
1 x Lithium Ion Battery – 850mAh
1 x Thumb Joystick
1 x SparkFun Thumb Joystick Breakout
1 x Slide Pot (Small)
1 x Slide Potentiometer Knob
1 x RGB Smart NeoPixel
2 x DRV8835 Dual Motor Driver Carrier
2 x Solarbotics RM2
2 x Pololu Universal Aluminum Mounting Hub 3mm Shaft, #4-40 Holes
2 x Pololu Mini Plastic Gearmotor Bracket Pair – Wide
1 x Half-Size Breadboard
2 x Adafruit Perma-Proto Quarter-Sized Breadboard
1 x SparkFun Cerberus USB Cable
Fio v3 – ATmega32U4 – Transmitter
XBee S1: Transmitter
CH Channel: C
PAN Id: 3333
SH Serial Number: 13A200
SL Serial Number: 40717A1F
CE Coordinator: Coordinator
BD: 9600
RX0 – Digital 0
TX0 – Digital 1
PO0 – Analog A0
JY0 – Analog A1
JY1 – Analog A2
SE0 – Digital 16
VIN – +3.3V
GND – GND
——
DL2201Mk02t.ino
/* ***** Don Luc Electronics © *****
Software Version Information
Project #12: Robotics - DC Motor - Mk18
01-02
DL2201Mk02t.ino
1 x Fio v3 - ATmega32U4
1 x XBee S1
1 x Lithium Ion Battery - 850mAh
1 x Thumb Joystick
1 x SparkFun Thumb Joystick Breakout
1 x Slide Pot (Small)
1 x Slide Potentiometer Knob
1 x SparkFun Cerberus USB Cable
*/

// Include the Library Code
// EEPROM library to read and write EEPROM with unique ID for unit
#include <EEPROM.h>

// Communication
unsigned long dTime = 200;

// Slide Pot (Small)
// Select the input pin for the slide pot
// Power
const int iSP1 = A0;
// Power to store the value
int iPower = 0;

// Connections to joystick
// Vertical
const int VERT = A1;
// Horizontal
const int HORIZ = A2;
// Pushbutton
const int SEL = 16;
// Initialize variables for analog and digital values
int vertical;
int horizontal;
int select;

// Software Version Information
// Version
String sver = "12-18t";
// Unit ID Information
// UID
String uid = "";

void loop()
{

  // Thumb Joystick
  isThumbJoystick();

  // Process Message
  isProcessMessage();

  delay( dTime );

}
getEEPROM.ino
// EEPROM
// is UID
void isUID()
{

  // Is Unit ID
  // UID
  uid = "";
  for (int x = 0; x < 5; x++)
  {
    uid = uid + char(EEPROM.read(x));
  }

}
getProcessMessage.ino
// Process Message
// isProcessMessage
void isProcessMessage() {

   // Loop through serial buffer
   // Print = "<" + vertical + "|" + horizontal + "|" + select + "|" + iValue + "|" + sver + "|" + uid + "*"

   Serial1.print( '<'  );
   Serial1.print( vertical );
   Serial1.print( '|' );
   Serial1.print( horizontal );
   Serial1.print( '|' );
   Serial1.print( select );
   Serial1.print( '|' );
   Serial1.print( iPower );
   Serial1.print( '|' );
   Serial1.print( sver );
   Serial1.print( '|' );
   Serial1.print( uid );
   Serial1.println( '*' );

}
getThumbJoystick.ino
// Thumb Joystick
void isThumbJoystick() {

  // Read all values from the joystick
  // Joystick was sitting around 520 for the vertical and horizontal values
  // Will be 0-1023
  vertical = analogRead(VERT);
  // Will be 0-1023
  horizontal = analogRead(HORIZ);
  // Will be HIGH (1) if not pressed, and LOW (0) if pressed
  select = digitalRead(SEL);
  // Read the value
  // Power be 0-1023
  iPower = analogRead( iSP1 );

}
setup.ino
// Setup
void setup()
{

  // EEPROM Unit ID
  isUID();

  // Pause
  delay(5);

  // Make the SEL line an input
  pinMode(SEL, INPUT_PULLUP);

  // Open Serial1 port at 9600 baud
  Serial1.begin( 9600 );

  // Pause
  delay(5);

}
——
Arduino Pro Mini 328 – 5V/16MHz – Receiver
XBee S1: Receiver
CH Channel: C
PAN Id: 3333
SH Serial Number: 13A200
SL Serial Number: 4076E2C5
CE Coordinator: End Device
BD: 9600
RX0 – Digital 0
TX0 – Digital 1
M11 – Digital 2
M12 – Digital 3
M21 – Digital 4
M22 – Digital 5
NEO – Digital 6
VIN – +5V
GND – GND
——
DL2201Mk02r.ino
/* ***** Don Luc Electronics © *****
Software Version Information
Project #12: Robotics - DL2201Mk02r - Mk18
01-02
DL2201Mk02r.ino
1 x Arduino Pro Mini 328 - 5V/16MHz
1 x SparkFun FTDI Basic Breakout - 5V
1 x XBee S1
1 x XBee Explorer Regulated
1 x RGB Smart NeoPixel
2 x DRV8835 Dual Motor Driver Carrier
2 x Solarbotics RM2
2 x Pololu Universal Aluminum Mounting Hub 3mm Shaft, #4-40 Holes
2 x Pololu Mini Plastic Gearmotor Bracket Pair - Wide
1 x Half-Size Breadboard
2 x Adafruit Perma-Proto Quarter-Sized Breadboard
1 x SparkFun Cerberus USB Cable
*/

// Include the library code:
// EEPROM library to read and write EEPROM with unique ID for unit
#include <EEPROM.h>
// NeoPixels
#include <Adafruit_NeoPixel.h>

// Solarbotics RM2 -> 1
#define MOTOR1_IN1 2
#define MOTOR1_IN2 3
// Solarbotics RM2 -> 2
#define MOTOR2_IN1 4
#define MOTOR2_IN2 5

// Power be 0-1023
int iPower = 0;
String POW = "";
// Joystick was sitting around 520 for the vertical and horizontal values
// Will be 0-1023
// Vertical
int vertical;
String VER = "";
// Horizontal
// Will be 0-1023
int horizontal;
String HOR = "";
// Select
// Will be HIGH (1) if not pressed, and LOW (0) if pressed
int select1 = 0;
String SEL = "";
int firstClosingBracket = 0;
// Map Vertical and Horizontal
int mapVer = 0;
int mapHor = 0;
int iVer = 1;
int iHor = 0;

// NeoPixels
// On digital pin 6
#define PIN 6
// NeoPixels NUMPIXELS = 1
#define NUMPIXELS 1
// Pixels
Adafruit_NeoPixel pixels = Adafruit_NeoPixel(NUMPIXELS, PIN, NEO_GRB + NEO_KHZ800);
// Red
int red = 0;
// Green
int green = 0;
// Blue
int blue = 0;
// Neopix
int iNeo = 0;
// Value
int zz = 0;

// Process Message
// Start
bool bStart = false;
// End
bool bEnd   = false;
// Variable to store the incoming byte
int incb = 0;
// Message
String msg = "";
// Index
byte in = 0;
int x = 0;

// Software Version Information
String sver = "12-18r";
// Unit ID information
String uid = "";

void loop() {

  // Check for serial messages
  isProcessMessage();

}
getEEPROM.ino
// EEPROM
// isUID
void isUID()
{

  // Is Unit ID
  uid = "";
  for (int x = 0; x < 5; x++)
  {
    uid = uid + char(EEPROM.read(x));
  }

}
getNeopix.ino
// NeoPixels
// Neopix
void isNeopix()
{

    // Pixels
    pixels.setBrightness( 130 );
    // Pixels color takes RGB values, from 0,0,0 up to 255,255,255
    pixels.setPixelColor( iNeo, pixels.Color(red,green,blue) );
    // This sends the updated pixel color to the hardware
    pixels.show();
    // Delay for a period of time (in milliseconds)
    delay(50);

}
// isNUMPIXELS
void isNUMPIXELS()
{

  // Neopix Value
  switch ( zz ) {
    case 0:
      // NeoPixels Green
      // Red
      red = 0;
      // Green
      green = 255;
      // Blue
      blue = 0;
      // Neopix
      iNeo = 0;
      isNeopix();
      break;
    case 1:
      // NeoPixels Blue
      // Red
      red = 0;
      // Green
      green = 0;
      // Blue
      blue = 255;
      // Neopix
      iNeo = 0;
      isNeopix();
      break;
    case 2:
      // NeoPixels Red
      // Red
      red = 255;
      // Green
      green = 0;
      // Blue
      blue = 0;
      // Neopix
      iNeo = 0;
      isNeopix();
      break;
    case 3:
      // NeoPixels Yellow
      // Red
      red = 255;
      // Green
      green = 255;
      // Blue
      blue = 0;
      // Neopix
      iNeo = 0;
      isNeopix();
      break;
    case 4:
      // NeoPixels Magenta
      // Red
      red = 255;
      // Green
      green = 0;
      // Blue
      blue = 255;
      // Neopix
      iNeo = 0;
      isNeopix();
      break;
    case 5:
      // NeoPixels Cyan
      // Red
      red = 0;
      // Green
      green = 255;
      // Blue
      blue = 255;
      // Neopix
      iNeo = 0;
      isNeopix();
      break;
    case 6:
      // NeoPixels White
      // Red
      red = 255;
      // Green
      green = 255;
      // Blue
      blue = 255;
      // Neopix
      iNeo = 0;
      isNeopix();
      break;
  }

}
// isNUMPIXELSoff
void isNUMPIXELSoff()
{

   // Black Off
   // NeoPixels
   // Red
   red = 0;
   // Green
   green = 0;
   // Blue
   blue = 0;
   isNeopix();

}
getProcessMessage.ino
// ProcessMessage
// isProcessMessage
void isProcessMessage() {

  // Loop through serial buffer one byte at a time until you reach * which will be end of message
  while ( Serial.available() > 0 )
  {

      // Read the incoming byte:
      incb = Serial.read();

      // Start the message when the '<' symbol is received
      if(incb == '<')
      {

        // Start
        bStart = true;
        in = 0;
        msg = "";

      }
      // End the message when the '*' symbol is received
      else if(incb == '*')
      {

        // End
        bEnd = true;
        x = msg.length();
        msg.remove( x , 1);
        // Done reading

        break;
      }
      // Read the message
      else
      {

        // Message
        msg = msg + char(incb);
        in++;

      }

   }

   // Start - End
   if( bStart && bEnd)
   {

      // isRM2Motor => Message
      isRM2Motor();

      // Start - End
      in = 0;
      msg = "";
      bStart = false;
      bEnd = false;
      vertical;
      horizontal;
      iPower;

   }

}
getRM2Motor.ino
// RM2 Motor
// Setup RM2 Motor
void isSetupRM2Motor() {

  // Solarbotics RM2 -> 1
  pinMode(MOTOR1_IN1, OUTPUT);
  pinMode(MOTOR1_IN2, OUTPUT);
  // Solarbotics RM2 -> 2
  pinMode(MOTOR2_IN1, OUTPUT);
  pinMode(MOTOR2_IN2, OUTPUT);

}
// isRM2Motor
void isRM2Motor() {

  // msg = vertical + "|" + horizontal + "|" + select + "|" + iValue + "|" + sver + "|" + uid
  firstClosingBracket = 0;
  // Vertical
  firstClosingBracket = msg.indexOf('|');
  VER = msg;
  VER.remove(firstClosingBracket);
  vertical = VER.toInt();
  // Horizontal
  firstClosingBracket = firstClosingBracket + 1;
  msg.remove(0, firstClosingBracket );
  firstClosingBracket = msg.indexOf('|');
  HOR = msg;
  HOR.remove(firstClosingBracket);
  horizontal = HOR.toInt();
  // Select
  firstClosingBracket = firstClosingBracket + 1;
  msg.remove(0, firstClosingBracket );
  firstClosingBracket = msg.indexOf('|');
  SEL = msg;
  SEL.remove(firstClosingBracket);
  select1 = SEL.toInt();
  // Power
  firstClosingBracket = firstClosingBracket + 1;
  msg.remove(0, firstClosingBracket );
  firstClosingBracket = msg.indexOf('|');
  POW = msg;
  POW.remove(firstClosingBracket);
  iPower = POW.toInt();

  // Set the direction
  // Joystick was sitting around 520 for the vertical and horizontal values
  // Will be 0-1023
  mapVer = map(vertical, 0, 1023, -512, 512);
  mapHor = map(horizontal, 0, 1023, -512, 512);
  // Power
  iPower = map(iPower, 0, 1023, 30, 200);

  // Vertical and Horizontal
  if ( mapVer == -512 ) {

      // Down
      // NeoPixels Blue
      zz = 1;
      isNUMPIXELS();
      iVer = 1;

  } else if ( mapVer == 512 ) {

      // Up
      // NeoPixels Green
      zz = 0;
      isNUMPIXELS();
      iVer = 2;

  } else if ( mapHor == -512 ) {

      // Left
      // NeoPixels Yellow
      zz = 3;
      isNUMPIXELS();
      iVer = 3;

  } else if ( mapHor == 512 ) {

      // Right
      // NeoPixels Magenta
      zz = 4;
      isNUMPIXELS();
      iVer = 4;

  } else {

    // Stop
    // NeoPixels Red
    zz = 2;
    isNUMPIXELS();
    iVer = 5;

  }

  // XBee Car
  switch ( iVer ) {
    case 1:

      // Solarbotics RM2 -> 1 Forward
      digitalWrite(MOTOR1_IN1, LOW);
      analogWrite(MOTOR1_IN2, iPower);
      delay(10);

      // Solarbotics RM2 -> 2 Forward
      digitalWrite(MOTOR2_IN1, LOW);
      analogWrite(MOTOR2_IN2, iPower);
      delay(10);

      break;
    case 2:

      // Solarbotics RM2 -> 1 Backward
      digitalWrite(MOTOR1_IN2, LOW);
      analogWrite(MOTOR1_IN1, iPower);
      delay(10);

      // Solarbotics RM2 -> 2 Backward
      digitalWrite(MOTOR2_IN2, LOW);
      analogWrite(MOTOR2_IN1, iPower);
      delay(10);

      break;
    case 3:

      // Right
      // Solarbotics RM2 -> 1 Forward
      digitalWrite(MOTOR1_IN1, LOW);
      analogWrite(MOTOR1_IN2, iPower);
      delay(10);

      // Solarbotics RM2 -> 2 Backward
      digitalWrite(MOTOR2_IN2, LOW);
      analogWrite(MOTOR2_IN1, iPower);
      delay(10);

      break;
    case 4:

      // Left
      // Solarbotics RM2 -> 1 Backward
      digitalWrite(MOTOR1_IN2, LOW);
      analogWrite(MOTOR1_IN1, iPower);
      delay(10);

      // Solarbotics RM2 -> 2 Forward
      digitalWrite(MOTOR2_IN1, LOW);
      analogWrite(MOTOR2_IN2, iPower);
      delay(10);

      break;
    case 5:

      // Stop
      // NeoPixels Red
      //zz = 2;
      //isNUMPIXELS();
      // Solarbotics RM2 -> 1
      digitalWrite(MOTOR1_IN1, LOW);
      analogWrite(MOTOR1_IN2, 0);
      delay(10);

      // Solarbotics RM2 -> 2
      digitalWrite(MOTOR2_IN1, LOW);
      analogWrite(MOTOR2_IN2, 0);
      delay(10);

      break;
 }

}
setup.ino
// Setup
void setup() {

  // Open the serial port at 9600 bps:
  Serial.begin( 9600 );

  // Pause
  delay(5);

  // EEPROM Unit ID
  isUID();

  // Pause
  delay(5);

  // Setup Solarbotics RM2 Motor
  isSetupRM2Motor();

  // Pause
  delay(5);

  // NeoPixels
  // This initializes the NeoPixel library
  pixels.begin();
  // Delay for a period of time (in milliseconds)
  delay(50);
  // isNUMPIXELS Off
  isNUMPIXELSoff();

}
——
People can contact us: https://www.donluc.com/?page_id=1927
Technology Experience
- Single-Board Microcontrollers (PIC, Arduino, Raspberry Pi,Espressif, etc…)
- IoT
- Robotics
- Camera and Video Capture Receiver Stationary, Wheel/Tank and Underwater Vehicle
- Unmanned Vehicles Terrestrial and Marine
- Research & Development (R & D)
- Desktop Applications (Windows, OSX, Linux, Multi-OS, Multi-Tier, etc…)
- Mobile Applications (Android, iOS, Blackberry, Windows Mobile, Windows CE, etc…)
- Web Applications (LAMP, Scripting, Java, ASP, ASP.NET, RoR, Wakanda, etc…)
- Social Media Programming & Integration (Facebook, Twitter, YouTube, Pinterest, etc…)
- Content Management Systems (WordPress, Drupal, Joomla, Moodle, etc…)
- Bulletin Boards (phpBB, SMF, Vanilla, jobberBase, etc…)
- eCommerce (WooCommerce, OSCommerce, ZenCart, PayPal Shopping Cart, etc…)
Instructor and E-Mentor
- IoT
- PIC Microcontrollers
- Arduino
- Raspberry Pi
- Espressif
- Robotics
- DOS, Windows, OSX, Linux, iOS, Android, Multi-OS
- Linux-Apache-PHP-MySQL
Follow Us
J. Luc Paquin – Curriculum Vitae – 2021 English & Español
https://www.jlpconsultants.com/luc/
Web: https://www.donluc.com/
Web: https://www.jlpconsultants.com/
Facebook: https://www.facebook.com/neosteam.labs.9/
YouTube: https://www.youtube.com/channel/UC5eRjrGn1CqkkGfZy0jxEdA
Twitter: https://twitter.com/labs_steam
Pinterest: https://www.pinterest.com/NeoSteamLabs/
Instagram: https://www.instagram.com/neosteamlabs/
Don Luc
