Program
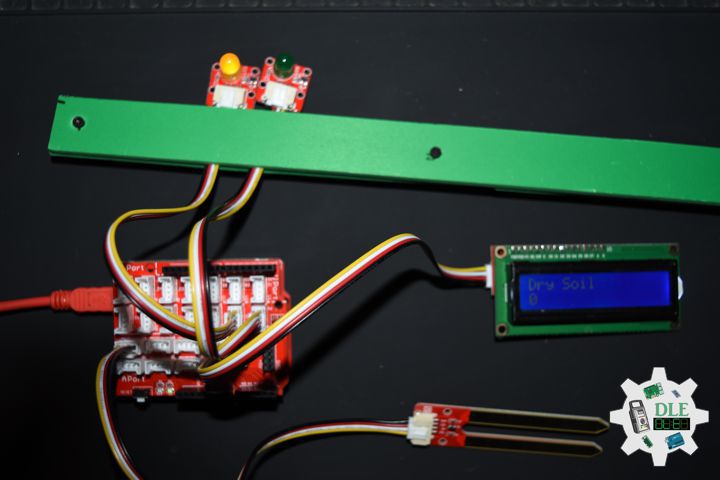
Project #15: Environment – Crowtail Rotary Angle Sensor – Mk23
——
#DonLucElectronics #DonLuc #Arduino #ASM #Display #Elecrow #Project #Patreon #Electronics #Microcontrollers #IoT #Fritzing #Programming #Consultant
——
——
——
——
Crowtail – Rotary Angle Sensor 2.0
This rotary angle sensor may also be known as potentiometer that produces analog output between 0 and 3.3-5 Volt. The angular range is 300 degrees with a linear change in value. The resistance value is 10k ohms, perfect for Arduino use. Some applications like smart light control, volume control, only you can not think of things, no impossible things.
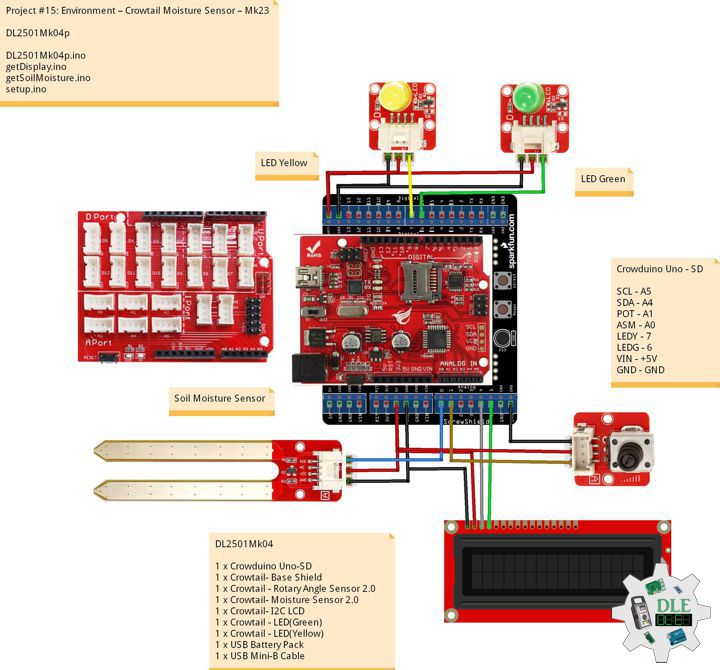
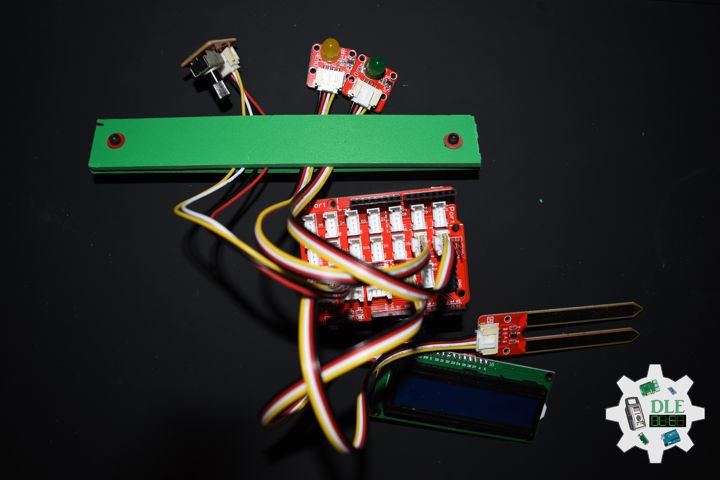
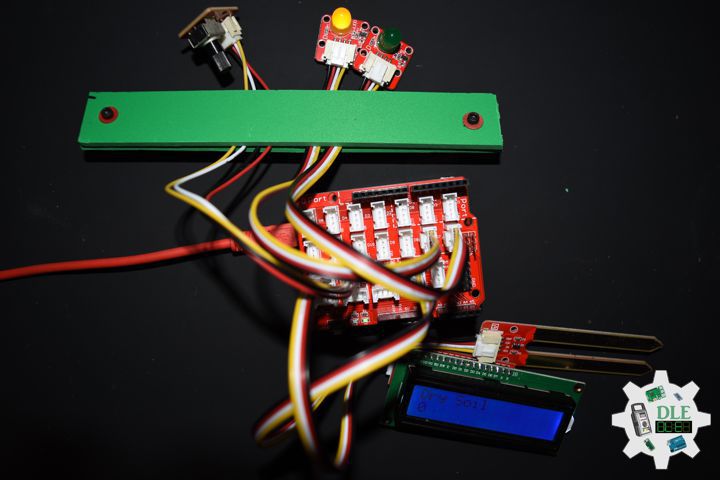
DL2501Mk04
1 x Crowduino Uno – SD
1 x Crowtail – Base Shield
1 x Crowtail – Rotary Angle Sensor 2.0
1 x Crowtail – Moisture Sensor 2.0
1 x Crowtail – I2C LCD
1 x Crowtail – LED(Green)
1 x Crowtail – LED(Yellow)
1 x USB Battery Pack
1 x USB Mini-B Cable
Crowduino Uno – SD
SCL – A5
SDA – A4
POT – A1
ASM – A0
LEDY – 7
LEDG – 6
VIN – +5V
GND – GND
DL2501Mk04p
DL2501Mk04p.ino
/****** Don Luc Electronics © ******
Software Version Information
Project #15: Environment – Crowtail Rotary Angle Sensor – Mk23
DL2501Mk04p.ino
DL2501Mk04
1 x Crowduino Uno - SD
1 x Crowtail - Base Shield
1 x Crowtail - Rotary Angle Sensor 2.0
1 x Crowtail - Moisture Sensor 2.0
1 x Crowtail - I2C LCD
1 x Crowtail - LED(Green)
1 x Crowtail - LED(Yellow)
1 x USB Battery Pack
1 x USB Mini-B Cable
*/

// Include the Library Code
// Wire
#include <Wire.h>
// Liquid Crystal
#include "LiquidCrystal.h"

// Potentiometer
int iPotentiometer = A1;
// Change Your Threshold Here
int Threshold = 0;
int zz = 0;

// Liquid Crystal
// Connect via i2c
LiquidCrystal lcd(0);

// Crowtail Moisture Sensor
int iSoilMoisture = A0;
int iSoilMoistureVal = 0;

// LED Yellow
int iLEDYellow = 7;

// LED Green
int iLEDGreen = 6;

// Software Version Information
String sver = "15-23";

void loop() {

  // Crowtail Moisture Sensor
  isSoilMoisture();

  // Delay 1 Second
  delay( 1000 );

}
getDisplay.ino
// getDisplay
// Crowbits - OLED 128X64 UID
void isDisplayUID(){

  // Set up the LCD's number of rows and columns:
  lcd.begin(16, 2);
  // Print a message to the LCD.
  // Cursor
  lcd.setCursor(0, 0);
  lcd.print("Don Luc Electron");
  // Cursor
  lcd.setCursor(0, 1);
  // Print a message to the LCD.
  lcd.print( sver );

}
// isDisplay Green
void isDisplayG(){

  // Print a message to the LCD
  // Clear
  lcd.clear();
  // Cursor
  lcd.setCursor(0, 0);
  lcd.print("Humid Soil");
  // Cursor
  lcd.setCursor(0, 1);
  // Print a message to the LCD
  lcd.print( iSoilMoistureVal );

}
// isDisplay Yellow
void isDisplayY(){

  // Print a message to the LCD
  // Clear
  lcd.clear();
  // Cursor
  lcd.setCursor(0, 0);
  lcd.print("Dry Soil");
  // Cursor
  lcd.setCursor(0, 1);
  // Print a message to the LCD
  lcd.print( iSoilMoistureVal );

}
getSoilMoisture.ino
// Crowtail Moisture Sensor
// Soil Moisture
void isSoilMoisture(){

  // Connect Soil Moisture Sensor to Analog 0
  // iSoilMoistureVal => 0~700 Soil Moisture
  iSoilMoistureVal = analogRead( iSoilMoisture );

  // Threshold => 200~500
  zz = analogRead( iPotentiometer );
  Threshold = map( zz, 0, 1024, 200, 500);

  // Threshold
  if (iSoilMoistureVal > Threshold) {

    // 300~700 - Humid Soil
    // LED Yellow
    digitalWrite(iLEDYellow, LOW);
    // Display Green
    isDisplayG();
    // LED Green
    digitalWrite(iLEDGreen, HIGH);

  }
  else {

    // 0-300 Dry Soil
    // LED Green
    digitalWrite(iLEDGreen, LOW);
    // Display Yellow
    isDisplayY();
    digitalWrite(iLEDYellow, HIGH);

  }

}
setup.ino
// Setup
void setup()
{

  // Delay
  delay(100);

  // Initialize the LED iLED Yellow
  pinMode(iLEDYellow, OUTPUT);

  // Initialize the LED LED Green
  pinMode(iLEDGreen, OUTPUT);

  // Display UID
  isDisplayUID();

  // Delay 5 Second
  delay( 5000 );

}
——
People can contact us: https://www.donluc.com/?page_id=1927
Electronics, IoT, Teacher, Instructor, R&D and Consulting
- Programming Language
- Single-Board Microcontrollers (PIC, Arduino, Raspberry Pi, Arm, Silicon Labs, Espressif, Etc…)
- IoT
- Wireless (Radio Frequency, Bluetooth, WiFi, Etc…)
- Robotics
- Automation
- Camera and Video Capture Receiver Stationary, Wheel/Tank and Underwater Vehicle
- Unmanned Vehicles Terrestrial and Marine
- Machine Learning
- Artificial Intelligence (AI)
- RTOS
- Sensors, eHealth Sensors, Biosensor, and Biometric
- Research & Development (R & D)
- Consulting
Follow Us
Luc Paquin – Curriculum Vitae – 2024
https://www.donluc.com/luc/
Web: https://www.donluc.com/
Facebook: https://www.facebook.com/neosteam.labs.9/
YouTube: https://www.youtube.com/@thesass2063
Twitter: https://twitter.com/labs_steam
Pinterest: https://www.pinterest.com/NeoSteamLabs/
Instagram: https://www.instagram.com/neosteamlabs/
Patreon: https://patreon.com/DonLucElectronics59
DFRobot: https://learn.dfrobot.com/user-10186.html
Hackster.io: https://www.hackster.io/neosteam-labs
Elecrow: https://www.elecrow.com/share/sharepj/center/no/760816d385ebb1edc0732fd873bfbf13
TikTok: https://www.tiktok.com/@luc.paquin8
Twitch: https://www.twitch.tv/lucpaquin
LinkedIn: https://www.linkedin.com/in/jlucpaquin/
Project #25 – Movement – ADXL345 – Mk07
——
#DonLucElectronics #DonLuc #ADXL345 #Accelerometer #Movement #ESP32 #Bluetooth #Elecrow #DFRobot #Arduino #Project #Patreon #Electronics #Microcontrollers #IoT #Fritzing #Programming #Consultant
——
——
——
——
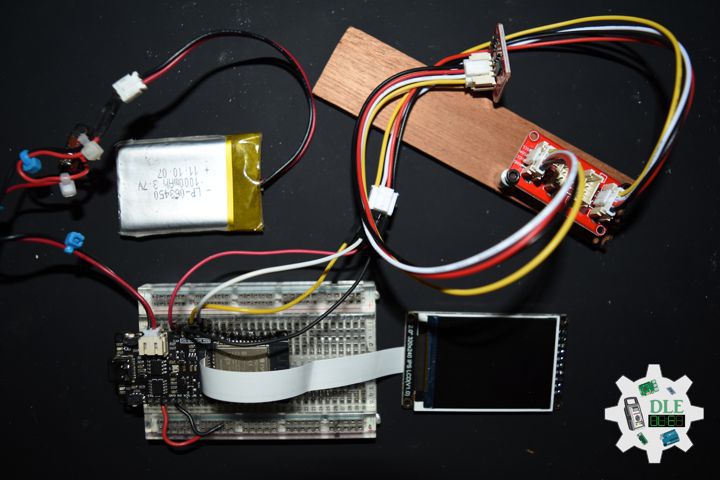
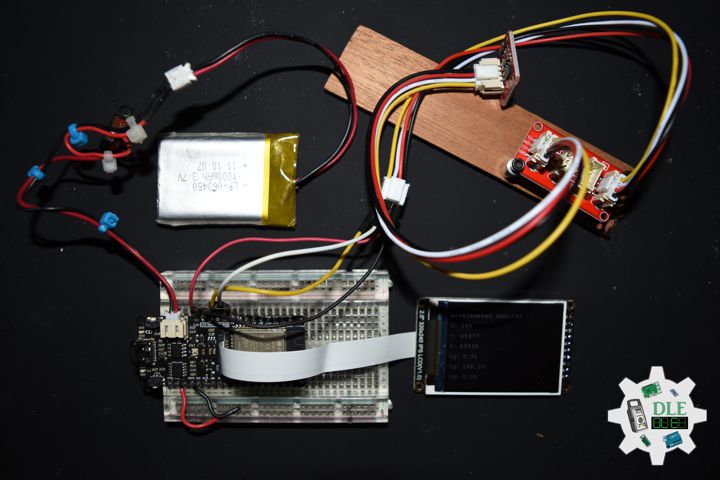
Crowtail – 3-Axis Digital Accelerometer
Crowtail – 3-Axis Digital Accelerometer with specific Crowtail interface, It’s base on an advanced 3-axis IC ADXL345. This is a high resolution digital accelerometer providing you at max 3.9mg/LSB resolution and large ±16g measurement range. Have no worry to implement it into your free-fall detection project, cause it’s robust enough to survive up to 10,000g shock. Meanwhile, it’s agile enough to detect single and double taps. It’s ideal for motion detection, gesture detection as well as robotics. This digital 3-axis accelerometer has excellent EMI protection.
Its variable output makes it suitable for a wide range of applications:
- 1. HDD shock protection
- 2. Vibration sensor
- 3. Game controller input
- 4. Robotics
- 5. Smart vehicles
- 6. Anywhere you need to obtain motion-sensing and orientation information.
- 7. The excellent sensitivity provide high-precision output up to ±16g.
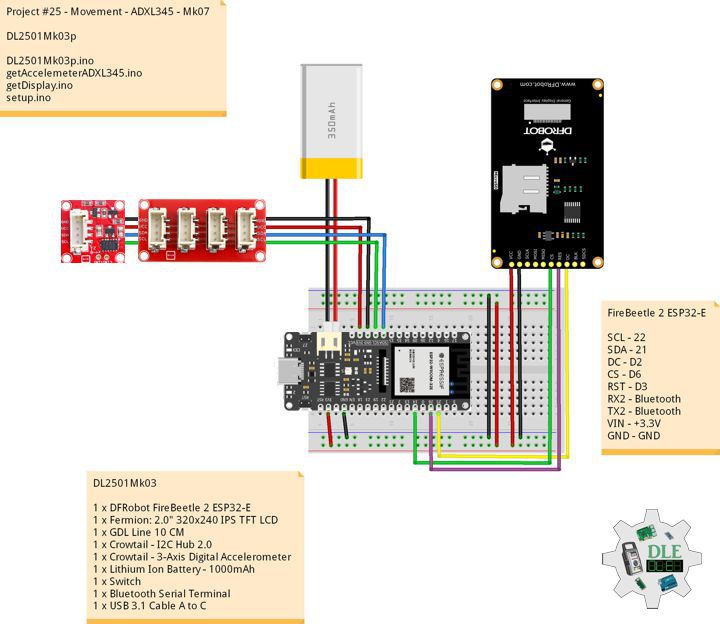
DL2501Mk03
1 x DFRobot FireBeetle 2 ESP32-E
1 x Fermion: 2.0″ 320×240 IPS TFT LCD
1 x GDL Line 10 CM
1 x Crowtail – I2C Hub 2.0
1 x Crowtail – 3-Axis Digital Accelerometer
1 x Lithium Ion Battery – 1000mAh
1 x Switch
1 x Bluetooth Serial Terminal
1 x USB 3.1 Cable A to C
FireBeetle 2 ESP32-E
SCL – 22
SDA – 21
DC – D2
CS – D6
RST – D3
RX2 – Bluetooth
TX2 – Bluetooth
VIN – +3.3V
GND – GND
DL2501Mk03p
DL2501Mk03p.ino
/****** Don Luc Electronics © ******
Software Version Information
Project #25 - Movement - ADXL345 - Mk07
25-07
DL2501Mk03p.ino
DL2501Mk03
1 x DFRobot FireBeetle 2 ESP32-E
1 x Fermion: 2.0" 320x240 IPS TFT LCD
1 x GDL Line 10 CM
1 x Crowtail - I2C Hub 2.0
1 x Crowtail - 3-Axis Digital Accelerometer
1 x Lithium Ion Battery - 1000mAh
1 x Switch
1 x Bluetooth Serial Terminal
1 x USB 3.1 Cable A to C
*/

// Include the Library Code
// Arduino
#include <Arduino.h>
// Wire
#include <Wire.h>
// DFRobot Display GDL API
#include <DFRobot_GDL.h>
// Bluetooth Serial
#include "BluetoothSerial.h"
#if !defined(CONFIG_BT_ENABLED) || !defined(CONFIG_BLUEDROID_ENABLED)
#error Bluetooth is not enabled! Please run `make menuconfig` to and enable it
#endif
// Accelemeter ADXL345
#include <ADXL345.h>

// Variable ADXL345 library
ADXL345 adxl;
// Accelerometer ADXL345
// x, y, z
int x;
int y;
int z;
// Standard Gravity
// xyz
double xyz[3];
double ax;
double ay;
double az;
// FullString
String FullString = "";

// Bluetooth Serial
BluetoothSerial SerialBT;

// Defined ESP32
#define TFT_DC  D2
#define TFT_CS  D6
#define TFT_RST D3

/*dc=*/ /*cs=*/ /*rst=*/
// DFRobot Display 240x320
DFRobot_ST7789_240x320_HW_SPI screen(TFT_DC, TFT_CS, TFT_RST);

// Software Version Information
String sver = "25-07";

void loop() {

  // Accelemeter ADXL345
  isADXL345();

  // Delay 0.5 Second
  delay( 500 );

}
getAccelemeterADXL345.ino
// Accelemeter ADXL345
// Setup Accelemeter ADXL345
void isSetupADXL345(){

  // Power On
  adxl.powerOn();

  // Set activity inactivity thresholds (0-255)
  // 62.5mg per increment
  adxl.setActivityThreshold(75);
  // 62.5mg per increment
  adxl.setInactivityThreshold(75);
  // How many seconds of no activity is inactive?
  adxl.setTimeInactivity(10);

  //look of activity movement on this axes - 1 == on; 0 == off
  adxl.setActivityX(1);
  adxl.setActivityY(1);
  adxl.setActivityZ(1);

  //look of inactivity movement on this axes - 1 == on; 0 == off
  adxl.setInactivityX(1);
  adxl.setInactivityY(1);
  adxl.setInactivityZ(1);

  // Look of tap movement on this axes - 1 == on; 0 == off
  adxl.setTapDetectionOnX(0);
  adxl.setTapDetectionOnY(0);
  adxl.setTapDetectionOnZ(1);

  // Set values for what is a tap, and what is a double tap (0-255)
  // 62.5mg per increment
  adxl.setTapThreshold(50);
  // 625us per increment
  adxl.setTapDuration(15);
  // 1.25ms per increment
  adxl.setDoubleTapLatency(80);
  // 1.25ms per increment
  adxl.setDoubleTapWindow(200);

  // set values for what is considered freefall (0-255)
  // (5 - 9) recommended - 62.5mg per increment
  adxl.setFreeFallThreshold(7);
  // (20 - 70) recommended - 5ms per increment
  adxl.setFreeFallDuration(45);

  // Setting all interrupts to take place on int pin 1
  // I had issues with int pin 2, was unable to reset it
  adxl.setInterruptMapping( ADXL345_INT_SINGLE_TAP_BIT,   ADXL345_INT1_PIN );
  adxl.setInterruptMapping( ADXL345_INT_DOUBLE_TAP_BIT,   ADXL345_INT1_PIN );
  adxl.setInterruptMapping( ADXL345_INT_FREE_FALL_BIT,    ADXL345_INT1_PIN );
  adxl.setInterruptMapping( ADXL345_INT_ACTIVITY_BIT,     ADXL345_INT1_PIN );
  adxl.setInterruptMapping( ADXL345_INT_INACTIVITY_BIT,   ADXL345_INT1_PIN );

  // Register interrupt actions - 1 == on; 0 == off
  adxl.setInterrupt( ADXL345_INT_SINGLE_TAP_BIT, 1);
  adxl.setInterrupt( ADXL345_INT_DOUBLE_TAP_BIT, 1);
  adxl.setInterrupt( ADXL345_INT_FREE_FALL_BIT,  1);
  adxl.setInterrupt( ADXL345_INT_ACTIVITY_BIT,   1);
  adxl.setInterrupt( ADXL345_INT_INACTIVITY_BIT, 1);

}
// Accelemeter ADXL345
void isADXL345(){

  // Read the accelerometer values and store them in variables  x,y,z
  adxl.readXYZ(&x, &y, &z);
  // Output x,y,z values
  Serial.print("Values of X , Y , Z: ");
  Serial.print(x);
  Serial.print(" , ");
  Serial.print(y);
  Serial.print(" , ");
  Serial.println(z);

  // FullString
  FullString = "Values of X , Y , Z: " + String(x) + " , " +
  String(y) + " , " + String(z) + + "\r\n";

  // Accelemeter ADXL345
  isDisplayADXL345();

  // FullString Bluetooth Serial + Serial
  for(int i = 0; i < FullString.length(); i++)
  {

    // Bluetooth Serial
    SerialBT.write(FullString.c_str()[i]);
    // Serial
    Serial.write(FullString.c_str()[i]);

  }
  // Standard Gravity
  // Acceleration
  adxl.getAcceleration(xyz);
  ax = xyz[0];
  ay = xyz[1];
  az = xyz[2];
  Serial.print("X=");
  Serial.print(ax);
    Serial.println(" g");
  Serial.print("Y=");
  Serial.print(ay);
    Serial.println(" g");
  Serial.print("Z=");
  Serial.println(az);
    Serial.println(" g");
  Serial.println("**********************");

  // FullString
  // xg
  FullString = "X = " + String(ax) + " g" + "\r\n";
  // FullString Bluetooth Serial + Serial
  for(int i = 0; i < FullString.length(); i++)
  {

    // Bluetooth Serial
    SerialBT.write(FullString.c_str()[i]);
    // Serial
    Serial.write(FullString.c_str()[i]);

  }
  // yg
  FullString = "y = " + String(ay) + " g" + "\r\n";
  // FullString Bluetooth Serial + Serial
  for(int i = 0; i < FullString.length(); i++)
  {

    // Bluetooth Serial
    SerialBT.write(FullString.c_str()[i]);
    // Serial
    Serial.write(FullString.c_str()[i]);

  }
  // zg
  FullString = "z = " + String(az) + " g" + "\r\n";
  // FullString Bluetooth Serial + Serial
  for(int i = 0; i < FullString.length(); i++)
  {

    // Bluetooth Serial
    SerialBT.write(FullString.c_str()[i]);
    // Serial
    Serial.write(FullString.c_str()[i]);

  }

}
getDisplay.ino
// DFRobot Display 240x320
// DFRobot Display 240x320 - UID
void isDisplayUID(){

  // DFRobot Display 240x320
  // Text Display
  // Text Wrap
  screen.setTextWrap(false);
  // Rotation
  screen.setRotation(3);
  // Fill Screen => black
  screen.fillScreen(0x0000);
  // Text Color => white
  screen.setTextColor(0xffff);
  // Font => Free Mono 9pt
  screen.setFont(&FreeMono9pt7b);
  // TextSize => 1.5
  screen.setTextSize(1.5);
  // Don Luc Electronics
  screen.setCursor(0, 30);
  screen.println("Don Luc Electronics");
  // Accelemeter ADXL345
  screen.setCursor(0, 60);
  screen.println("Accelemeter ADXL345");
  // Version
  screen.setCursor(0, 90);
  screen.println("Version");
  screen.setCursor(0, 120);
  screen.println( sver );

}
// Accelemeter ADXL345
void isDisplayADXL345(){

  // DFRobot Display 240x320
  // Text Display
  // Text Wrap
  screen.setTextWrap(false);
  // Rotation
  screen.setRotation(3);
  // Fill Screen => black
  screen.fillScreen(0x0000);
  // Text Color => white
  screen.setTextColor(0xffff);
  // Font => Free Mono 9pt
  screen.setFont(&FreeMono9pt7b);
  // TextSize => 1.5
  screen.setTextSize(1.5);
  // Accelemeter ADXL345
  screen.setCursor(0, 30);
  screen.println("Accelemeter ADXL345");
  // Accelemeter ADXL345 X
  screen.setCursor(0, 60);
  screen.println("X: ");
  screen.setCursor(30, 60);
  screen.println( x );
  // Accelemeter ADXL345 Y
  screen.setCursor(0, 90);
  screen.println( "Y: " );
  screen.setCursor(30, 90);
  screen.println( y );
  // Accelemeter ADXL345 Z
  screen.setCursor(0, 120);
  screen.println( "Z: " );
  screen.setCursor(30, 120);
  screen.println( z );
  // Standard Gravity
  // Accelemeter ADXL345 Xg
  screen.setCursor(0, 150);
  screen.println( "Xg: " );
  screen.setCursor(40, 150);
  screen.println( ax );
  // Accelemeter ADXL345 Yg
  screen.setCursor(0, 180);
  screen.println( "Yg: " );
  screen.setCursor(40, 180);
  screen.println( ay );
  // Accelemeter ADXL345 Zg
  screen.setCursor(0, 210);
  screen.println( "Zg: " );
  screen.setCursor(40, 210);
  screen.println( az );

}
setup.ino
// Setup
void setup()
{

  // Serial Begin
  Serial.begin(115200);
  Serial.println("Starting BLE work!");

  // Bluetooth Serial
  SerialBT.begin("DL2501Mk03");
  Serial.println("Bluetooth Started! Ready to pair...");

  // Delay
  delay(100);

  // DFRobot Display 240x320
  screen.begin();

  // Delay
  delay(100);

  // Setup Accelemeter ADXL345
  isSetupADXL345();

  // DFRobot Display 240x320 - UID
  // Don Luc Electronics
  // Version
  isDisplayUID();

  // Delay 5 Second
  delay( 5000 );

}
——
People can contact us: https://www.donluc.com/?page_id=1927
Electronics, IoT, Teacher, Instructor, R&D and Consultant
- Programming Language
- Single-Board Microcontrollers (PIC, Arduino, Raspberry Pi, Arm, Silicon Labs, Espressif, Etc…)
- IoT
- Wireless (Radio Frequency, Bluetooth, WiFi, Etc…)
- Robotics
- Automation
- Camera and Video Capture Receiver Stationary, Wheel/Tank and Underwater Vehicle
- Unmanned Vehicles Terrestrial and Marine
- Machine Learning
- Artificial Intelligence (AI)
- RTOS
- Sensors, eHealth Sensors, Biosensor, and Biometric
- Research & Development (R & D)
- Consulting
Follow Us
Luc Paquin – Curriculum Vitae – 2025
https://www.donluc.com/luc/
Web: https://www.donluc.com/
Facebook: https://www.facebook.com/neosteam.labs.9/
YouTube: https://www.youtube.com/@thesass2063
Twitter: https://twitter.com/labs_steam
Pinterest: https://www.pinterest.com/NeoSteamLabs/
Instagram: https://www.instagram.com/neosteamlabs/
Patreon: https://patreon.com/DonLucElectronics59
DFRobot: https://learn.dfrobot.com/user-10186.html
Hackster.io: https://www.hackster.io/neosteam-labs
Elecrow: https://www.elecrow.com/share/sharepj/center/no/760816d385ebb1edc0732fd873bfbf13
TikTok: https://www.tiktok.com/@luc.paquin8
Twitch: https://www.twitch.tv/lucpaquin
LinkedIn: https://www.linkedin.com/in/jlucpaquin/
Don Luc
Project #15: Environment – Crowtail Moisture Sensor – Mk22
——
#DonLucElectronics #DonLuc #Arduino #ASM #Display #Elecrow #Project #Patreon #Electronics #Microcontrollers #IoT #Fritzing #Programming #Consultant
——
——
——
——
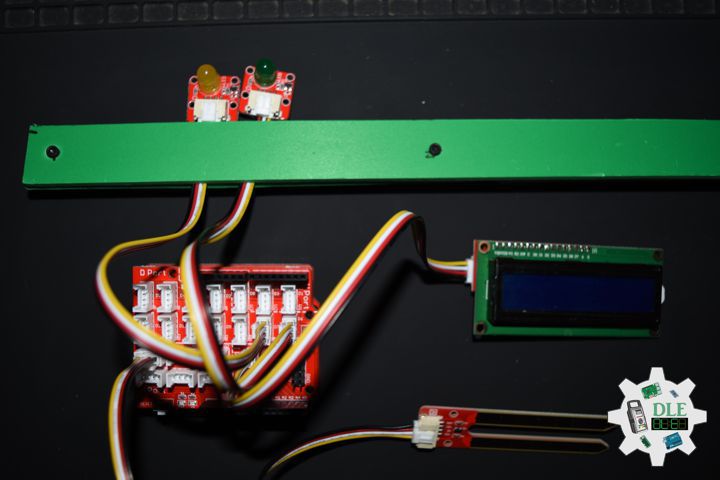
Crowtail Moisture Sensor 2.0
This Moisture Sensor can be used to detect the moisture of soil and thus to monitor if the plants in your garden need some water. This sensor uses the two probes to pass current through the soil, and then it reads then resistance to get the moisture level. More water makes the soil conduct electricity more easily (less resistance), while dry soil conducts electricity poorly (more resistance). Compares to the other moistures sensor using the same moisture test method, this module has super long legs, making it suitable for actual applications. This Moisture Sensor can be used to detect the moisture of soil or your pet plant’s water level, let the plants in your garden reach out for human help.
Crowtail – I2C LCD
A new crowtail for LCD1602, it contains LCD1602 and MCP23008 module. Unique interface for crowtail. Provide convenience to work with a LCD.
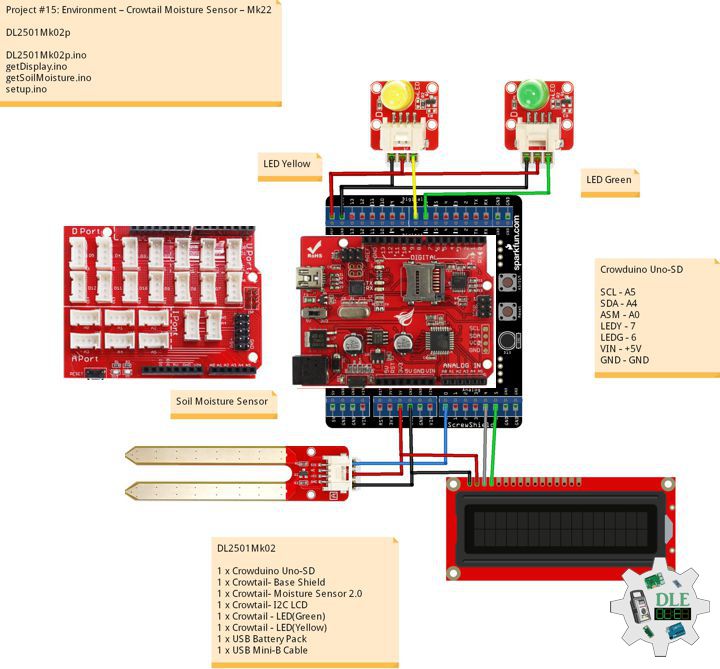
DL2501Mk02
1 x Crowduino Uno – SD
1 x Crowtail – Base Shield
1 x Crowtail – Moisture Sensor 2.0
1 x Crowtail – I2C LCD
1 x Crowtail – LED(Green)
1 x Crowtail – LED(Yellow)
1 x USB Battery Pack
1 x USB Mini-B Cable
Crowduino Uno – SD
SCL – A5
SDA – A4
ASM – A0
LEDY – 7
LEDG – 6
VIN – +5V
GND – GND
DL2501Mk02p
DL2501Mk02p.ino
/****** Don Luc Electronics © ******
Software Version Information
Project #15: Environment – Crowtail Moisture Sensor – Mk22
15-22
DL2501Mk02p.ino
DL2501Mk02
1 x Crowduino Uno - SD
1 x Crowtail - Base Shield
1 x Crowtail - Moisture Sensor 2.0
1 x Crowtail - I2C LCD
1 x Crowtail - LED(Green)
1 x Crowtail - LED(Yellow)
1 x USB Battery Pack
1 x USB Mini-B Cable
*/

// Include the Library Code
// Wire
#include <Wire.h>
// Liquid Crystal
#include "LiquidCrystal.h"

// Liquid Crystal
// Connect via i2c
LiquidCrystal lcd(0);

// Crowtail Moisture Sensor
int iSoilMoisture = A0;
int iSoilMoistureVal = 0;
// Change Your Threshold Here
int Threshold = 300;

// LED Yellow
int iLEDYellow = 7;

// LED Green
int iLEDGreen = 6;

// Software Version Information
String sver = "15-22";

void loop() {

  // Crowtail Moisture Sensor
  isSoilMoisture();

  // Delay 1 Second
  delay( 1000 );

}
getDisplay.ino
// getDisplay
// Crowbits - OLED 128X64 UID
void isDisplayUID(){

  // Set up the LCD's number of rows and columns:
  lcd.begin(16, 2);
  // Print a message to the LCD.
  // Cursor
  lcd.setCursor(0, 0);
  lcd.print("Don Luc Electron");
  // Cursor
  lcd.setCursor(0, 1);
  // Print a message to the LCD.
  lcd.print( sver );

}
// isDisplay Green
void isDisplayG(){

  // Print a message to the LCD
  // Clear
  lcd.clear();
  // Cursor
  lcd.setCursor(0, 0);
  lcd.print("Humid Soil");
  // Cursor
  lcd.setCursor(0, 1);
  // Print a message to the LCD
  lcd.print( iSoilMoistureVal );

}
// isDisplay Yellow
void isDisplayY(){

  // Print a message to the LCD
  // Clear
  lcd.clear();
  // Cursor
  lcd.setCursor(0, 0);
  lcd.print("Dry Soil");
  // Cursor
  lcd.setCursor(0, 1);
  // Print a message to the LCD
  lcd.print( iSoilMoistureVal );

}
getSoilMoisture.ino
// Crowtail Moisture Sensor
// Soil Moisture
void isSoilMoisture(){

  // Connect Soil Moisture Sensor to Analog 0
  // iSoilMoistureVal => 0~700 Soil Moisture
  iSoilMoistureVal = analogRead( iSoilMoisture );

  // Threshold
  if (iSoilMoistureVal > Threshold) {

    // 300~700 - Humid Soil
    // LED Yellow
    digitalWrite(iLEDYellow, LOW);
    // Display Green
    isDisplayG();
    // LED Green
    digitalWrite(iLEDGreen, HIGH);

  }
  else {

    // 0-300 Dry Soil
    // LED Green
    digitalWrite(iLEDGreen, LOW);
    // Display Yellow
    isDisplayY();
    digitalWrite(iLEDYellow, HIGH);

  }

}
setup.ino
void setup()
{

  // Delay
  delay(100);

  // Initialize the LED iLED Yellow
  pinMode(iLEDYellow, OUTPUT);

  // Initialize the LED LED Green
  pinMode(iLEDGreen, OUTPUT);

  // Display UID
  isDisplayUID();

  // Delay 5 Second
  delay( 5000 );

}
——
People can contact us: https://www.donluc.com/?page_id=1927
Electronics, IoT, Teacher, Instructor, R&D and Consulting
- Programming Language
- Single-Board Microcontrollers (PIC, Arduino, Raspberry Pi, Arm, Silicon Labs, Espressif, Etc…)
- IoT
- Wireless (Radio Frequency, Bluetooth, WiFi, Etc…)
- Robotics
- Automation
- Camera and Video Capture Receiver Stationary, Wheel/Tank and Underwater Vehicle
- Unmanned Vehicles Terrestrial and Marine
- Machine Learning
- Artificial Intelligence (AI)
- RTOS
- Sensors, eHealth Sensors, Biosensor, and Biometric
- Research & Development (R & D)
- Consulting
Follow Us
Luc Paquin – Curriculum Vitae – 2024
https://www.donluc.com/luc/
Web: https://www.donluc.com/
Facebook: https://www.facebook.com/neosteam.labs.9/
YouTube: https://www.youtube.com/@thesass2063
Twitter: https://twitter.com/labs_steam
Pinterest: https://www.pinterest.com/NeoSteamLabs/
Instagram: https://www.instagram.com/neosteamlabs/
Patreon: https://patreon.com/DonLucElectronics59
DFRobot: https://learn.dfrobot.com/user-10186.html
Hackster.io: https://www.hackster.io/neosteam-labs
Elecrow: https://www.elecrow.com/share/sharepj/center/no/760816d385ebb1edc0732fd873bfbf13
TikTok: https://www.tiktok.com/@luc.paquin8
Twitch: https://www.twitch.tv/lucpaquin
LinkedIn: https://www.linkedin.com/in/jlucpaquin/
Don Luc
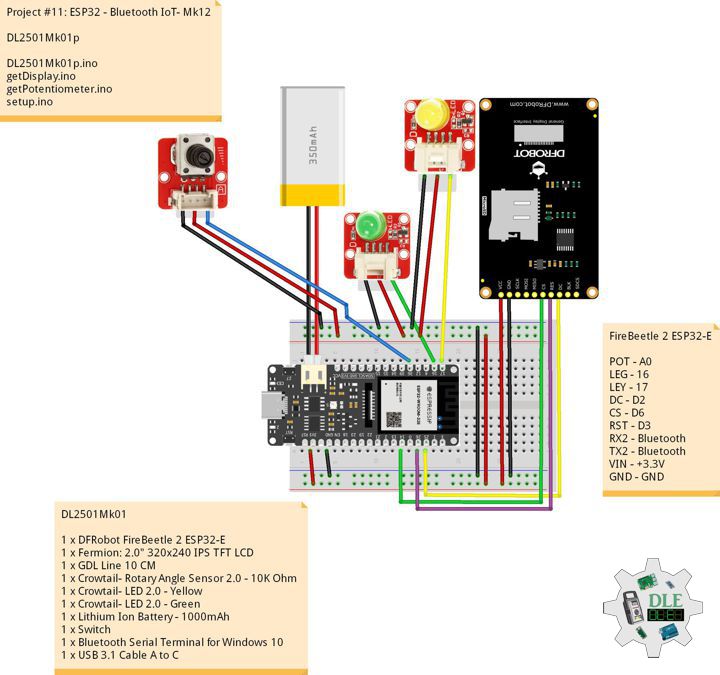
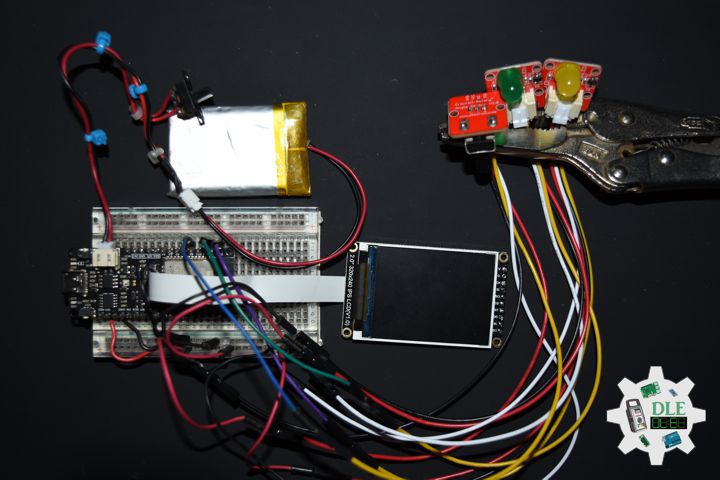
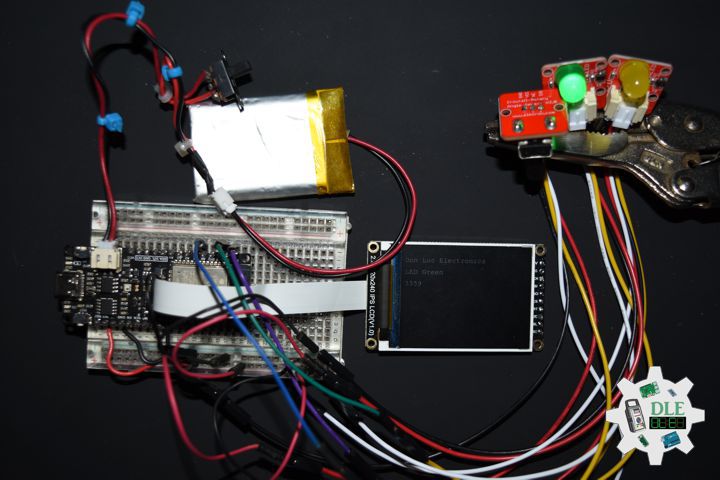
Project #11: ESP32 – Bluetooth IoT – Mk12
——
#DonLucElectronics #DonLuc #ESP32 #Bluetooth #Elecrow #DFRobot #Arduino #Project #Patreon #Electronics #Microcontrollers #IoT #Fritzing #Programming #Consultant
——
——
——
——
Bluetooth
Bluetooth is a short-range wireless technology standard that is used for exchanging data between fixed and mobile devices over short distances and building personal area networks. In the most widely used mode, transmission power is limited to 2.5 milliwatts, giving it a very short range of up to 10 metres. It employs UHF radio waves in the ISM bands, from 2.402 GHz to 2.48 GHz.
You can pair all kinds of Bluetooth devices with your PC, including keyboards, mice, phones, speakers, IoT, and a whole lot more. To do this, your PC needs to have Bluetooth. Some PCs, such as laptops and tablets, have Bluetooth built in. If your PC doesn’t, you can plug a USB Bluetooth adapter into the USB port on your PC to get it.
DL2501Mk01
1 x DFRobot FireBeetle 2 ESP32-E
1 x Fermion: 2.0″ 320×240 IPS TFT LCD
1 x GDL Line 10 CM
1 x Crowtail- Rotary Angle Sensor 2.0 – 10K Ohm
1 x Crowtail- LED 2.0 – Yellow
1 x Crowtail- LED 2.0 – Green
1 x Lithium Ion Battery – 1000mAh
1 x Switch
1 x Bluetooth Serial Terminal for Windows 10
1 x USB 3.1 Cable A to C
FireBeetle 2 ESP32-E
POT – A0
LEG – 16
LEY – 17
DC – D2
CS – D6
RST – D3
RX2 – Bluetooth
TX2 – Bluetooth
VIN – +3.3V
GND – GND
DL2501Mk01p
DL2501Mk01p.ino
/****** Don Luc Electronics © ******
Software Version Information
Project #11: ESP32 - Bluetooth IoT - Mk12
11-12
DL2501Mk01p.ino
DL2501Mk01
1 x DFRobot FireBeetle 2 ESP32-E
1 x Fermion: 2.0" 320x240 IPS TFT LCD
1 x GDL Line 10 CM
1 x Crowtail- Rotary Angle Sensor 2.0 - 10K Ohm
1 x Crowtail- LED 2.0 - Yellow
1 x Crowtail- LED 2.0 - Green
1 x Lithium Ion Battery - 1000mAh
1 x Switch
1 x Bluetooth Serial Terminal for Windows 10
1 x USB 3.1 Cable A to C
*/

// Include the Library Code
// Arduino
#include <Arduino.h>
// Wire
#include <Wire.h>
// DFRobot Display GDL API
#include <DFRobot_GDL.h>
// Bluetooth Serial
#include "BluetoothSerial.h"
#if !defined(CONFIG_BT_ENABLED) || !defined(CONFIG_BLUEDROID_ENABLED)
#error Bluetooth is not enabled! Please run `make menuconfig` to and enable it
#endif

// Bluetooth Serial
BluetoothSerial SerialBT;

// Defined ESP32
#define TFT_DC  D2
#define TFT_CS  D6
#define TFT_RST D3

/*dc=*/ /*cs=*/ /*rst=*/
// DFRobot Display 240x320
DFRobot_ST7789_240x320_HW_SPI screen(TFT_DC, TFT_CS, TFT_RST);

// Potentiometer
int iPot = A0;
int iPotVal = 0;
// Change Your Threshold Here
int Threshold = 2000;
// Full String
String FullString = "";

// LED Yellow
int iLEDY = 17;

// LED Green
int iLEDG = 16;

// Software Version Information
String sver = "11-12";

void loop() {

  // Potentiometer
  isPotentiometer();

  // Delay 2 Second
  delay( 2000 );

}
getDisplay.ino
// DFRobot Display 240x320
// DFRobot Display 240x320 - UID
void isDisplayUID(){

  // DFRobot Display 240x320
  // Text Display
  // Text Wrap
  screen.setTextWrap(false);
  // Rotation
  screen.setRotation(3);
  // Fill Screen => black
  screen.fillScreen(0x0000);
  // Text Color => white
  screen.setTextColor(0xffff);
  // Font => Free Mono 9pt
  screen.setFont(&FreeMono9pt7b);
  // TextSize => 1.5
  screen.setTextSize(1.5);
  // DFRobot Display
  screen.setCursor(0, 30);
  screen.println("Don Luc Electronics");
  // Don Luc Electronics
  screen.setCursor(0, 60);
  screen.println("DFRobot Display");
  // Version
  screen.setCursor(0, 90);
  screen.println("Version");
  screen.setCursor(0, 120);
  screen.println( sver );

}
// isDisplay Green
void isDisplayG(){

  // DFRobot Display 240x320
  // Text Display
  // Text Wrap
  screen.setTextWrap(false);
  // Rotation
  screen.setRotation(3);
  // Fill Screen => black
  screen.fillScreen(0x0000);
  // Text Color => white
  screen.setTextColor(0xffff);
  // Font => Free Mono 9pt
  screen.setFont(&FreeMono9pt7b);
  // TextSize => 1.5
  screen.setTextSize(1.5);
  // Don Luc Electronics
  screen.setCursor(0, 30);
  screen.println("Don Luc Electronics");
  // LED Yellow
  screen.setCursor(0, 60);
  screen.println("LED Green");
  // Potentiometer Value
  screen.setCursor(0, 90);
  screen.println( iPotVal );

}
// isDisplay Yellow
void isDisplayY(){

  // DFRobot Display 240x320
  // Text Display
  // Text Wrap
  screen.setTextWrap(false);
  // Rotation
  screen.setRotation(3);
  // Fill Screen => black
  screen.fillScreen(0x0000);
  // Text Color => white
  screen.setTextColor(0xffff);
  // Font => Free Mono 9pt
  screen.setFont(&FreeMono9pt7b);
  // TextSize => 1.5
  screen.setTextSize(1.5);
  // Don Luc Electronics
  screen.setCursor(0, 30);
  screen.println("Don Luc Electronics");
  // LED Yellow
  screen.setCursor(0, 60);
  screen.println("LED Yellow");
  // Potentiometer Value
  screen.setCursor(0, 90);
  screen.println( iPotVal );

}
getPotentiometer.ino
// Potentiometer
// Potentiometer
void isPotentiometer(){

  // Connect Potentiometer to Analog 0
  iPotVal = analogRead( iPot );

  // Threshold
  if (iPotVal > Threshold) {

    // LED Yellow
    digitalWrite(iLEDY, LOW);
    // isDisplay Green
    isDisplayG();
    // LED Green
    digitalWrite(iLEDG, HIGH);
    // FullString
    FullString = "LED Green = " + String(iPotVal) + "\r\n";

  }
  else {

    // LED Green
    digitalWrite(iLEDG, LOW);
    // isDisplay Yellow
    isDisplayY();
    // LED Yellow
    digitalWrite(iLEDY, HIGH);
    // FullString
    FullString = "LED Yellow = " + String(iPotVal) + "\r\n";

  }

  // FullString Bluetooth Serial + Serial
  for(int i = 0; i < FullString.length(); i++)
  {

    // Bluetooth Serial
    SerialBT.write(FullString.c_str()[i]);
    // Serial
    Serial.write(FullString.c_str()[i]);

  }

}
setup.ino
// Setup
void setup()
{

  // Serial Begin
  Serial.begin(115200);
  Serial.println("Starting BLE work!");

  // Bluetooth Serial
  SerialBT.begin("Don Luc Electronics");
  Serial.println("Bluetooth Started! Ready to pair...");

  // Delay
  delay(100);

  // DFRobot Display 240x320
  screen.begin();

  // Delay
  delay(100);

  // Initialize the LED Yellow
  pinMode(iLEDY, OUTPUT);

  // Initialize the LED Green
  pinMode(iLEDG, OUTPUT);

  // DFRobot Display 240x320 - UID
  // Don Luc Electronics
  // Version
  isDisplayUID();

  // Delay 5 Second
  delay( 5000 );

}
——
People can contact us: https://www.donluc.com/?page_id=1927
Electronics, IoT, Teacher, Instructor, R&D and Consulting
- Programming Language
- Single-Board Microcontrollers (PIC, Arduino, Raspberry Pi, Arm, Silicon Labs, Espressif, Etc…)
- IoT
- Wireless (Radio Frequency, Bluetooth, WiFi, Etc…)
- Robotics
- Automation
- Camera and Video Capture Receiver Stationary, Wheel/Tank and Underwater Vehicle
- Unmanned Vehicles Terrestrial and Marine
- Machine Learning
- Artificial Intelligence (AI)
- RTOS
- Sensors, eHealth Sensors, Biosensor, and Biometric
- Research & Development (R & D)
- Consulting
Follow Us
Luc Paquin – Curriculum Vitae – 2024
https://www.donluc.com/luc/
Web: https://www.donluc.com/
Facebook: https://www.facebook.com/neosteam.labs.9/
YouTube: https://www.youtube.com/@thesass2063
Twitter: https://twitter.com/labs_steam
Pinterest: https://www.pinterest.com/NeoSteamLabs/
Instagram: https://www.instagram.com/neosteamlabs/
Patreon: https://patreon.com/DonLucElectronics59
DFRobot: https://learn.dfrobot.com/user-10186.html
Hackster.io: https://www.hackster.io/neosteam-labs
Elecrow: https://www.elecrow.com/share/sharepj/center/no/760816d385ebb1edc0732fd873bfbf13
TikTok: https://www.tiktok.com/@luc.paquin8
Twitch: https://www.twitch.tv/lucpaquin
LinkedIn: https://www.linkedin.com/in/jlucpaquin/
Don Luc
Christmas and Elecrow
——
#DonLucElectronics #DonLuc #Arduino #Christmas #SantaClaus #Display #Elecrow #Project #Patreon #Electronics #Microcontrollers #IoT #Fritzing #Programming #Consultant
——
——
——
——
Christmas – Santa Claus
Santa Claus is a legendary figure originating in Western Christian culture who is said to bring gifts during the late evening and overnight hours on Christmas Eve. Christmas elves are said to make the gifts in Santa’s workshop, while flying reindeer pull his sleigh through the air. The popular conception of Santa Claus originates from folklore traditions surrounding the 4th-century Christian bishop Saint Nicholas, the patron saint of children. Saint Nicholas became renowned for his reported generosity and secret gift-giving.
Tracking
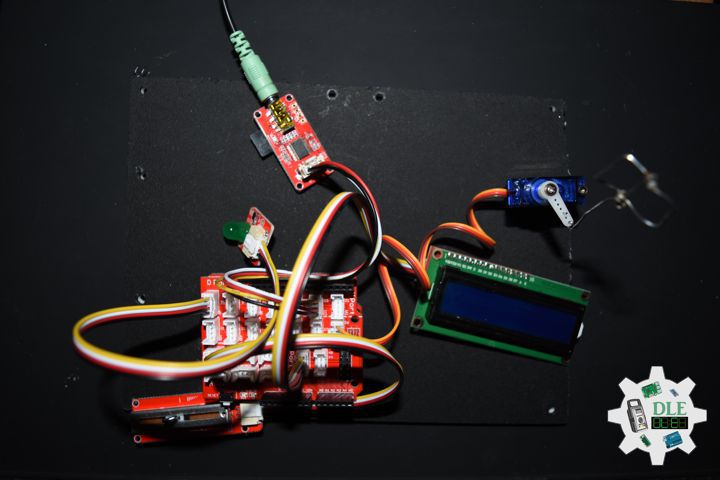
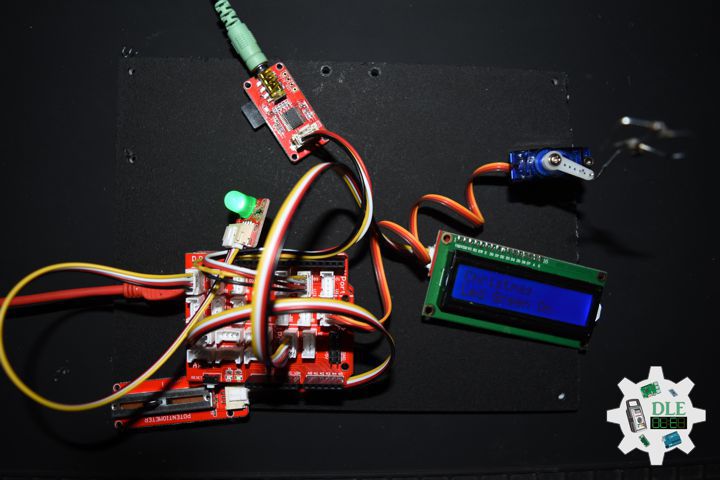
A Servo that to track Santa Claus’ yearly journey.
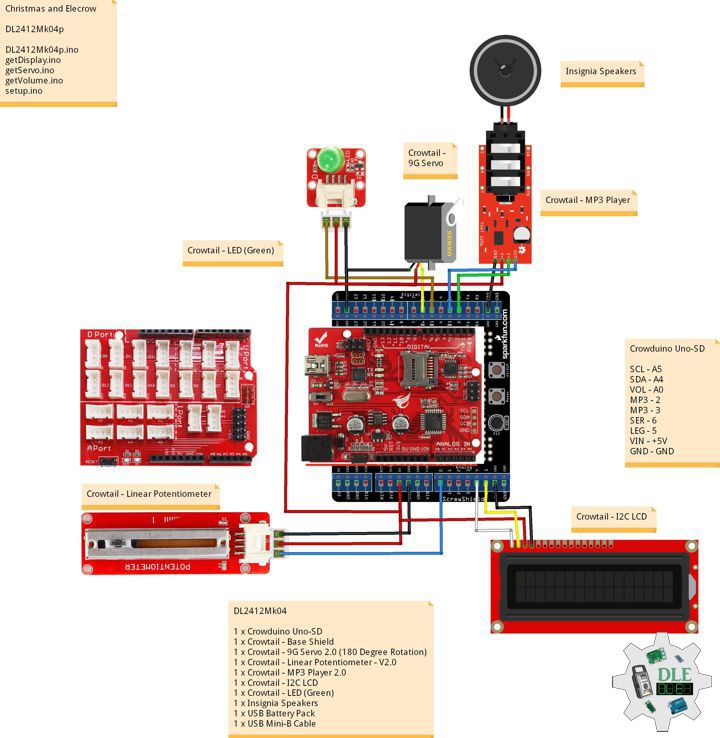
DL2412Mk04
1 x Crowduino Uno-SD
1 x Crowtail – Base Shield
1 x Crowtail – 9G Servo 2.0 (180 Degree Rotation)
1 x Crowtail – Linear Potentiometer – V2.0
1 x Crowtail – MP3 Player 2.0
1 x Crowtail – I2C LCD
1 x Crowtail – LED (Green)
1 x MicroSD 2 GB
1 x Insignia Speakers
1 x USB Battery Pack
1 x USB Mini-B Cable
Crowduino Uno-SD
SCL – A5
SDA – A4
VOL – A0
MP3 – 2
MP3 – 3
SER – 6
LEG – 5
VIN – +5V
GND – GND
DL2412Mk04p
DL2412Mk04p.ino
/****** Don Luc Electronics © ******
Software Version Information
Christmas and Elecrow
Christmas
DL2412Mk04p.ino
DL2412Mk04
1 x Crowduino Uno-SD
1 x Crowtail - Base Shield
1 x Crowtail - 9G Servo 2.0 (180 Degree Rotation)
1 x Crowtail - Linear Potentiometer - V2.0
1 x Crowtail - MP3 Player 2.0
1 x Crowtail - I2C LCD
1 x Crowtail - LED (Green)
1 x MicroSD 2 GB
1 x Insignia Speakers
1 x USB Battery Pack
1 x USB Mini-B Cable
*/

// Include the Library Code
// Software Serial
#include <SoftwareSerial.h>
// MP3 Player
#include <MP3Player_KT403A.h>
// Servo
#include<Servo.h>
// Wire
#include <Wire.h>
// Liquid Crystal
#include "LiquidCrystal.h"

// Liquid Crystal
// Connect via i2c
LiquidCrystal lcd(0);

// MP3 Player
SoftwareSerial mp3(2, 3);

// Linear Potentiometer
int LinearPot = A0;
int LinearPotValue = 0;
int z = 0;

// LED Green
int LedGreen =  5;
// LED Green On Off
int zzz = 1;

// Create servo object to control a servo
Servo myservo;
// iServo
int iServo = 6;
// Servo zz
int zz = 0;

// Software Version Information
String sver = "Christmas";

void loop() {

  // Volume
  isVolume();

  // isServo
  isServo();

}
getDisplay.ino
// getDisplay
// Crowtail- I2C LCD
// Display UID
void isDisplayUID(){

  // Set up the LCD's number of rows and columns:
  lcd.begin(16, 2);
  // Print a message to the LCD.
  // Cursor
  lcd.setCursor(0, 0);
  lcd.print("Don Luc Electron");
  // Cursor
  lcd.setCursor(0, 1);
  // Print a message to the LCD.
  lcd.print( sver );

}
// isDisplay Green On
void isDisplayGOn(){

  // Print a message to the LCD
  // Clear
  lcd.clear();
  // Cursor
  lcd.setCursor(0, 0);
  lcd.print("Christmas");
  // Cursor
  lcd.setCursor(0, 1);
  // Print a message to the LCD
  lcd.print( "Led Green On" );

}
// isDisplay Green Off
void isDisplayGOff(){

  // Print a message to the LCD
  // Clear
  lcd.clear();
  // Cursor
  lcd.setCursor(0, 0);
  lcd.print("Christmas");
  // Cursor
  lcd.setCursor(0, 1);
  // Print a message to the LCD
  lcd.print( "Led Green Off" );

}
getServo.ino
// Servo
// isServo
void isServo(){

  // Servo zz
  zz -= 1;

  if ( zz == 0 ) {

    // Servo zz
    zz = 100;

    // LED Green On Off
    if ( zzz == 1 ) { // Led Green On

      // Led Green On
      Serial.println("Led Green On");
      digitalWrite(LedGreen, HIGH);
      // Servo Write
      myservo.write(-90);
      // isDisplay Green On
      isDisplayGOn();
      zzz = 2;

    } else if ( zzz == 2 ) { // Led Green Off

       // Led Green Off
      Serial.println("Led Green Off");
      digitalWrite(LedGreen, LOW);
      // Servo Write
      myservo.write(90);
      // isDisplay Green Off
      isDisplayGOff();
      zzz = 1;

    }

 }

}
getVolume.ino
// Volume
// is Volume
void isVolume(){
// Linear Potentiometer
// Allowable Volume values are 0 to 30
LinearPotValue = analogRead( LinearPot );
z = map(LinearPotValue, 0, 1023, 0, 30);
// Volume
SetVolume(z);
}
setup.ino
// Setup
void setup()
{

  // Delay
  delay(100);

  // Initialize the LED Green
  pinMode(LedGreen, OUTPUT);

  // MP3 Player
  // MP3 Player module is configured to talk at 9600 bauds
  mp3.begin(9600);

  // Small delay
  delay(100);

  // We configure the library to use the SD card
  SelectPlayerDevice(0x02);

  // Index of the song between 0 and 65535
  // Play Loop
  PlayLoop();

  // Attaches the iServo
  myservo.attach(iServo);

  // Servo zz
  zz = 101;

  // Display UID
  isDisplayUID();

  // Delay 5 Second
  delay( 5000 );

}
——
People can contact us: https://www.donluc.com/?page_id=1927
Electronics, IoT, Teacher, Instructor, R&D and Consulting
- Programming Language
- Single-Board Microcontrollers (PIC, Arduino, Raspberry Pi, Arm, Silicon Labs, Espressif, Etc…)
- IoT
- Wireless (Radio Frequency, Bluetooth, WiFi, Etc…)
- Robotics
- Automation
- Camera and Video Capture Receiver Stationary, Wheel/Tank and Underwater Vehicle
- Unmanned Vehicles Terrestrial and Marine
- Machine Learning
- Artificial Intelligence (AI)
- RTOS
- Sensors, eHealth Sensors, Biosensor, and Biometric
- Research & Development (R & D)
- Consulting
Follow Us
Luc Paquin – Curriculum Vitae – 2024
https://www.donluc.com/luc/
Web: https://www.donluc.com/
Facebook: https://www.facebook.com/neosteam.labs.9/
YouTube: https://www.youtube.com/@thesass2063
Twitter: https://twitter.com/labs_steam
Pinterest: https://www.pinterest.com/NeoSteamLabs/
Instagram: https://www.instagram.com/neosteamlabs/
Patreon: https://patreon.com/DonLucElectronics59
DFRobot: https://learn.dfrobot.com/user-10186.html
Hackster.io: https://www.hackster.io/neosteam-labs
Elecrow: https://www.elecrow.com/share/sharepj/center/no/760816d385ebb1edc0732fd873bfbf13
TikTok: https://www.tiktok.com/@luc.paquin8
Twitch: https://www.twitch.tv/lucpaquin
LinkedIn: https://www.linkedin.com/in/jlucpaquin/
Don Luc
Patreon: Intermediate
——
#DonLucElectronics #DonLuc #ESP8266 #ESP32 #Arduino #Elecrow #Project #Patreon #Electronics #Microcontrollers #IoT #Fritzing #Programming #Consultant
——
——
——
——
Patreon: Intermediate
Intermediate: Internet of Things (IoT). Internet of Things (IoT) describes devices with sensors, processing ability, software and other technologies that connect and exchange data with other devices and systems over the Internet or other communication networks.
Internet of Things (IoT)
Internet of Things (IoT), the vast array of physical objects equipped with sensors and software that enable them to interact with little human intervention by collecting and exchanging data via a network. The Internet of Things (IoT) includes the many “Smart”, computer-like devices so commonplace today, which can connect with the Internet or interact via wireless networks; these “Things” include phones, appliances, thermostats, lighting systems, irrigation systems, security cameras, vehicles, even animals and cities. Today, smart watches track exercise and steps, smart speakers add items to shopping lists and switch lights on and off, and transponders allow cars to pass through tollbooths and pay the fee electronically.
Espressif Systems
Espressif Systems, a company with headquarters in Shanghai, China made its debut in the microcontroller scene with their range of inexpensive and feature-packed WiFi microcontrollers.
ESP8266
The ESP8266 is a low-cost Wi-Fi microcontroller, with built-in TCP/IP networking software, and microcontroller capability.
Programming
Arduino — A C++-based firmware. With this core, the ESP8266 CPU and its Wi-Fi components can be programmed like any other Arduino device.
ESP32
ESP32 is a series of low-cost, low-power system-on-chip microcontrollers with integrated Wi-Fi and dual-mode Bluetooth. The ESP32 series employs either a Tensilica Xtensa LX6 microprocessor in both dual-core and single-core variations, an Xtensa LX7 dual-core microprocessor, or a single-core RISC-V microprocessor.
Programming
Arduino – A C++-based firmware. With this core, Arduino core for the ESP32, ESP32-S2, ESP32-S3, ESP32-C3, Etc.
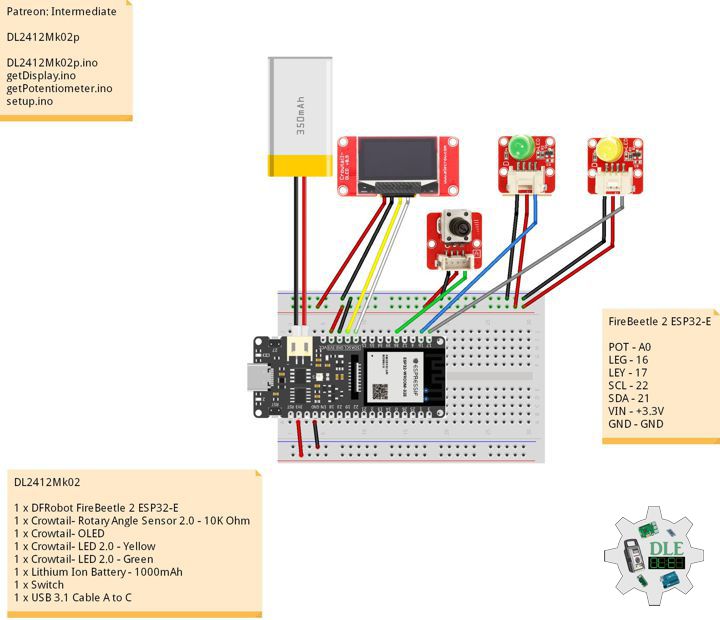
DL2412Mk02
1 x DFRobot FireBeetle 2 ESP32-E
1 x Crowtail- Rotary Angle Sensor 2.0 – 10K Ohm
1 x Crowtail- OLED
1 x Crowtail- LED 2.0 – Yellow
1 x Crowtail- LED 2.0 – Green
1 x Lithium Ion Battery – 1000mAh
1 x Switch
1 x USB 3.1 Cable A to C
FireBeetle 2 ESP32-E
POT – A0
LEG – 16
LEY – 17
SCL – 22
SDA – 21
VIN – +3.3V
GND – GND
——
DL2412Mk02p
DL2412Mk02p.ino
/****** Don Luc Electronics © ******
Software Version Information
Patreon: Intermediate
Intermediate
DL2412Mk02p.ino
DL2412Mk02
1 x DFRobot FireBeetle 2 ESP32-E
1 x Crowtail- Rotary Angle Sensor 2.0 - 10K Ohm
1 x Crowtail- OLED
1 x Crowtail- LED 2.0 - Yellow
1 x Crowtail- LED 2.0 - Green
1 x Lithium Ion Battery - 1000mAh
1 x Switch
1 x USB 3.1 Cable A to C
*/

// Include the Library Code
// Arduino
#include <Arduino.h>
// Crowtail- OLED
#include <U8x8lib.h>
// SPI
#include <SPI.h>

// Crowtail- OLED
// U8x8 Contructor List
U8X8_SSD1306_128X64_NONAME_HW_I2C u8x8(/* reset=*/ U8X8_PIN_NONE);

// Potentiometer
int iPot = A0;
int iPotVal = 0;
// Change Your Threshold Here
int Threshold = 2000;

// LED Yellow
int iLEDY = 17;

// LED Green
int iLEDG = 16;

// Software Version Information
String sver = "Intermediate";

void loop() {

  // Potentiometer
  isPotentiometer();

  // Delay 0.5 Second
  delay( 500 );

}
getDisplay.ino
// getDisplay
// Crowbits-OLED 128X64 UID
void isDisplayUID(){

  // Clear
  u8x8.clear();
  // Font
  u8x8.setFont(u8x8_font_chroma48medium8_r);
  // Draw
  u8x8.drawString(0,0,"Don Luc Electron");
  // Draw
  u8x8.drawString(0,35,"Intermediate");

}
// isDisplay Green
void isDisplayG(){

  // Clear
  u8x8.clear();
  // Font
  u8x8.setFont(u8x8_font_chroma48medium8_r);
  // Cursor
  u8x8.setCursor(0,0);
  // Print
  u8x8.print("Don Luc Electron");
  // Cursor
  u8x8.setCursor(0,30);
  // Print
  u8x8.print("LED Green");
  // Cursor
  u8x8.setCursor(0,35);
  // Print
  u8x8.print(iPotVal);

}
// isDisplay Yellow
void isDisplayY(){

  // Clear
  u8x8.clear();
  // Font
  u8x8.setFont(u8x8_font_chroma48medium8_r);
  // Cursor
  u8x8.setCursor(0,0);
  // Print
  u8x8.print("Don Luc Electron");
  // Cursor
  u8x8.setCursor(0,30);
  // Print
  u8x8.print("LED Yellow");
  // Cursor
  u8x8.setCursor(0,35);
  // Print
  u8x8.print(iPotVal);

}
getPotentiometer.ino
// Potentiometer
// Potentiometer
void isPotentiometer(){

  // Connect Potentiometer to Analog 0
  iPotVal = analogRead( iPot );

  // Threshold
  if (iPotVal > Threshold) {

    // LED Yellow
    digitalWrite(iLEDY, LOW);
    // isDisplay Green
    isDisplayG();
    // LED Green
    digitalWrite(iLEDG, HIGH);

  }
  else {

    // LED Green
    digitalWrite(iLEDG, LOW);
    // isDisplay Yellow
    isDisplayY();
    // LED Yellow
    digitalWrite(iLEDY, HIGH);

  }

}
setup.ino
// Setup
void setup()
{

  // Delay
  delay(100);

  // Crowtail- OLED
  u8x8.begin();
  u8x8.setPowerSave(0);

  // Delay
  delay(100);

  // Initialize the LED Yellow
  pinMode(iLEDY, OUTPUT);

  // Initialize the LED Green
  pinMode(iLEDG, OUTPUT);

  // Crowbits-OLED 128X64
  // Don Luc Electronics
  // Version
  isDisplayUID();

  // Delay 5 Second
  delay( 5000 );

}
——
People can contact us: https://www.donluc.com/?page_id=1927
Electronics, IoT, Teacher, Instructor, R&D and Consulting
- Programming Language
- Single-Board Microcontrollers (PIC, Arduino, Raspberry Pi, Arm, Silicon Labs, Espressif, Etc…)
- IoT
- Wireless (Radio Frequency, Bluetooth, WiFi, Etc…)
- Robotics
- Automation
- Camera and Video Capture Receiver Stationary, Wheel/Tank and Underwater Vehicle
- Unmanned Vehicles Terrestrial and Marine
- Machine Learning
- Artificial Intelligence (AI)
- RTOS
- Sensors, eHealth Sensors, Biosensor, and Biometric
- Research & Development (R & D)
- Consulting
Follow Us
Luc Paquin – Curriculum Vitae – 2024
https://www.donluc.com/luc/
Web: https://www.donluc.com/
Facebook: https://www.facebook.com/neosteam.labs.9/
YouTube: https://www.youtube.com/@thesass2063
Twitter: https://twitter.com/labs_steam
Pinterest: https://www.pinterest.com/NeoSteamLabs/
Instagram: https://www.instagram.com/neosteamlabs/
Patreon: https://patreon.com/DonLucElectronics59
DFRobot: https://learn.dfrobot.com/user-10186.html
Hackster.io: https://www.hackster.io/neosteam-labs
Elecrow: https://www.elecrow.com/share/sharepj/center/no/760816d385ebb1edc0732fd873bfbf13
TikTok: https://www.tiktok.com/@luc.paquin8
Twitch: https://www.twitch.tv/lucpaquin
LinkedIn: https://www.linkedin.com/in/jlucpaquin/
Don Luc
Project #15: Environment – Soil Moisture Sensor – Mk20
——
#DonLucElectronics #DonLuc #Arduino #ASM #Project #Patreon #Electronics #Microcontrollers #IoT #Fritzing #Programming #Consultant
——
——
——
——
Soil Moisture Sensor
Soil moisture is the critical parameter in agriculture. If there is a shortage or overabundance of water, plants may die. At the same time, this data depends on many external factors, primarily weather conditions and climate changes. That is why it is so vital to understand the most effective methods for analyzing soil moisture content.
This term refers to the entire quantity of water in the ground’s pores or on its surface. The moisture content of soil depends on such factors as weather, type of land, and plants. The parameter is vital in monitoring soil moisture activities, predicting natural disasters, managing water supply, etc. This data may signal a future flood or water deficit ahead of other indicators.
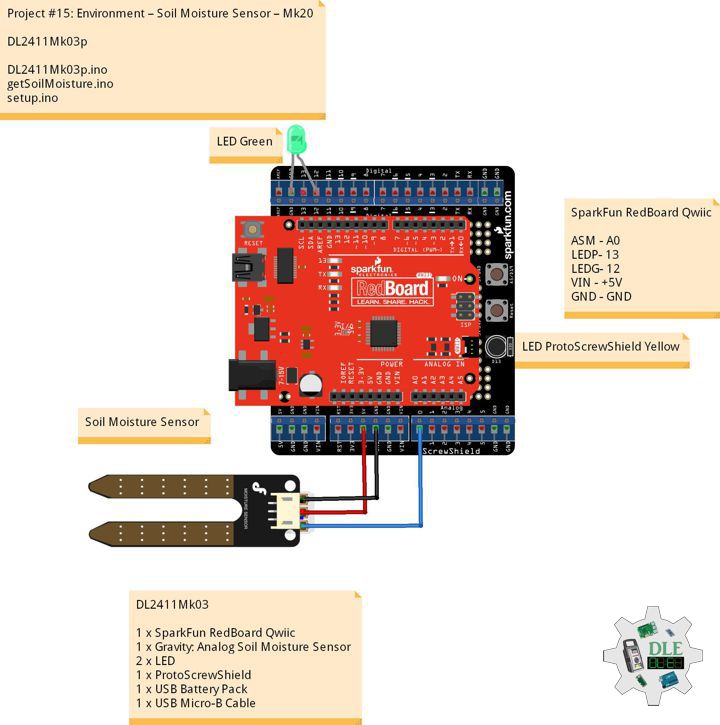
DL2411Mk03
1 x SparkFun RedBoard Qwiic
1 x Gravity: Analog Soil Moisture Sensor
2 x LED
1 x ProtoScrewShield
1 x USB Battery Pack
1 x USB Micro-B Cable
SparkFun RedBoard Qwiic
ASM – A0
LEDP- 13
LEDG- 12
VIN – +5V
GND – GND
DL2411Mk03p
DL2411Mk03p.ino
/****** Don Luc Electronics © ******
Software Version Information
Project #15: Environment – Soil Moisture Sensor – Mk20
15-20
DL2411Mk03p.ino
DL2411Mk03
1 x SparkFun RedBoard Qwiic
1 x Gravity: Analog Soil Moisture Sensor
2 x LED
1 x ProtoScrewShield
1 x USB Battery Pack
1 x USB Micro-B Cable
*/

// Include the Library Code

// Gravity: Analog Soil Moisture Sensor
int iSoilMoisture = A0;
int iSoilMoistureVal = 0;
int zz = 0;
// Change Your Threshold Here
int Threshold = 300;

// LED ProtoScrewShield Yellow
int iLEDProto = 13;

// LED Green
int iLEDGreen = 12;

// Software Version Information
String sver = "15-20";

void loop() {

  // Gravity: Analog Soil Moisture Sensor
  isSoilMoisture();

  // Delay 1 Second
  delay( 1000 );

}
getSoilMoisture.ino
// Gravity: Analog Soil Moisture Sensor
// Soil Moisture
void isSoilMoisture(){

  // Connect Soil Moisture Sensor to Analog 0
  zz = analogRead( iSoilMoisture );

  // iSoilMoistureVal => 0~900 Soil Moisture
  iSoilMoistureVal = map( zz, 0, 715, 0, 900);

  // Serial
  Serial.print("Moisture Sensor Value: ");

  // Threshold
  if (iSoilMoistureVal > Threshold) {

    // 300~900 - Humid Soil
    // LEDProto
    digitalWrite(iLEDProto, LOW);
    // Serial
    Serial.print( "Humid Soil " );
    Serial.println( iSoilMoistureVal );
    // LEDGreen
    digitalWrite(iLEDGreen, HIGH);

  }
  else {

    // 0-300 Dry Soil
    // LEDGreen
    digitalWrite(iLEDGreen, LOW);
    // Serial
    Serial.print( "Dry Soil " );
    Serial.println( iSoilMoistureVal );
    // LEDProto
    digitalWrite(iLEDProto, HIGH);

  }

}
setup.ino
// Setup
void setup()
{

  // Delay
  delay(100);

  // Serial
  Serial.begin(57600);

  // Initialize the LED iLEDProto
  pinMode(iLEDProto, OUTPUT);

  // Initialize the LED iLEDGreen
  pinMode(iLEDGreen, OUTPUT);

  // Delay 1 Second
  delay( 1000 );

}
——
People can contact us: https://www.donluc.com/?page_id=1927
Electronics, IoT, Teacher, Instructor, R&D and Consulting
- Programming Language
- Single-Board Microcontrollers (PIC, Arduino, Raspberry Pi, Arm, Silicon Labs, Espressif, Etc…)
- IoT
- Wireless (Radio Frequency, Bluetooth, WiFi, Etc…)
- Robotics
- Automation
- Camera and Video Capture Receiver Stationary, Wheel/Tank and Underwater Vehicle
- Unmanned Vehicles Terrestrial and Marine
- Machine Learning
- Artificial Intelligence (AI)
- RTOS
- Sensors, eHealth Sensors, Biosensor, and Biometric
- Research & Development (R & D)
- Consulting
Follow Us
Luc Paquin – Curriculum Vitae – 2024
https://www.donluc.com/luc/
Web: https://www.donluc.com/
Facebook: https://www.facebook.com/neosteam.labs.9/
YouTube: https://www.youtube.com/@thesass2063
Twitter: https://twitter.com/labs_steam
Pinterest: https://www.pinterest.com/NeoSteamLabs/
Instagram: https://www.instagram.com/neosteamlabs/
Patreon: https://patreon.com/DonLucElectronics59
DFRobot: https://learn.dfrobot.com/user-10186.html
Hackster.io: https://www.hackster.io/neosteam-labs
Elecrow: https://www.elecrow.com/share/sharepj/center/no/760816d385ebb1edc0732fd873bfbf13
TikTok: https://www.tiktok.com/@luc.paquin8
Twitch: https://www.twitch.tv/lucpaquin
LinkedIn: https://www.linkedin.com/in/jlucpaquin/
Don Luc
Patreon: Beginner
——
#DonLucElectronics #DonLuc #Arduino #Project #Patreon #Electronics #Microcontrollers #IoT #Fritzing #Programming #Consultant
——
——
——
——
Patreon: Beginner
Beginner: These beginner-friendly microcontrollers is Arduino Uno are easy to use and program with just a computer or laptop, a USB cable, and some open-source software.
What is Arduino?
Arduino board designs use a variety of microprocessors and controllers. The boards are equipped with sets of digital and analog input/output (I/O) pins that may be interfaced to various expansion boards “Shields” or breadboards and other circuits. The boards feature serial communications interfaces, including Universal Serial Bus (USB) on some models, which are also used for loading programs. Arduino boards are able to read inputs, light on a sensor, a finger on a button, or a Twitter message, and turn it into an output, activating a motor, turning on an LED, publishing something online. You can tell your board what to do by sending a set of instructions to the microcontroller on the board. The microcontrollers can be programmed using the C and C++ programming languages, using a standard API which is also known as the Arduino Programming Language, and the Arduino Software (IDE).
Arduino Software (IDE)
A minimal Arduino C/C++ program consists of only two functions:
setup(): This function is called once when a sketch starts after power-up or reset. It is used to initialize variables, input and output pin modes, and other libraries needed in the sketch.
loop(): After setup() function exits, the loop() function is executed repeatedly in the main program. It controls the board until the board is powered off or is reset. It is analogous to the function while.
DL2412Mk01
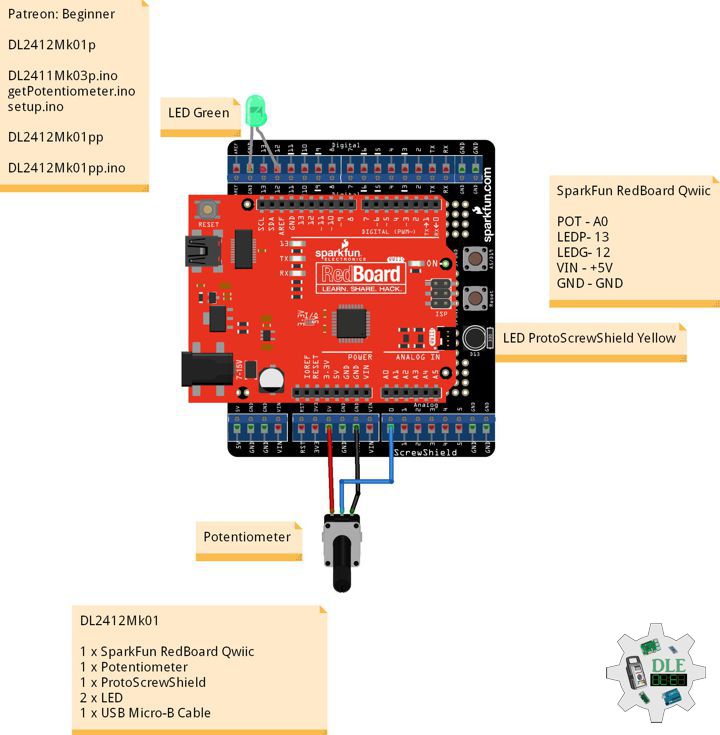
1 x SparkFun RedBoard Qwiic
1 x Potentiometer 10K Ohm
1 x ProtoScrewShield
2 x LED
1 x USB Micro-B Cable
SparkFun RedBoard Qwiic
POT – A0
LEDP – 13
LEDG – 12
VIN – +5V
GND – GND
——
DL2412Mk01ppp
DL2412Mk01ppp.ino
/****** Don Luc Electronics © ******/

int iPot = A0;
int iPotVal = 0;
int Threshold = 500;
int iLEDProto = 13;
int iLEDGreen = 12;
String sver = "Beginner";

void setup()
{

  delay(100);

  Serial.begin(57600);
  pinMode(iLEDProto, OUTPUT);
  pinMode(iLEDGreen, OUTPUT);
  delay( 100 );

}

void loop() {

  iPotVal = analogRead( iPot );
  Serial.print("Potentiometer: ");
  if (iPotVal > Threshold) {

    digitalWrite(iLEDProto, LOW);
    Serial.print( "LED Green " );
    Serial.println( iPotVal );
    digitalWrite(iLEDGreen, HIGH);

  }
  else {

    digitalWrite(iLEDGreen, LOW);
    Serial.print( "LED Proto " );
    Serial.println( iPotVal );
    digitalWrite(iLEDProto, HIGH);

  }
  delay( 100 );

}
——
DL2412Mk01pp
DL2412Mk01pp.ino
/****** Don Luc Electronics © ******
Software Version Information
Patreon: Beginner
Beginner
DL2412Mk01pp.ino
DL2412Mk01
1 x SparkFun RedBoard Qwiic
1 x Potentiometer
1 x ProtoScrewShield
2 x LED
1 x USB Micro-B Cable
*/

// Include the Library Code

// Potentiometer
int iPot = A0;
int iPotVal = 0;
// Change Your Threshold Here
int Threshold = 500;

// LED ProtoScrewShield Yellow
int iLEDProto = 13;

// LED Green
int iLEDGreen = 12;

// Software Version Information
String sver = "Beginner";

// Setup
void setup()
{

  // Delay
  delay(100);

  // Serial
  Serial.begin(57600);

  // Initialize the LED iLEDProto
  pinMode(iLEDProto, OUTPUT);

  // Initialize the LED iLEDGreen
  pinMode(iLEDGreen, OUTPUT);

  // Delay 0.1 Second
  delay( 100 );

}
// Loop
void loop() {

  // Potentiometer
  // Connect Potentiometer to Analog 0
  iPotVal = analogRead( iPot );

  // Serial
  Serial.print("Potentiometer: ");

  // Threshold
  if (iPotVal > Threshold) {

    // LEDProto
    digitalWrite(iLEDProto, LOW);
    // Serial
    Serial.print( "LED Green " );
    Serial.println( iPotVal );
    // LEDGreen
    digitalWrite(iLEDGreen, HIGH);

  }
  else {

    // LEDGreen
    digitalWrite(iLEDGreen, LOW);
    // Serial
    Serial.print( "LED Proto " );
    Serial.println( iPotVal );
    // LEDProto
    digitalWrite(iLEDProto, HIGH);

  }

  // Delay 0.1 Second
  delay( 100 );

}
——
DL2412Mk01p
DL2412Mk01p.ino
loop()
getPotentiometer.ino
Attaining => get
Combining Form => is
setup.ino
setup()
DL2412Mk01p
DL2411Mk03p.ino
/****** Don Luc Electronics © ******
Software Version Information
Patreon: Beginner
Beginner
DL2412Mk01p.ino
DL2412Mk01
1 x SparkFun RedBoard Qwiic
1 x Potentiometer
1 x ProtoScrewShield
2 x LED
1 x USB Micro-B Cable
*/

// Include the Library Code

// Potentiometer
int iPot = A0;
int iPotVal = 0;
// Change Your Threshold Here
int Threshold = 500;

// LED ProtoScrewShield Yellow
int iLEDProto = 13;

// LED Green
int iLEDGreen = 12;

// Software Version Information
String sver = "Beginner";

void loop() {

  // Potentiometer
  isPotentiometer();

  // Delay 0.1 Second
  delay( 100 );

}
getPotentiometer.ino
// Potentiometer
// Potentiometer
void isPotentiometer(){

  // Connect Potentiometer to Analog 0
  iPotVal = analogRead( iPot );

  // Serial
  Serial.print("Potentiometer: ");

  // Threshold
  if (iPotVal > Threshold) {

    // LEDProto
    digitalWrite(iLEDProto, LOW);
    // Serial
    Serial.print( "LED Green " );
    Serial.println( iPotVal );
    // LEDGreen
    digitalWrite(iLEDGreen, HIGH);

  }
  else {

    // LEDGreen
    digitalWrite(iLEDGreen, LOW);
    // Serial
    Serial.print( "LED Proto " );
    Serial.println( iPotVal );
    // LEDProto
    digitalWrite(iLEDProto, HIGH);

  }

}
setup.ino
// Setup
void setup()
{

  // Delay
  delay(100);

  // Serial
  Serial.begin(57600);

  // Initialize the LED iLEDProto
  pinMode(iLEDProto, OUTPUT);

  // Initialize the LED iLEDGreen
  pinMode(iLEDGreen, OUTPUT);

  // Delay 0.1 Second
  delay( 100 );

}
——
People can contact us: https://www.donluc.com/?page_id=1927
Electronics, IoT, Teacher, Instructor, R&D and Consulting
- Programming Language
- Single-Board Microcontrollers (PIC, Arduino, Raspberry Pi, Arm, Silicon Labs, Espressif, Etc…)
- IoT
- Wireless (Radio Frequency, Bluetooth, WiFi, Etc…)
- Robotics
- Automation
- Camera and Video Capture Receiver Stationary, Wheel/Tank and Underwater Vehicle
- Unmanned Vehicles Terrestrial and Marine
- Machine Learning
- Artificial Intelligence (AI)
- RTOS
- Sensors, eHealth Sensors, Biosensor, and Biometric
- Research & Development (R & D)
- Consulting
Follow Us
Luc Paquin – Curriculum Vitae – 2024
https://www.donluc.com/luc/
Web: https://www.donluc.com/
Facebook: https://www.facebook.com/neosteam.labs.9/
YouTube: https://www.youtube.com/@thesass2063
Twitter: https://twitter.com/labs_steam
Pinterest: https://www.pinterest.com/NeoSteamLabs/
Instagram: https://www.instagram.com/neosteamlabs/
Patreon: https://patreon.com/DonLucElectronics59
DFRobot: https://learn.dfrobot.com/user-10186.html
Hackster.io: https://www.hackster.io/neosteam-labs
Elecrow: https://www.elecrow.com/share/sharepj/center/no/760816d385ebb1edc0732fd873bfbf13
TikTok: https://www.tiktok.com/@luc.paquin8
Twitch: https://www.twitch.tv/lucpaquin
LinkedIn: https://www.linkedin.com/in/jlucpaquin/
Don Luc
Project #30 – UNIHIKER – MEMS – Mk07
——
#DonLucElectronics #DonLuc #UNIHIKER #CH4 #VOC #Display #IoT #Project #Debian #Python #Thonny #DFRobot #Fritzing #Programming #Electronics #Microcontrollers #Consultant
——
——
——
——
MEMS
MEMS (Micro-Electromechanical Systems) is the technology of microscopic devices incorporating both electronic and moving parts. MEMS are made up of components between 1 and 100 micrometres in size, and MEMS devices generally range in size from 20 micrometres to a millimetre, although components arranged in arrayscan be more than 1000 mm2. They usually consist of a central unit that processes data, an integrated circuit chip such as microprocessor, and several components that interact with the surroundings, such as microsensors.
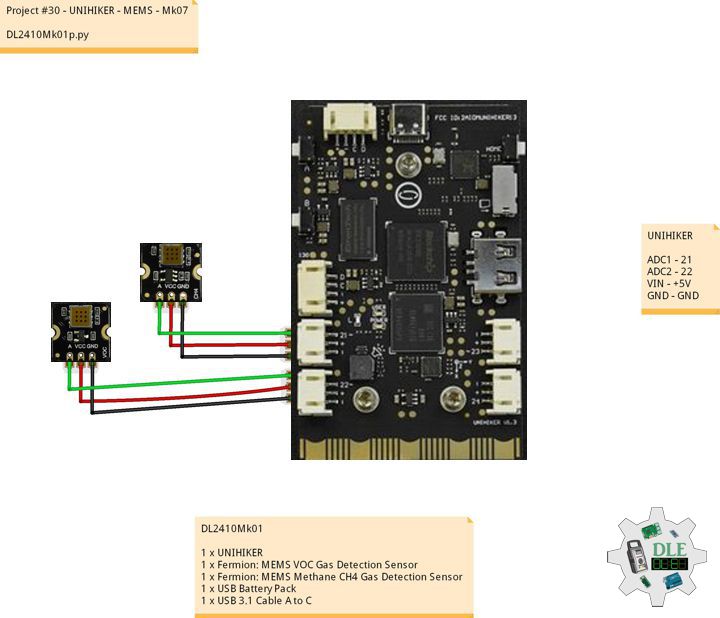
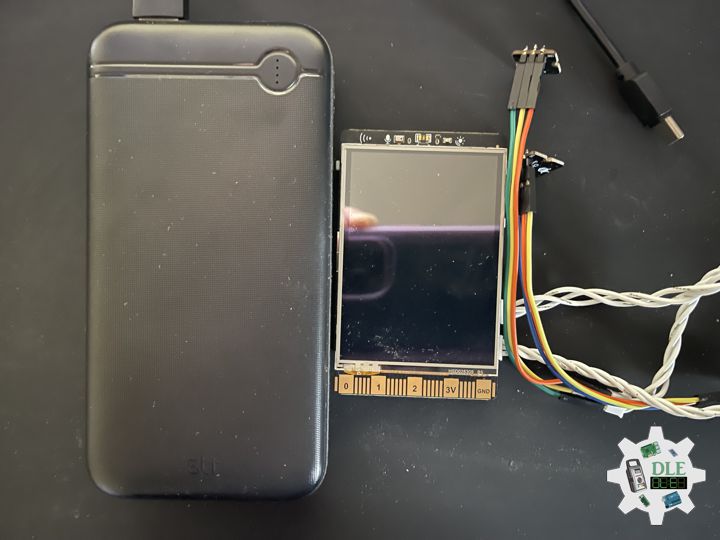
DL2410Mk01
1 x UNIHIKER
1 x Fermion: MEMS VOC Gas Detection Sensor
1 x Fermion: MEMS Methane CH4 Gas Detection Sensor
1 x USB Battery Pack
1 x USB 3.1 Cable A to C
UNIHIKER
ADC1 – 21
ADC2 – 22
VIN – +5V
GND – GND
DL2410Mk01p
DL2410Mk01p.py
****** Don Luc Electronics © ******
Software Version Information
Project #30 - UNIHIKER - MEMS - Mk07
30-07
DL2410Mk01.py
DL2410Mk01
1 x UNIHIKER
1 x Fermion: MEMS VOC Gas Detection Sensor
1 x Fermion: MEMS Methane CH4 Gas Detection Sensor
1 x USB Battery Pack
1 x USB 3.1 Cable A to C

-*- coding: utf-8 -*-
"""
# Import the unihiker library
from unihiker import GUI

# Import the time library
import time

# Import the Board module from the pinpong.board package
from pinpong.board import Board

# Import all modules from the pinpong.extension.unihiker package
from pinpong.extension.unihiker import *

# Initialize the board by selecting the board type and port number;
# if not specified, the program will automatically detect it
Board().begin()

# Initialize pin 21 as analog input mode
# Fermion: MEMS Methane CH4 Gas Detection Sensor
adc0 = Pin(Pin.P21, Pin.ANALOG)

# Initialize pin 22 as analog input mode
# Fermion: MEMS VOC Gas Detection Sensor
adc1 = Pin(Pin.P22, Pin.ANALOG)

# Instantiate the GUI class and create a gui object
gui = GUI()

# Display the initial background image 'DL2410Mk01p'
img = gui.draw_image(x=0, y=0, w=240, h=320, image='DL2410Mk01p.png')

# Fermion: MEMS Methane CH4 Gas Detection Sensor
# Display the initial Fermion: MEMS Methane CH4 Gas Detection Sensor valueCH4
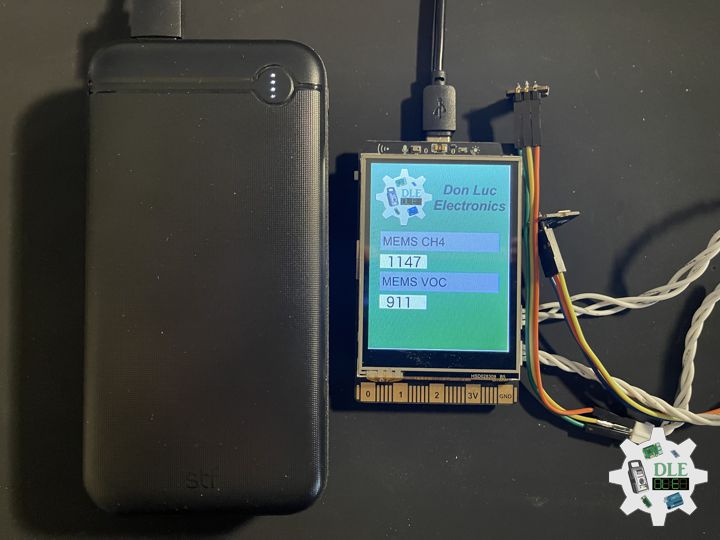
valueCH4 = gui.draw_text(x=30, y=151, text='0', font_size=18)

# MEMS VOC
# Display the initial Fermion: MEMS VOC Gas Detection Sensor valueVOC
valueVOC = gui.draw_text(x=30, y=221, text='0', font_size=18)

while True:

    # Fermion: MEMS Methane CH4 Gas Detection Sensor
    # Read analog value
    CH4Sensor = adc0.read_analog()
    valueCH4.config(text=CH4Sensor)

    # Fermion: MEMS VOC Gas Detection Sensor
    # Read analog value
    VOCSensor = adc1.read_analog()
    valueVOC.config(text=VOCSensor)

    # Delay for 1 second to keep the screen content displayed for a longer time
    time.sleep(1)
——
People can contact us: https://www.donluc.com/?page_id=1927
Electronics, IoT, Teacher, Instructor, R&D and Consulting
- Programming Language
- Single-Board Microcontrollers (PIC, Arduino, Raspberry Pi, Arm, Silicon Labs, Espressif, Etc…)
- IoT
- Wireless (Radio Frequency, Bluetooth, WiFi, Etc…)
- Robotics
- Automation
- Camera and Video Capture Receiver Stationary, Wheel/Tank and Underwater Vehicle
- Unmanned Vehicles Terrestrial and Marine
- Machine Learning
- Artificial Intelligence (AI)
- RTOS
- Sensors, eHealth Sensors, Biosensor, and Biometric
- Research & Development (R & D)
- Consulting
Follow Us
Luc Paquin – Curriculum Vitae – 2024
https://www.donluc.com/luc/
Web: https://www.donluc.com/
Facebook: https://www.facebook.com/neosteam.labs.9/
YouTube: https://www.youtube.com/@thesass2063
Twitter: https://twitter.com/labs_steam
Pinterest: https://www.pinterest.com/NeoSteamLabs/
Instagram: https://www.instagram.com/neosteamlabs/
DFRobot Luc.Paquin: https://edu.dfrobot.com/dashboard/makelogs
Hackster.io: https://www.hackster.io/neosteam-labs
ELECROW: https://www.elecrow.com/share/sharepj/center/no/760816d385ebb1edc0732fd873bfbf13
TikTok: www.tiktok.com/@luc.paquin8
LinkedIn: https://www.linkedin.com/in/jlucpaquin/
Don Luc
Project #29 – DFRobot – RTC – Mk31
——
#DonLucElectronics #DonLuc #DFRobot #RTC #SD #ASM #SHTC3 #FireBeetle2ESP32C6 #Display #EEPROM #ESP32 #IoT #SparkFun #Adafruit #Arduino #Project #Fritzing #Programming #Electronics #Microcontrollers #Consultant
——
——
——
——
Real-Time Clock
A Real-Time Clock (RTC) is an electronic device, most often in the form of an integrated circuit, that measures the passage of time. Although the term often refers to the devices in personal computers, servers and embedded systems, RTCs are present in almost any electronic device which needs to keep accurate time of day.
Although keeping time can be done without an RTC, using one has benefits:
- Reliably maintains and provides current time through disruptive system states such as hangs, sleep, reboots, or if given sufficient backup power, full shutdown and hardware reassembly, without the need to have its time set again.
- Low power consumption, important when running from alternate power.
- Frees the main system for time-critical tasks.
- Sometimes more accurate than other methods.
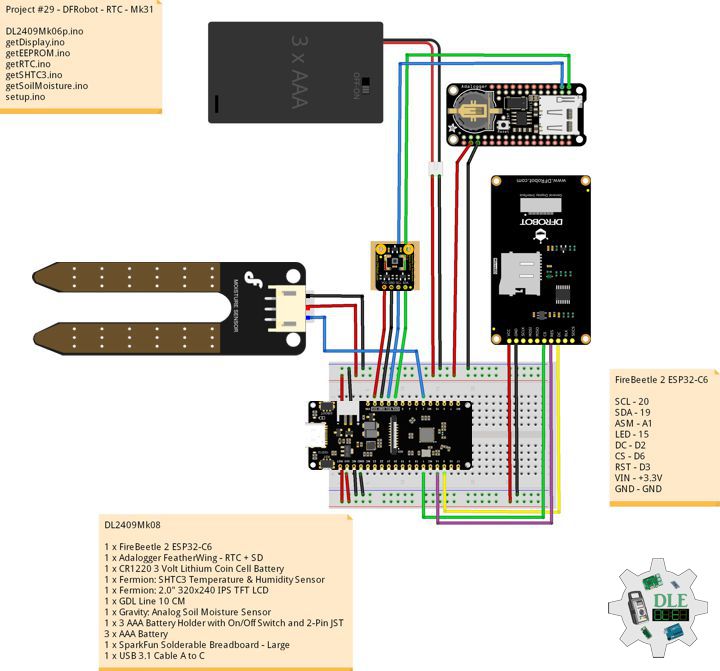
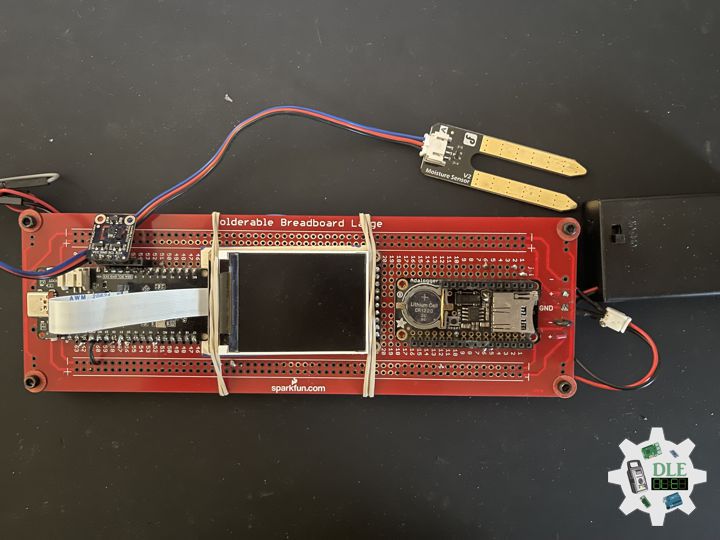
DL2409Mk08
1 x FireBeetle 2 ESP32-C6
1 x Adalogger FeatherWing – RTC + SD
1 x CR1220 3 Volt Lithium Coin Cell Battery
1 x Fermion: SHTC3 Temperature & Humidity Sensor
1 x Fermion: 2.0″ 320×240 IPS TFT LCD
1 x GDL Line 10 CM
1 x Gravity: Analog Soil Moisture Sensor
1 x 3 AAA Battery Holder with On/Off Switch and 2-Pin JST
3 x AAA Battery
1 x SparkFun Solderable Breadboard – Large
1 x USB 3.1 Cable A to C
FireBeetle 2 ESP32-C6
SCL – 20
SDA – 19
ASM – A1
LED – 15
DC – D2
CS – D6
RST – D3
VIN – +3.3V
GND – GND
DL2409Mk08p
DL2409Mk08p.ino
/****** Don Luc Electronics © ******
Software Version Information
Project #29 - DFRobot - RTC - Mk31
29-31
DL2409Mk08p.ino
DL2409Mk08
1 x FireBeetle 2 ESP32-C6
1 x Adalogger FeatherWing - RTC + SD
1 x CR1220 3 Volt Lithium Coin Cell Battery
1 x Fermion: SHTC3 Temperature & Humidity Sensor
1 x Fermion: 2.0" 320x240 IPS TFT LCD
1 x GDL Line 10 CM
1 x Gravity: Analog Soil Moisture Sensor
1 x 3 AAA Battery Holder with On/Off Switch and 2-Pin JST
3 x AAA Battery
1 x SparkFun Solderable Breadboard - Large
1 x USB 3.1 Cable A to C
*/

// Include the Library Code
// EEPROM Library to Read and Write EEPROM
// with Unique ID for Unit
#include "EEPROM.h"
// Arduino
#include <Arduino.h>
// Wire
#include <Wire.h>
// DFRobot Display GDL API
#include <DFRobot_GDL.h>
// Fermion: SHTC3 Temperature & Humidity Sensor
#include"DFRobot_SHTC3.h"
// Date and Time Functions PCF8523 RTC
#include <RTClib.h>

// Date and Time PCF8523 RTC
RTC_PCF8523 rtc;
String dateRTC = "";
String timeRTC = "";

// Fermion: SHTC3 Temperature & Humidity Sensor
DFRobot_SHTC3 SHTC3;
uint32_t id = 0;
float temperature;
float humidity;

// Defined ESP32
#define TFT_DC  D2
#define TFT_CS  D6
#define TFT_RST D3

/*dc=*/ /*cs=*/ /*rst=*/
// DFRobot Display 240x320
DFRobot_ST7789_240x320_HW_SPI screen(TFT_DC, TFT_CS, TFT_RST);

// Gravity: Analog Soil Moisture Sensor
int iSoilMoisture = A1;
int iSoilMoistureVal = 0;
int zz = 0;
// Change Your Threshold Here
int Threshold = 300;
String SM = "";

// LED Green
int iLEDGreen = 15;

// EEPROM Unique ID Information
#define EEPROM_SIZE 64
String uid = "";

// Software Version Information
String sver = "29-31";

void loop() {

  // Date and Time PCF8523 RTC
  isRTC();

  // SHTC3 Temperature and Humidity Sensor
  isSHTC3();

  // Gravity: Analog Soil Moisture Sensor
  isSoilMoisture();

  // DFRobot Display 240x320 - ASM - Temperature and Humidity - Date and Time
  isDisplayTH();

  // Delay 5 Second
  delay( 5000 );

}
getDisplay.ino
// DFRobot Display 240x320
// DFRobot Display 240x320 - UID
void isDisplayUID() {

    // DFRobot Display 240x320
    // Text Display
    // Text Wrap
    screen.setTextWrap(false);
    // Rotation
    screen.setRotation(3);
    // Fill Screen => black
    screen.fillScreen(0x0000);
    // Text Color => white
    screen.setTextColor(0xffff);
    // Font => Free Mono 9pt
    screen.setFont(&FreeMono9pt7b);
    // TextSize => 1.5
    screen.setTextSize(1.5);
    // DFRobot Display
    screen.setCursor(0, 30);
    screen.println("DFRobot Display");
    // Don Luc Electronics
    screen.setCursor(0, 60);
    screen.println("Don Luc Electronics");
    // Version
    screen.setCursor(0, 90);
    screen.println("Version");
    screen.setCursor(0, 120);
    screen.println( sver );
    // EEPROM
    screen.setCursor(0, 150);
    screen.println("EEPROM");
    screen.setCursor(0, 180);
    screen.println( uid );

}
// DFRobot Display 240x320 - ASM - Temperature and Humidity
void isDisplayTH() {

    // DFRobot Display 240x320
    // Text Display
    // Text Wrap
    screen.setTextWrap(false);
    // Rotation
    screen.setRotation(3);
    // Fill Screen => black
    screen.fillScreen(0x0000);
    // Text Color => white
    screen.setTextColor(0xffff);
    // Font => Free Mono 9pt
    screen.setFont(&FreeMono9pt7b);
    // TextSize => 1.5
    screen.setTextSize(1.5);
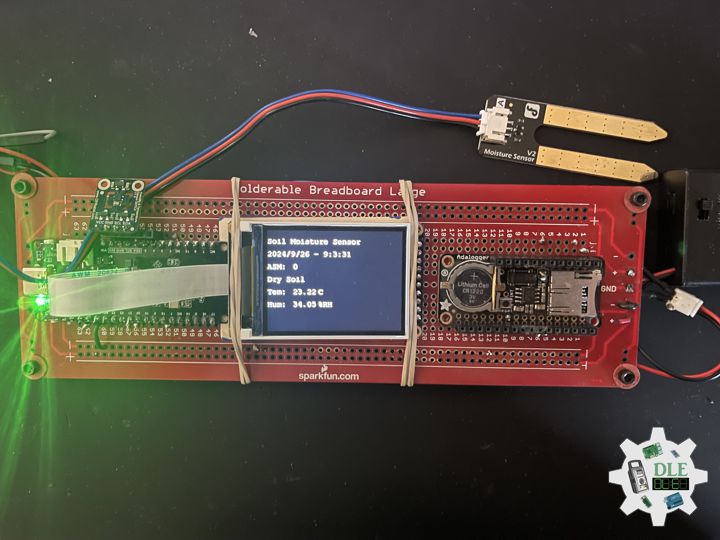
    // Soil Moisture Sensor
    screen.setCursor(0, 30);
    screen.println("Soil Moisture Sensor");
    // Date and Time
    screen.setCursor(0, 60);
    screen.println( dateRTC + " - " + timeRTC );
    // Gravity: Analog Soil Moisture Sensor
    screen.setCursor(0, 90);
    screen.println( "ASM: " );
    screen.setCursor(60, 90);
    screen.println( iSoilMoistureVal );
    screen.setCursor(0, 120);
    screen.println( SM );
    // SHTC3 Temperature
    screen.setCursor(0, 150);
    screen.println( "Tem: " );
    screen.setCursor(60, 150);
    screen.println( temperature );
    screen.setCursor(120, 150);
    screen.println( "C" );
    // SHTC3 Humidity
    screen.setCursor(0, 180);
    screen.println( "Hum: " );
    screen.setCursor(60, 180);
    screen.println( humidity );
    screen.setCursor(120, 180);
    screen.println( "%RH" );

}
getEEPROM.ino
// EEPROM
// isUID EEPROM Unique ID
void isUID() {

  // Is Unit ID
  uid = "";
  for (int x = 0; x < 7; x++)
  {
    uid = uid + char(EEPROM.read(x));
  }

}
getRTC.ino
// Date and Time PCF8523 RTC
// Setup Date and Time PCF8523 RTC
void isSetupRTC() {

  // Date and Time PCF8523 RTC
  if (! rtc.begin()) {
    while (1);
  }
  if (! rtc.initialized()) {

    // Following line sets the RTC to the date & time this sketch was compiled
    rtc.adjust(DateTime(F(__DATE__), F(__TIME__)));
    // This line sets the RTC with an explicit date & time, for example to set
    // January 21, 2014 at 3am you would call:
    // rtc.adjust(DateTime(2024, 9, 26, 9, 1, 0));

  }

  // When the RTC was stopped and stays connected to the battery, it has
  // to be restarted by clearing the STOP bit. Let's do this to ensure
  // the RTC is running.
  rtc.start();

   // The PCF8523 can be calibrated for:
  //  - Aging adjustment
  //  - Temperature compensation
  //  - Accuracy tuning
  // The offset mode to use, once every two hours or once every minute.
  // The offset Offset value from -64 to +63.
  // See the Application Note for calculation of offset values.
  // https://www.nxp.com/docs/en/application-note/AN11247.pdf
  // The deviation in parts per million can be calculated over
  // a period of observation. Both the drift (which can be negative)
  // and the observation period must be in seconds. For accuracy
  // the variation should be observed over about 1 week.
  // Note: any previous calibration should cancelled prior to
  // any new observation period.
  // Seconds plus or minus over oservation period - set to
  // 0 to cancel previous calibration.
  float drift = 43;
  // total obsevation period in seconds (86400 = seconds in 1 day:
  // 7 days = (7 * 86400) seconds )
  float period_sec = (7 * 86400);
  // Deviation in parts per million (μs)
  float deviation_ppm = (drift / period_sec * 1000000);
  // Use with offset mode PCF8523_TwoHours
  float drift_unit = 4.34;
  //For corrections every min the drift_unit is 4.069 ppm
  // (use with offset mode PCF8523_OneMinute)
  // float drift_unit = 4.069;
  int offset = round(deviation_ppm / drift_unit);

}
// Date and Time PCF8523 RTC
void isRTC () {

  // Date and Time
  DateTime now = rtc.now();
  // Date
  dateRTC = now.year(), DEC;
  dateRTC = dateRTC + "/";
  dateRTC = dateRTC + now.month(), DEC;
  dateRTC = dateRTC + "/";
  dateRTC = dateRTC + now.day(), DEC;
  // Time
  timeRTC = now.hour(), DEC;
  timeRTC = timeRTC + ":";
  timeRTC = timeRTC + now.minute(), DEC;
  timeRTC = timeRTC + ":";
  timeRTC = timeRTC + now.second(), DEC;

}
getSHTC3.ino
// SHTC3 Temperature and Humidity Sensor
// SHTC3
void isSHTC3(){

  // SHTC3 Temperature and Humidity Sensor
  /**
   *    Mode  For configuring sensor working mode
   *    SHTC3:
           PRECISION_HIGH_CLKSTRETCH_ON Clock Stretching Enabled
   *       PRECISION_HIGH_CLKSTRETCH_OFF Clock Stretching Disabled
   *       PRECISION_LOW_CLKSTRETCH_ON Clock Stretching Enabled & Low Power
   *       PRECISION_LOW_CLKSTRETCH_OFF Clock Stretching Disabled & Low Power
   */
  temperature = SHTC3.getTemperature(PRECISION_HIGH_CLKSTRETCH_ON);
  /**
   *    Mode  For configuring sensor working mode
   *    SHTC3
   *       PRECISION_HIGH_CLKSTRETCH_ON Clock Stretching Enabled
   *       PRECISION_HIGH_CLKSTRETCH_OFF Clock Stretching Disabled
   *       PRECISION_LOW_CLKSTRETCH_ON Clock Stretching Enabled & Low Power
   *       PRECISION_LOW_CLKSTRETCH_OFF Clock Stretching Disabled & Low Power
   */
  humidity = SHTC3.getHumidity(PRECISION_HIGH_CLKSTRETCH_OFF);

}
getSoilMoisture.ino
// Gravity: Analog Soil Moisture Sensor
// Soil Moisture
void isSoilMoisture(){

  // Connect Soil Moisture Sensor to Analog 0
  zz = analogRead( iSoilMoisture );

  // iSoilMoistureVal => 0~900 Soil Moisture
  iSoilMoistureVal = map( zz, 0, 4095, 0, 900);

  // Threshold
  if (iSoilMoistureVal > Threshold)

    // 300~950 - Humid Soil
    SM = "Humid Soil";

  else {

    // 0-300 Dry Soil
    SM = "Dry Soil";

  }

}
setup.ino
// Setup
void setup()
{

  // Give display time to power on
  delay(100);

  // EEPROM Size
  EEPROM.begin(EEPROM_SIZE);

  // EEPROM Unique ID
  isUID();

  // Delay
  delay( 100 );

  // Wire
  Wire.begin();

  // Delay
  delay( 100 );

  // DFRobot Display 240x320
  screen.begin();

  // Delay
  delay(100);

  // Fermion: SHTC3 Temperature & Humidity Sensor
  SHTC3.begin();
  /*SHTC3 is set to sleep mode by default. Please wake it up before use.
  Use SHTC3.sleep() to let SHTC3 enter sleep mode; SHTC3
  stops working in sleep mode*/
  SHTC3.wakeup();

  // Delay
  delay(100);

  // Setup Date and Time PCF8523 RTC
  isSetupRTC();

  // Date and Time PCF8523 RTC
  isRTC();

  // Delay
  delay(100);

  // Initialize the LED Green
  pinMode(iLEDGreen, OUTPUT);

  // iLEDGreen HIGH
  digitalWrite(iLEDGreen, HIGH );

  // DFRobot Display 240x320 - UID
  // Don Luc Electronics
  // Version
  // EEPROM
  isDisplayUID();

  // Delay 5 Second
  delay( 5000 );

}
——
People can contact us: https://www.donluc.com/?page_id=1927
Electronics, IoT, Teacher, Instructor, R&D and Consulting
- Programming Language
- Single-Board Microcontrollers (PIC, Arduino, Raspberry Pi, Arm, Silicon Labs, Espressif, Etc…)
- IoT
- Wireless (Radio Frequency, Bluetooth, WiFi, Etc…)
- Robotics
- Automation
- Camera and Video Capture Receiver Stationary, Wheel/Tank and Underwater Vehicle
- Unmanned Vehicles Terrestrial and Marine
- Machine Learning
- Artificial Intelligence (AI)
- RTOS
- Sensors, eHealth Sensors, Biosensor, and Biometric
- Research & Development (R & D)
- Consulting
Follow Us
Luc Paquin – Curriculum Vitae – 2024
https://www.donluc.com/luc/
Web: https://www.donluc.com/
Facebook: https://www.facebook.com/neosteam.labs.9/
YouTube: https://www.youtube.com/@thesass2063
Twitter: https://twitter.com/labs_steam
Pinterest: https://www.pinterest.com/NeoSteamLabs/
Instagram: https://www.instagram.com/neosteamlabs/
DFRobot Luc.Paquin: https://edu.dfrobot.com/dashboard/makelogs
Hackster.io: https://www.hackster.io/neosteam-labs
ELECROW: https://www.elecrow.com/share/sharepj/center/no/760816d385ebb1edc0732fd873bfbf13
TikTok: www.tiktok.com/@luc.paquin8
LinkedIn: https://www.linkedin.com/in/jlucpaquin/
Don Luc
